HOMEABOUT USSHOP HERECROPDATESCURRENT CHALLENGESTIPS&TUTORIALS

Wednesday, January 30, 2019

"Friendship" using Webster's Pages
by Amanda Hartmann

Hello AAS fans!
 
January has flown by! I hope you are getting back into the routine for the new year and 
that includes some time to scrap!
 
Today I am sharing a page I created using the Webster's Pages Collection - Changing Colours.
I scrapbooked a photo of me, with my Dutch friend. On a recent trip to the Netherlands,
 I found a craft shop and found some Dutch words in chipboard. I used one on this page.
 The rough translation of "Een bijzonder", is "A Special", so my page title is
 "A Special Friendship"!
 
 
My base paper is titled: Bouquet Branch, I love the warm wood tones.
 
When I love a paper range and cannot decide on which papers to buy, I often buy a paper pack.
 In this range I got the 8x8" Paper pad. I used these 8x8" papers to finish my page.
 
I layered papers with florals, the wood pattern and pinks & oranges, directly under the
 photos and as well as in a panel at the back.
 

I cut some squares from a paper from the paper pad, to place on either side of the photo.
 I machine stitched across the page to tie this all together.
Next I did some fussy cutting... I found a paper with birds and leaves and I cut them out.
 I sprinkled them across the page, with some white enamel dots, taken from a Pinkfresh set I had.

"Be silly, be honest, be kind" - a great description of our friendship.

Finally for the title, as mentioned, I used the Dutch chipboard and in English, I wrote "Friendship", using Pinkfresh Mini Puffy Alpha Stickers. (Note: I love these alpha sticker packs - so many letters, great colours, so versatile for so many pages! Get them in your shopping cart! LOL).

Thanks for looking today!
Amanda

Monday, January 28, 2019

Sweet with Simple Stories I Am by Fiona Johnstone

Hello everyone

This weeks layout I have created using Simple Stories I Am collection: 

Sweet
For this layout I have chosen a black and white photo so it pops against the busyness of the background paper. I have also matted the photo with a plainer patterned paper to help with this effect. 

I've fussy cut some butterflies from the patterned paper to co-ordinate with the I Am chipboard stickers. 

Love the Rose Gold Phrase thickers pack - looks great against the black and adds some nice shine to finish off the page. 
Thanks for stopping by
Till next week

Fiona
x
Photobucket
Products Used:
Simple Stories I Am paper - Making it Happen
Simple Stories I Am paper - Choosing Happiness
Simple Stories I Am paper - 4x6 Vertical elements
Simple Stories I Am paper - 4x4 Elements
Simple Stories I Am Chipboard Stickers
American Crafts Thickers Chill Phrase Stickers

Friday, January 25, 2019

Love You using Simple Stories Kissing Booth by Kerryn Fry

Good morning everyone!
We are literally cooking here in South Australia this week,
but at least I've had a good excuse to stay indoors and scrapbook.
My page today has been created using the gorgeous collection,
Simple Stories Kissing Booth.
I've picked this collection for the great colour match to the photo,
and it also worked with the love theme of the papers.
This is a much younger photo of my niece 
who I took to the zoo a few weeks ago.
 

I've started the page with a Kraft cardstock base.
After roughly planning the page design, I've worked out where to add the colour to the background.
I've used a leaf stencil with Bundled Sage and Iced Spruce Distress Oxide Inks first.
The second layer is a heart stencil with Festive Berries, Aged Mahogany and Tattered Rose.


I have hand cut some flowers from the Smitten paper 
and used them to create clusters on the page.
They have been given some dimension with foam tape.
The 2 Crafty Lattice Leaves were base-coated with gesso
and them coloured with Distress Oxides Bundled Sage and Iced Spruce.
I've finished them with a rough coat of Dimensional Magic.
They have been randomly added to each flower cluster.


The paper heart and sentiment were hand-cut from the 4x4 Elements page.
Both pieces have been lifted with foam tape.


The 2 Crafty word #Cherish was also covered with gesso
and then inked with Tattered Rose Distress Oxide.
I've heat set the Tattered Rose layer 
and then added Aged Mahogany Distress Oxide around the edges.
Again I have finished with a layer of Dimensional Magic.


The 2 Crafty title Love You was given a two tone effect.
Starting with a base coat of gesso,
The words have been inked with Aged mahogany Distress Oxide.
I've then added Tattered Rose to the heart 
and blended the join between the two colours.
With some gold ink and a script stamp,
I have randomly stamped the chipboard before adding the Dimensional Magic.

Thank you for visiting the blog today,
I hope you have enjoyed the process of my page.
Have a fabulous Australia Day weekend
and please join us again on Monday for Fiona's next project.
Products used:
Bazzill Kraft Cardstock
Bazzill White Cardstock
Simple Stories Kissing Booth - 4x4 Elements
Simple Stories Kissing Booth - Smitten
Simple Stories Kissing Booth - Love & Adore
Simple Stories Kissing Booth - Love Day
Simple Stories Kissing Booth - 4x6 Vertical Elements
2 Crafty title LoveYou
2 Crafty #Cherish
2 Crafty Lattice Leaves
Distress Oxide Inks
Dimensional Magic
Photobucket

Wednesday, January 23, 2019

"Go See Do", with Penelope Dee, by Amanda Hartmann

Hi again!
 
Last year, I had the chance to travel to the Netherlands again (my third visit), but this time my husband came with me. It was our first trip away without the kids in a long time. We really enjoyed the experience together. Here is my first page to share from the trip. I used the Penelope Dee "Wanderlust" collection. It was a perfect range to start documenting our trip.
 
Here is my page:
 
I started with 3 paper layers for the base. At the back was the Journey paper, then Kraft paper, and on top the Adventures paper. I inked all the edges black.
This Adventures paper was a mix of patterns and designs, like an antique scrapbook. I decided this pattern made an interesting backing! Perfect!
For the photo, I mounted it with a few different layers: Black cardstock, more Journey paper, and Kraft paper.
The last major element to my page using the Penelope Dee collection was using the Wander paper. It had strips of black words. I decided to hand cut some of these and scatter them on the page. These black words really pulled the page together!
Around the photo, I used a 2 Crafty Messy Frame. And I got messy colouring the chipboard with a mix of gesso, sprays and inks. I worked until I got the colours right to match the page. I finished with some Dimensional Magic and some old Prima Mica flakes.

In the top left corner of the photo, I used a 2 Crafty Hot air balloon. It got the same paint-mica flakes - Dimensional magic treatment.
Next to the photo, I created a journaling spot. I stamped a circle journal spot on the Journey paper and hand cut it and tucked it under the corner of the photo.  You can also see how I used the hand cut black words from the  Wander paper to embellish the page.
Through out my page I scattered some diecuts (in black & gold tones) from my old pack of Pinkfresh Escape the Ordinary collection.
For the title, I inked black some 2 Crafty words- go, see, do- taken from the Travel Mini Word Set 1. I placed them in the top right corner of the photo, layered on the messy frame with some black words and diecuts.
I finished the page with some gold and black ink splatters.

 
Thank you for looking today!
 
Amanda
 
 
Product Used:
Penelope Dee - Wanderlust Paper - Journey
Penelope Dee - Wanderlust Paper - Adventures
Penelope Dee - Wanderlust Paper - Wander
Kraft paper
Black cardstock
Dimensional Magic
2Crafty Frame Messy Squares 6"
2 Crafty Hot air balloon
2Crafty Travel Mini Word Set 1
Dylusions Ink Spray - Black Marble
Colour Blast - Colour Shimmer Spray - Bling
 
Photobucket

Monday, January 21, 2019

Choose Happy with Heidi Swapp Emerson Lane by Fiona Johnstone

Hello

Back with another layout created with the beautiful Emerson Lane collection by Heidi Swapp. 

Choose Happy


For this layout, I created my background using the leftover paint from my previous
 page - I may have made a bit too much! 
 This then inspired the colour choices for the rest of my layout. 

Then I have added some paper layers and matching Heidi Swapp embellishments. 


Recently I decided to sort through my ever growing stash of ephemera and sort it into colour groups - making it much easier to find something to co-ordinate with my page and helping me to use up my stash.
  I've mixed some other vellum pieces with the vellum in the Emerson Lane ephemera pack.


Photobucket
Products Used:
Heidi Swapp Emerson Lane paper - True Stories
Heidi Swapp Emerson Lane - Dalila
Heidi Swapp Emerson Lane - Harrison
Heidi Swapp Emerson Lane - Restoration
Heidi Swapp Emerson Lane Ephemera Diecuts
Heidi Swapp Emerson Lane Cardstock Stickers
Dylusions Paint - Lemon Zest
Dylusions Paint - Fresh Lime
Dylusions Paint - Black Marble
Gold Vellum Circles - Crate Paper
Star Sequin - Crate Paper Ephemera
Gold Heart
White Cardstock

Friday, January 18, 2019

Enjoy today using Photo Play 'A Day at the Park' by Kerryn Fry

Hi everyone!
Today I have created a page using the collection,
Photo Play 'A Day at the Park'.
Always love red, yellow, black & white together,
these colours were perfect for the page that I had planned.
This collection is based on a Mickey Mouse and Disneyland,
but you can always find enough element to suit your page.
This is my Dad and the photos were taken at the Railway Museum,
where Dad was able to drive a train for his birthday.
He loved every minute of it.


I've started the page with a 12x12 sheet of Kraft Cardstock.
It's my usual starting piece, but I think it works really well with these colours.
The background effect was created with Distress Oxide Inks
I have used Fossilized Amber with the bricked stencil 
and Black Soot with the stitched stencil.
The colours have been randomly applied to frame the papers.


I have hand cut multiple stars from the different patterned papers,
giving them all a small border as I cut them out.
The Sticker Sheet had some great elements to add to the page,
they have been backed with Black Cardstock or patterned paper. 
The four small photos have also been backed with black cardstock.


The tag has been punched from the patterned papers
and I have added a bow with some string to embellish the top of the page.
Love how the string frames that particular photo.
 Most of the embellishments have been lifted with foam tape
to create extra layers and some dimension..


This week the chipboard has been given a very simple makeover.
The 2 Crafty Wire Stars have been covered with gold ink,
layered around the frame to form a base for the title.
The 2 Crafty title Enjoy Today has been inked in black
and stuck down to the stars.
I have used the sticker frame to highlight one of the photos.
It has been stuck onto black cardstock 
and then popped on foam tape.


I have created to journal strips from patterned paper scraps,
I have matted the strips with the yellow patterned paper to define them better.
The hearts were stickers and I have added them to some black cardstock
and then cut them out.
Lots more foam tape added to lift these elements.

That's this page finished
and I've already started another page with a completely different theme.
Have a fabulous weekend, stay cool
and happy crafting!
Please pop back on Monday for Fiona's next page.
Products Used:
Bazzill Kraft Cardstock
Bazzill Raven Cardstock
Photo Play A Day at the Park - Element Sticker Sheet
Photo Play A Day at the Park - 3x4 Cards
Photo Play A Day at the Park - Multi Dot/Yellow
Photo Play A Day at the Park - Multi Stripe/Dot
Photo Play A Day at the Park - Oh Boy
Photo Play A Day at the Park - Red Stripe/Dot
2 Crafty title Enjoy Today
2 Crafty Wire Stars
Tim Holtz Layering Stencils
Distress Oxide Inks
Photobucket

Wednesday, January 16, 2019

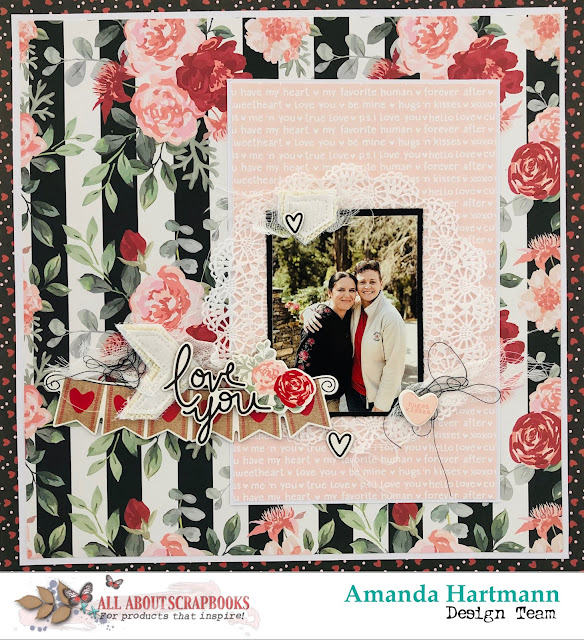
"Love you" with Simple Stories Kissing Booth by Amanda Hartmann

Hi AAS fans!
 
I loved the colours and patterns in the new Simple Stories "Kissing Booth" collection. Even though it is all about love and romance, I went a little crazy and used it with a photo of me with a good friend. The colours in my photos were just too perfect!
 
So here is my page.
 

I started with the Crazy for You paper as the base. Then for the next layers of patterned papers, I mounted them with white cardstock to break up the patterns. The floral stripes were next - the Smitten paper. Then I created a panel behind the photo using the soft pink Love Day paper.

I mounted the photo on black cardstock and a lace paper doiley.

Then I finished with some muslin, threads and the Chipboard Stickers.

Let's look at some close ups.
I used a chipboard sticker "love you" for the title, and layered this on a chipboard banner and floral cluster from the Chipboard Stickers pack. I also used some handmade Charms Creations - a white chevron and tab.
I added a little heart in the top left corner of the photo.

In the bottom right of the photo, I used another pink heart from the Chipboard Stickers pack.

That's it! Love this page, love my friend!

Thanks for looking,

Amanda


Products used:
Black cardstock
White cardstock
Simple Stories - Kissing Booth Paper - Crazy for You
Simple Stories - Kissing Booth Paper - Smitten
Simple Stories - Kissing Booth Paper - Love Day
Simple Stories - Kissing Booth Chipboard Stickers 6"X12"
 
Photobucket

Monday, January 14, 2019

Today with Heidi Swapp Emerson Lane by Fiona Johntonse

Hello everyone

Sharing the first of my layouts created with the beautiful Heidi Swapp Emerson Lane collection. I've been waiting for this colelction to arrive, it is just stunning. 

Today


I couldn't go past this gorgeous paper - Old School, and it formed the starting point for my layout.  I decided to cut the zig-zag strips, rough them up a little and then stick them onto some white cardstock. I added some paint sploshes to the white cardstock first in coordinating colours which I achieved using my Dylusions Paints. 


I've embellished with the co-ordinating Emerson Lane embellishments and added some pieces from my stash to finish off the page. 


Thanks for stopping by
Till next week
Fiona
x

Photobucket
Products used:
Heidi Swapp Emerson Lane paper -  Old School
Heidi Swapp Emerson Lane paper - True Stories
Heidi Swapp Emerson Lane Ephemera Diecuts
Heidi Swapp Emerson Lane Cardstock Stickers
CVS Wild at Heart Flair Buttons
Kaisercraft Mini Paper Blooms Fairy Floss
Dylusions Paint - Rose Quartz
Dylusions Paint - Lemon Zest
Dylusions Paint - Fresh Lime
Dylusions Paint - Black Marble

Friday, January 11, 2019

Captured the Moment with Jillibean Soup by Kerryn

Good morning all.
Today I am creating with one of the new collections,
Jillibean Soup Garden Harvest.
The beautiful, bright colours worked well with this recent pretty photo.
This is one of my gorgeous nieces, who was visiting from Brisbane last week.
The two of us hit the Zoo last Friday to check out the Dinosaur and Big Bug collection.
I've gone back to doing what I love.
A kraft cardstock base with colour added.
I have used Distress Ink Mustard Seed and Worn Lipstick 
and then grabbed two Tim Holtz Layering Stencils.
 

Using a small script stamp and gold ink,
I have randomly added stamping as another layer to the background.
I have used the same stamp when decorating the title piece.


thin base coat of white gesso.
When still slightly wet, I have swiped with Charcoal Ink,
in long strokes across the chipboard.
Once the ink had dried, I have stamped with the script stamp and gold ink.
and finished with Dimensional Magic for that glossy look.


I have fussy cut some flowers and leaves from the patterned paper 'Plant the Seed'
Great, simple designs that were easy to cut out and layer with foam tape.
I have also used some elements from the Pea Pod Parts,
the small flowers and hearts were great to fill the clusters.


The 2 Crafty Dandelions are one of my favourite pieces.
For this page, I have painted these flowers with olive paint
and then randomly sponged Peeled Paint and Crushed Olive Distress Ink for texture.
The tips have been covered with Stickles Glitter Glue.


That wraps up my page for this week
and it means the start of my holidays....Yeah!
Thank for visiting today, have a great weekend
and we hope to see you again on Monday for Fiona's next page.

Products Used:
Bazzill Kraft Cardstock
Jillibean Soup Garden Harvest - Bite Size Bits
Jillibean Soup Garden harvest - Plant the Seed
Jillibean Soup Garden Harvest - Harvest The Crop
Jillibean Soup Garden Harvest - Plow The Field
Jillibean Soup Garden Harvest - Reap The Grain
Jillibean Soup Garden Harvest - Water The Goods
Jillibean Soup Garden Harvest - Pea Pod Parts
2 Crafty title Capture the Moment
2 Crafty Dandelions
Distress Ink
Photobucket