HOMEABOUT USSHOP HERECROPDATESCURRENT CHALLENGESTIPS&TUTORIALS

Friday, January 31, 2020

Just Me using Simple Stories Hey, Crafty Girl by Kerryn Fry


Good morning AAS fans!
I am back today with my second layout created from the collection
Simple Stories Hey, Crafty Girl 
This is such a pretty collection,
I love how well it suited this photo of me, taken by my Mum
and it worked beautifully for a snow page.


Started with my norm,a Kraft Cardstock base,
then pulled out some white gesso and a snowflake stencil.
I've added a few different snowflakes to the background
and once  the gesso had dried I added Diamond Stickles to a few centres
and added them to the page with foam tape.


I've added Raven Cardstock to a few of the patterned paper layers
to pop those layers and tie in the touches of black in the collection.
The snowflakes have been die-cut and punched from white smooth cardstock 
and added them to the page with foam tape.
The finishing touch was adding Diamond Stickles to the ends of the snowflakes.

The 2 Crafty Tag has been covered with patterned paper
to create a journal spot.
I've embellished the tag with a string bow.
The flower clusters are from the Bits & Pieces Ephemera,
they have been given some dimension with foam tape.


The strip of hearts is from the paper Made with love,
I've added a background layer using the reverse side of the paper.


The 2 Crafty Small Filmstrip has been covered with black ink.
I have backed the strip with patterned paper
and cut it into two pieces.

The top right corner cluster has a small piece of the filmstrip,
the heart and word is from the Bits & Pieces pack
and the die-cut snowflake.

The 2 Crafty title Just Me has been covered with Distress Paint
and added to the lower cluster.


Thank you for visiting the blog today,
hopefully you have been inspired to get crafty!
Please join us again on Monday for Fiona's next project.


Products used:


Photobucket

Monday, January 27, 2020

Just Hanging About with Jillibean Soup Spoonful of Soul by Fiona Johnstone

Hello everyone

This week I'm sharing a layout with the super cute, Jillibean Soup Spoonful of Soul collection:

Just Hanging About


I wanted to go with an outdoors/garden theme for this layout to match my photo of my youngest hanging off a tree branch. So I chose my Kaisercraft butterfly stencil and did some masking with texture paste mixed with some Dylusions paint. 

Once dry I layered up some pretty Spoonful of Soul patterned papers to the centre of my cardstock, then mounted the cardstock onto the Bite Size bits paper. 


Then I painted the Just Hanging About 2Crafty title with some lightened Dylusions Paint in Lemon Zest. I've used the JIllibean soup pea pod diecuts and enamel dots to embellish my page before adding the gorgeous prima flower to complete the layout. 


Thanks for stopping by
till next week

Fiona
x
Photobucket

Products Used:

Jillibean Soup Spoonful of Soul paper - Free Spirit
Jillibean Soup Spoonful of Soul paper - Gentle Soul
Jillibean Soup Spoonful of Soul paper - Be Fearless
Jillibean Soup Spoonful of Soul paper - Bite Size Bits
Jillibean Soup Spoonful of Soul Pea Pod Parts - Die Cuts
2Crafty Chipboard - Just Hanging About
Dylusions Paint - Rose Quartz
Dylusions Paint - Lemon Zest
Texture Paste
Prima Flowers - Apricot Honey Berry Sweet
Kaisercraft Butterfly Skies template

Friday, January 24, 2020

Cousins using Simple Stories Cruisin' by Kerryn Fry

Hi there everyone!
Today I am sharing my first page created 
with the collection, Simple Stories Cruisin.
Not a ship in sight, but loved the primary colours in this range.
It's a very recent photo of Mr 15 and his cousins after playing croquet,
I can't believe how he towers over them now.


I've started with Raven cardstock this week,
the black background really pops the red, blue and yellow.
I've used the non-themed patterned papers from the collection
and left a small gap between the first layer of papers for the black to show through.   


The embellishments are from the Bits & Pieces Ephemera pack.
The flags at the top of the page 
have been lifted with foam tape to give them dimension.
I've used a white gel pen to add a border to the patterned papers


The larger stars are from the Ephemera pack,
the smaller stars have been hand-cut from the paper Seas the Day.
All of the stars have been lifted with foam tape.
I've added another border with a black gel pen. 


The 2 Crafty title Cousins has been gessoed first
and then covered with Mustard Seed Distress Paint.
I have added a border around the title with a white gel pen
and then finished the title with Dimensional Magic.
The heart is from the Ephemera Pack 


A simple and clean page to finish of the week.
Thank you for visiting the blog,
have a fabulous weekend
and please join us again on Monday.

Products used:
Bazzill Raven Cardstock
Simple Stories Cruisin - Explore The Shore
Simple Stories Cruisin - Anchors Aweigh
Simple Stories Cruisin - 3x4 Elements
Simple Stories Cruisin - 2x2 Elements
Simple Stories Cruisin - Bits & Pieces Ephemera
Simple Stories Cruisin - Seas The Day
2 Crafty title Cousins
Distress Paint
Dimensional Magic
Photobucket

Thursday, January 23, 2020

Australia Day Weekend Sale -30% off Storewide

 
From now until midnight on Monday 27th January

 get 30% OFF

 everything in-store,  this includes already 
Discounted Items in the Massive Clearance Section.


Use the code AUS30 in the discount code section of
 payment screen to receive 30% off all orders over $50.

(includes already discounted items)
(Excludes shipping)
(Sorry no code = no discount)

Use code in checkout process, once entered it will automatically discount order 
before payment details are entered.  

  All orders must be paid for at the time of ordering, any payment not 
received by the 29th January will not qualify for discount.

  Sale Conditions:
Sale does not apply to existing orders or backorders.
Total order before shipping must be over $50 for discount to apply.
Sale cannot be combined with any other offer.
Sale applies only to in stock items.
All orders must be paid in full at the time of order processing
Sale ends midnight Monday 27th January 2020.
 

Be quick and SHOP NOW


Monday, January 20, 2020

Wai-O-Tapu Rotorua with Pinkfresh Studio by Fiona Johnstone

Hello everyone

Today I'm sharing a layout created with Pinkfresh Studios Out & About Collection.
 Such a great travel collection - perfect for all sorts of photos. 

Wai-O-Tapu Rotorua
I wanted to do a double page layout to showcase a variety of the photos I took while we visited Wai-O-Tapu thermal reserve. I layered a couple of the patterned papers up across the double kraft cardstock background, then added my photos across both pages. 


The Bucket List paper was perfect to fussy cut to add some journaling as pictured above and the explore tag below. 


The embellishments are my favourite part of this collection - between the stickers, tags and mixed embellishment pack I had so many things to add to my layout. I particularly love the tags and just added a bit of twine to both for the extra detail. 


I finished with some enamel dots from the Mixed Embellishment pack and some from my stash before adding my title with the Puffy Stickers. 


Thanks for stopping by
Till next week

Fiona
x
Photobucket
Products Used:
Pinkfresh Studio Out & About paper - New Places
Pinkfresh Studio Out & About paper - Explore
Pinkfresh Studio Out & About paper - Travel Icons
Pinkfresh Studio Out & About paper - Adventure
Pinkfresh Studio Out & About paper - Bucket List
Pinkfresh Studio Out & About Travel Tags
Pinkfresh Studio Out & About Cardstock Stickers
Pinkfresh Studio Out & About Mixed Embellishment Pack
Pinkfresh Studio Puffy Stickers
Kraft Cardstock

Friday, January 17, 2020

Cheeky Grin using Bella Blvd Let's Go on an Adventure by Kerryn Fry

Hi everyone!
This week I've created a page using the collection,
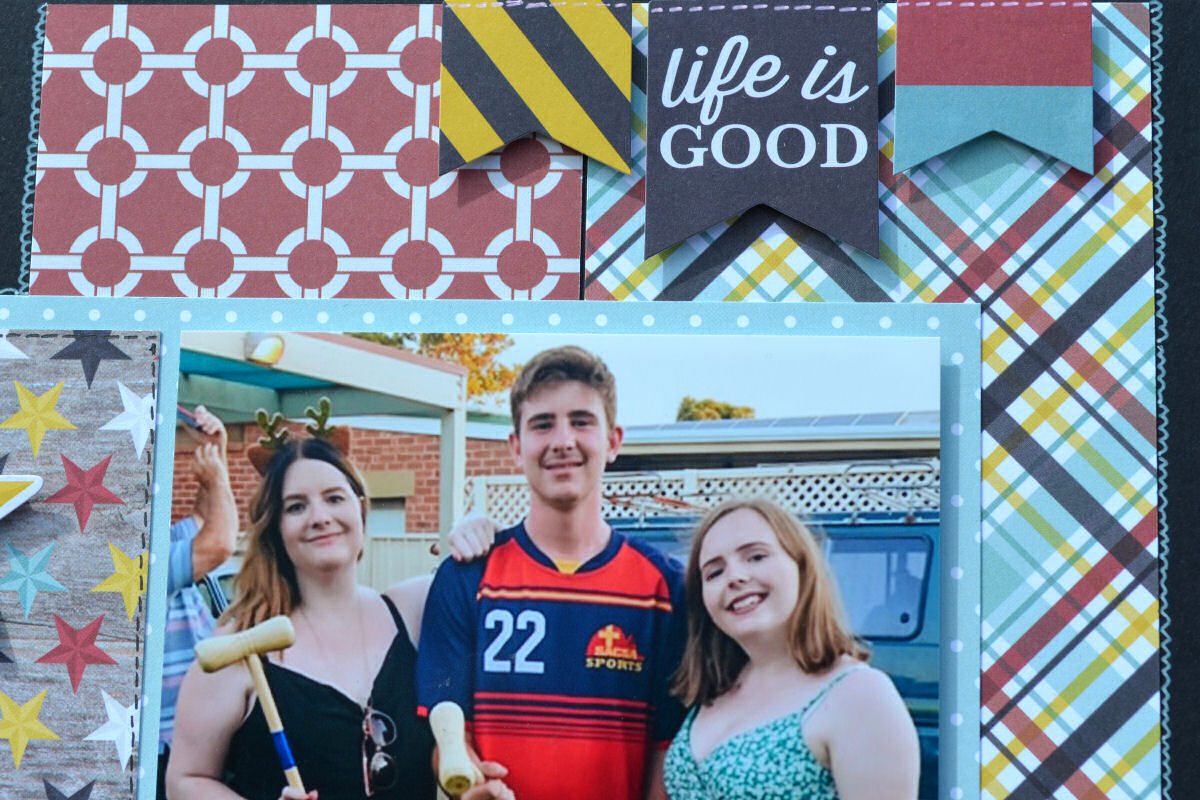
How cute is the photo of Mr 15, 
can't believe it was nearly 10 years ago!
His school uniform matched the collection perfectly.


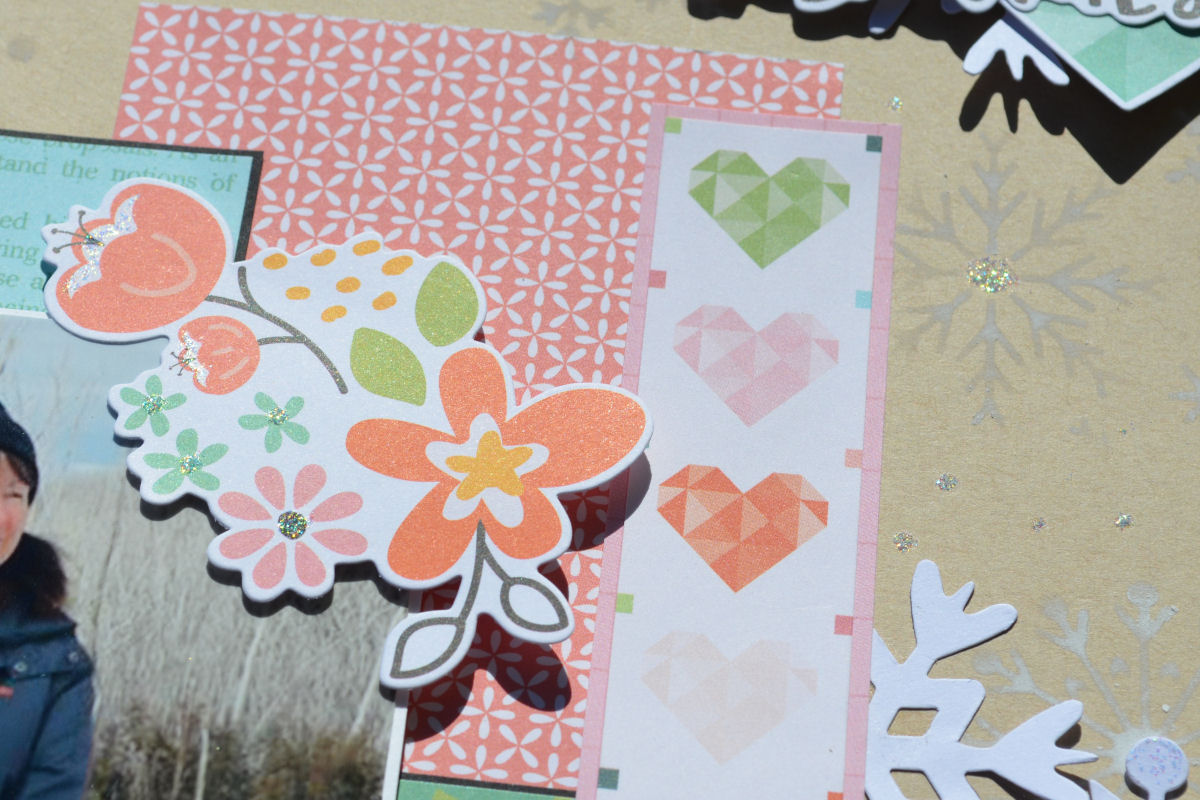
This page started like most of my others,
with a Kraft cardstock base.
But once the paper layers were added to the page, 
only a small peek of kraft remained.


I've done a little fussy cutting of some clouds from No Wifi Script 
and attached them with foam tape to give them a pop.
The photo has also been lifted with foam tape 
and has been matted using the reverse of Daily Details.
The quote along the base of the photo is from the 12x12 Stickers


There are a number of other elements from the 12x12 Sticker sheet,
the stars, heart, words, tab and small scallop border.
I've used foam tape on a few of those pieces.
The 2 Crafty Mini Camera has been covered with Gathered Twig Distress Paint,
I've added a sticker to the centre and attached it with foam tape.
The 2 Crafty Lattice Leaves have been covered with 
Peeled Paint Distrees Paint


The 2 Crafty Grass Clumps have been layered 
with three different Distress Paint colours.
Mowed Lawn,  Forest Moss and Gathered Twig.
The sticker has been added with foam tape.

The 2 Crafty title Cheeky Grin has been lightly swiped with layers of Ground Espresso, 
allowing peaks of the gesso base to come through
The title has been attached to the top of the journaling spot,
cut from the Daily Details paper.
The page has been finished with some black faux stitching lines.
Thanks for visiting the blog,
I hope you have enjoyed the process.
Have a great weekend
and pop back on Monday for Fiona's next page
Products used:
Bazzill Kraft Cardstock
Bella Blvd Let's Go on an Adventure - Sly Foxes
Bella Blvd Let's Go on an Adventure - No Wifi Script
Bella Blvd Let's Go on an Adventure - Mountain Peaks
Bella Blvd Let's Go on an Adventure - Daily Details
Bella Blvd Let's Go on an Adventure - Borders
Bella Blvd Let's Go on an Adventure - Wood Stumps
Bella Blvd Let's Go on an Adventure - 12x12 Doohickey Stickers
2 Crafty title Cheeky Grin
2 Crafty Grass Clumps
2 Crafty Lattice Leaves
2 Crafty Mini Camera
Distress Paints
Photobucket

Monday, January 13, 2020

Live out Loud with Vicki Boutin
Wildflower & Honey by Fiona Johnstone

Hello everyone

Back today with a layout created with the popular Vicki Boutin 
Wildflower & Honey collection.
 Such a fun and funky range! 

Live out Loud
 
The colours in this collection are just amazing, I was particularly drawn to the circle pattern of the Create a Buzz paper, and this inspired my design.
 I chose the 2Crafty Circle Dot Frame and dug out my Stitched circle stamps
 to continue the theme. 

With the frame as a feature, I then cut a couple of banners in the patterned paper - I used the more subtle circle pattern of Sweet & Honey paper to compliment the fun circles on the Create a Buzz paper. 
 
 
I've layered by photos on, then embellished my page with some more circles - a flair button and some dots before adding some journaling words and a few little stars. 

I've grabbed a fun title for this one, 2Craftys Live Out Loud and painted it with my Dylusions paints in Polished Jade. 
 

Photobucket
Products used:
Vicki Boutin Wildflower & Honey Collection - Create a Buzz
 Vicki Boutin Wildflower & Honey Collection -  Greenery
Vicki Boutin Wildflower & Honey Collection - Sweet Honey
2Crafty Chipboard - Live out Loud
2Crafty Chipboard - Circle Dot Frame
Pink Paislee - Truly Grateful Thickers
Cocoa Vanilla Studio - You Rock - Accessory Sheet
Prima Stitches Stamp
Dylusions Paint - Polished Jade
Flair Button
Shipping Tag
Kraft Cardstock

Friday, January 10, 2020

My Sister My Friend using Simple Stories Hey, Crafty Girl by Kerryn Fry

Good morning all!

This week I have created my first page from the gorgeous new collection,
Simple Stories Hey, Crafty Girl.
The colours in this range are just amazing 
and they coordinate perfectly with the photo of my nieces,
especially their hair and blue eyes.

The plain Black cardstock was a great base for the bright colours.
I've layered the papers, balancing the colours and patterns.
The photo was matted with black cardstock to define the edges
and I've used foam tape to lift the photo off the page.
I've used a white pen to add a border around the largest piece of patterned paper.


The 2 Crafty Heidi Vines have been covered with Peeled Paint
and Wild Honey Distress Paint.
I've added a little sparkle with Diamond Stickles.


The flowers are from the Bits & Pieces Ephemera,
I have added Diamond Stickles to the centres.
I've given the flowers a lift with foam tape. 

The journal spot was cut from the patterned paper
and decorated with more ephemera.
I've used more foam tape to lift the heart and flowers
and added a border with a black pen..


been covered with black archival ink.
The black worked well against the colourful patterned paper.


Thanks for dropping by today.
Enjoy your weekend and happy crafting.
Joining us again on Monday for Fiona's next project.
Products Used:
Bazzill Raven Cardstock
Simple Stories Hey, Crafty Girl - Create Beauty
Simple Stories Hey, Crafty Girl - DIY Queen
Simple Stories Hey, Crafty Girl - Made with Love
Simple Stories Hey, Crafty Girl - Say What?
Simple Stories Hey, Crafty Girl - So Artsy
Simple Stories Hey, Crafty Girl - Bits & Pieces Ephemera
2 Crafty title My Sister My Friend
2 Crafty Heidi Vines
Distress Paints
Photobucket

Monday, January 6, 2020

Grow with Cocoa Vanilla Studio Unforgettable by Fiona Johnstone

Hello everyone

Happy New Year! 

First up for you this year I have a layout to share using the beautiful Unforgettable collection by Cocoa Vanilla Studio. Always a stunning collection and they make it so easy to co-ordinate with all their fabulous embellishments. 

Grow


For this layout everything except one Flair button is from  Cocoa Vanilla Studios Unforgettable collection. They make creating layouts so easy!

I love a woodgrain background and used this as my base before adding my paper layers. Love the small floral of the Forget Me Not paper, so I have used a large rectangle of that before adding a banner in a monochrome colour that compliments the flowers. 


So many embellishments to choose from in this collection. Here I have used  Cardstock Stickers, Flair Buttons, Ephemera and Tassels. Makes it easy to co-ordinate the embellishments on your layouts. These tassels are the cutest!

I particularly love the large flower ephemera piece that I've partially tucked under my photo, adding a lovely pop of colour and shape to the layout. 


And I have finished the layout off with these fantastic Foam Title Stickers. These are fabulous, lots of words to choose from and they really pop off the page!


Thanks for stopping by
Till next week

Fiona
x

Photobucket
Products Used:
Cocoa Vanilla Studio Unforgettable collection - Forget me Not
Cocoa Vanilla Studio Unforgettable collection - Sprightly
Cocoa Vanilla Studio Unforgettable collection - Natural Beauty
Cocoa Vanilla Studio Unforgettable collection - Unscripted
Cocoa Vanilla Studio Unforgettable collection - Bows & Tassles
Cocoa Vanilla Studio Unforgettable collection - Ephemera
Cocoa Vanilla Studio Unforgettable collection - Flair Buttons
Cocoa Vanilla Studio Unforgettable collection - Foam Title Stickers
Cocoa Vanilla Studio Unforgettable collection - Accessory Sticker Sheet
Misc. Flair button