HOMEABOUT USSHOP HERECROPDATESCURRENT CHALLENGESTIPS&TUTORIALS

Wednesday, February 27, 2019

"Pack your bags", by Amanda Hartmann

Hi AAS fans!
 
I loved the latest travel range from Kaisercraft "Let's Go", so I combined papers with some of the awesome stickers to create this page.
 

I started with black cardstock as the base to the page.

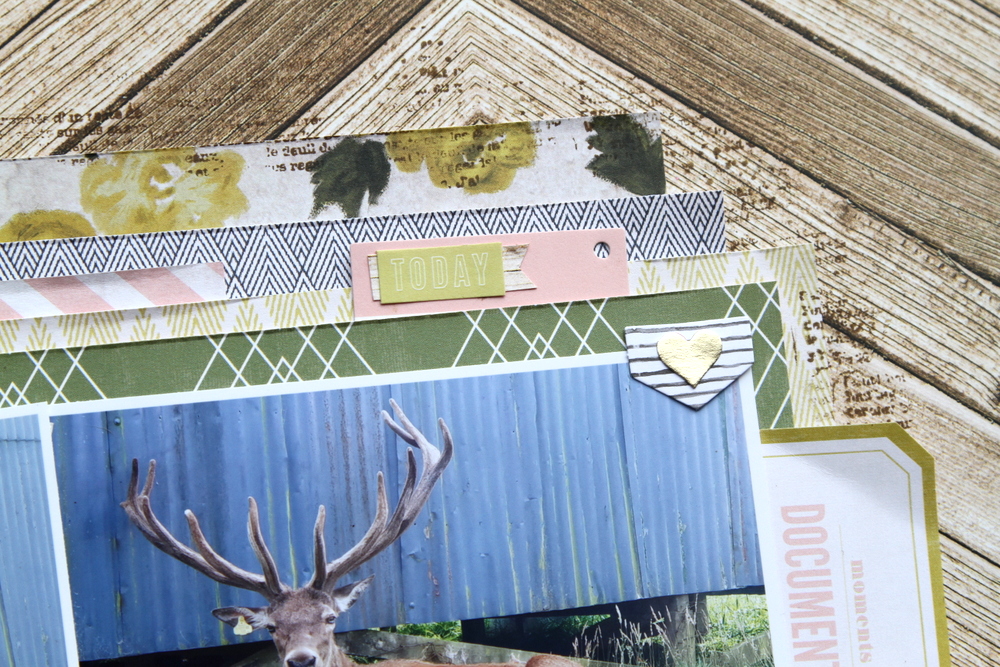
Then I layered vertical panels of papers down the page. I used: Fly Away, and Street Signs. I distressed the edges of the papers too.

To embellish the page, I combined different stickers taken from the Let's Go sticker sheet.

In a horizontal strip under the bottom of the photo,  I used the longer border stickers from the sheet. I also included a paper border taken from one the 12x12" papers.

I used a Kaisercraft doily die to cut a doily from the Street Signs paper and place under the photo.


I added some of the word and quote stickers in a stack, with some on foam tape for some pop.


And I finished the page with some black ink splatters.


This was such an old photo, I was so glad to get it scrapped! Have you got some old travel photos lying around? Get them out and use Let's Go to get them scrapped!

Thanks for looking today.

Amanda


Products used:

Kaisercraft - Let's Go Paper - Street Signs
Kaisercraft - Let's Go Sticker Sheet
Kaisercraft - Decorative Die - Detailed Doily
Dylusions Ink Spray - Black Marble
 
Photobucket

Monday, February 25, 2019

Mr Bock with Emerson Lane by Fiona Johnstone

Hello everyone

I can't get enough of this stunning Emerson Lane collection by Heidi Swapp so have another layout to share with you created with this range:

Mr Bock


We got to see this elderly guy on a visit to our cousins farm when we were overseas recently, he is about 20 years old and just magnificent!
For this layout I have focused on the colours in my photo, the fawn of the stag, the green grass and the blue shed, then adding a pop of pink & gold. 

I've used the Harrison paper for my background, gotta love the timber background papers. I've then added lots of paper layers to match my photo and tucked in some journaling pieces and tags. 

I've embellished my layout with the Emerson Lane stickers & ephemera, and then dug into my stash for a few extra pieces - love the gold hello and bow from 

For my title I found some cool wooden thickers, go perfectly with my background. 
Thanks for stopping by
Till next week

Fiona
x
Photobucket
Products Used:
Heidi Swapp Emerson Lane paper - Harrison
Heidi Swapp Emerson Lane paper - Emery
Heidi Swapp Emerson Lane paper - Restoration
Heidi Swapp Emerson Lane paper - Easy Peasy
Heidi Swapp Emerson Lane paper - Dalila
Heidi Swapp Emerson Lane paper - True Stories
Heidi Swapp Emerson Lane Cardstock Stickers
Heidi Swapp Emerson Lane Ephemera
My Minds Eye Gold Stickers
American Crafts Thickers 
Green Tara Apple Blossoms Pink
Bo Bunny It is Written Stamp

Friday, February 22, 2019

#Love everyday using Simple Stories Kissing Booth by Kerryn Fry

Happy Friday everyone!
Today I have another page to share using the lovely collection,
A rare photo of my man and me,
This one is a few years ago when we were ballroom dancing
and my hair was really dark.


It's the same starting point for me, why stop something I love.
A Bazzill Kraft Cardstock base, Stencils and Distress Oxides.
I love the chalky finish from the oxide inks on to the kraft.
Then using two different heart stencils and 
Distress Oxides Aged Mahogany, Worn Lipstick and Spun Sugar,
I have created the layered background.
I have highlighted random hearts with a white pen
and also doodled some free-hand small hearts across the page.


Before adding any paper layers, I have flicked white paint across the page.
The small paper hearts were hand-cut from the patterned papers
and then lifted with some foam tape.
I have cut the quote and flowers from a few different papers.
The Elements papers are perfect for a adding embellishments to a page.
It's a big reason why I love Simple Stories collections.


The flower has been cut from the 4x4 Elements page
and the banner cut from the 4x6 Vertical Elements.
I have layered them both pieces with foam tape.


The 2 Crafty words #Love and everyday have been used to create the title.
They have both been covered with Distress Oxide Worn Lipstick.
The final layer is Dimensional Magic.
I have used the heart cut from the 4x6 Vertical Elements as a base for the title.


And that's a wrap!
Thanks for visiting the All About Scrapbooks Blog today,
I hope to have enjoyed the process.
Have a great weekend
and please join us again on Monday for Fiona's next page.
Products Used:
Bazzill Kraft Cardstock
Simple Stories Kissing Booth - 4x4 Elements 
Simple Stories Kissing Booth - 4x6 Vertical Elements
Simple Stories Kissing Booth - Hugs & Kisses
Simple Stories Kissing Booth - Love Day
Simple Stories Kissing Booth - Smitten
2 Crafty #Love
2 Crafty title Everyday
Distress Oxides
Photobucket

Wednesday, February 20, 2019

"Bloom", by Amanda H

Hi everyone!
 
We really love Cocoa Vanilla Studios here at All About Scrapbooks. 
Today I have used the Midnight collection.
 

I started with some black cardstock to use at the back of the papers and behind the photo.

In the Midnight collection, I used two papers and layered them in panels: on the right is Bloom & Grow, and to the left is the pink stripes of Sophisticated.

I then add the photo on a paper lace doiley, and embellished the page with stickers from the Midnight Accessory Stickers pack
I combined flowers, journal tags, words and tabs in each cluster.
Beautiful papers!
Thanks so much for looking,
Amanda
 
 
Products used:
Black cardstock
Cocoa Vanilla - Midnight Accessory Stickers
Cocoa Vanilla - Midnight Paper - Bloom & Grow
Cocoa Vanilla - Midnight Paper - Sophisticated
 
Photobucket

Monday, February 18, 2019

Selfies with Echo Park You & Me by Fiona Johnstone

Hello everyone

Another page created with the pretty pastel Echo Park collection. Gotta love it when the kids take some selfies with your phone:

Selfies


I've used some Dylusions Paint for my background, I've painted it with a wide brush across my cardstock. Next I have used some texture paste and white paint through a mask to add some hearts to my background. 


I've added several layers of papers, then added some stickers from the sticker sheet - lots of banners on this page!


Some co-ordinating embellishments: Flair by CVS, cherry blossoms from Green Tara, alphas from PinkFresh and title by 2Crafty. 


Thanks for stopping by
Till next week

Fiona
x
Photobucket
Products Used:
Echo Park You & Me Paper - You & Me Flowers
Echo Park You & Me Paper - Swan Lake Love
Echo Park You & Me Paper -  Multi Journaling Cards
Echo Park You & Me Element Sticker Sheet
Dylusions Paint - Rose Quartz
Dylusions Paint - White Linen
Ranger Texture Paste
Cocoa Vanilla Studio Flair - Wild at Heart 
2Crafty Titles - Selfies Word Pack
Green Tara Cherryblossums White
White Cardstock


Friday, February 15, 2019

Life's Good using Bella Blvd Wish Big Boy by Kerryn Fry

Hi everyone!
This week, I've managed to squeeze a third and final page 
out of the remaining pieces of Bella Blvd Wish Big Boy collection.
Not for birthday photos this time,
these photos are of Mr 14 and his mates catching up.
The boys have been friends since they were about 6 weeks old.
 

The usual Kraft Cardstock base to start the page.
Then using two different stencils and two Distress Oxides colours,
I have applied colour to the background.


I've stamped some stars onto white cardstock with black ink,
then they've been coloured with Distress Oxides.
I've used colours that matched the patterned papers.
With the different sized stars, I have created 3 clusters around the photo.


I have used a label machine and black cardstock for the sub title.
Foam tape has been used to lift different elements on the page.
The smaller photo was taken in front of the same tree 4 years ago.
I have matted the photo with black cardstock as well.


The 2 Crafty title Life's Good is the main title.
I've covered it with layers of Distress Oxide
and then given it a coat of Dimensional Magic.
A simple page for me this week
I hope you have enjoyed the process
and have a great weekend.
Please join us again on Monday for Fiona's next project.
Products Used:
Bazzill Kraft Cardstock
Bazzill Raven Cardstock
Bella Blvd Wish Big Boy - Blow Them Out
Bella Blvd Wish Big Boy - Dinotastic
Bella Blvd Wish Big Boy - Happy Birthday
Bella Blvd Wish Big Boy - Make A Wish
Bella Blvd Wish Big Boy - Borders
Bella Blvd Wish Big Boy - Ephemera Words
2 Crafty title Life's Good
Distress Oxides
Tim Holtz Layering Stencil
Photobucket

Wednesday, February 13, 2019

"Together" by Amanda H

Hello AAS fans!
 
Today I am sharing another beach page, using some of the papers from the Deep Sea Kaisercraft collection. I combined this with some other matching bits and bobs... and here's what I came up with!
 
 
I started with a sheet of "Tide" from the Kaisercraft range. I used this as the base and to mount the photo (along with some black cardstock).
 
The next layer on the page is some white cardstock with some mixed media.
 
I firstly used White Gesso through a Kaisercraft stencil. Then I smooshed blue colour to the background. To do this I combined some Colour Blast Shimmer Dust (in Navy and Peacock) with some water on a plastic sheet. Then I pressed the white paper into the colour.
 
Please note: I did use some stickers on my page from my Kaisercraft stash - some sea theme stickers from the old Beach Shack collection.
 
Let's look at some close ups...
 
I could not resist the turtles on the "Snorkel" paper. I had to fussy cut one and add to the page. I placed it on some white muslin, with some twine and glitter.
For the title, I used the large black foam word "together", from the Jillibean Soup pack. I also added black foam hearts to the page from this same pack.
Here you see some stickers and alphabets from past Kaisercraft and Cocoa Vanilla Studios ranges. It is always good to dive into your stash and use them up!
Thank you for looking today,
Amanda
  
 Products used:
Kaisercraft - Deep Sea Paper - Tide
Kaisercraft - Deep Sea Paper - Snorkle
Colour Blast - White Heavy Gesso
Colour Blast - Colour Shimmer Dust - Peacock
Colour Blast - Colour Shimmer Dust - Navy
Kaisercraft Designer Template - Grunge 6x6
Jillibean Soup - Garden Harvest Foam Stickers
 
 
Photobucket
 

Monday, February 11, 2019

Perfect with Echo Park You & Me by Fiona Johnstone

Hello everyone

This week I have the pretty You & Me collection by Echo Park to scrap with.
 Lovely pastels colours with a bit of a love theme. 

Perfect
 
 
For this page I wanted to create a little sequence of Lily posing for some photos - 
she loves to do this as she gets older! 
I chose the pastel colours of this collection to suit the garden pictures, adding
 some black borders to make it pop more. 
 
 
I've embellished my layout with the stickers from the Echo Park collection and then used various embellishments from Cocoa Vanilla Studio to that co-ordinated with my page. 
 
 
I finished off the layout with this funky chipboard title by Cocoa Vanilla, the perfect title!

Thanks for stopping by
till next week

Fiona x

Photobucket
Products Used:
Echo Park You & Me Collection - I Love Us Floral
Echo Park You & Me Collection - Multi Journaling Cards
Echo Park You & Me Collection - You and Me Flowers
Websters Pages Love is in the Air paper - Sweet Fragrance
Echo Park You & Me Collection Element Sticker Sheet
Cocoa Vanilla Studio More than Words Chipboard Stickers
Cocoa Vanilla Studio More than Words Enamel Shapes
Cocoa Vanilla Studio Wild at Heart Flair Buttons
Cocoa Vanilla Studio Wild at Heart Rubber Charms
The Twinery Twine - Blossom
Black Cardstock
Gesso

Friday, February 8, 2019

Timeless using Jillibean Soup Garden Harvest by Kerryn Fry

Good morning AAS followers.
Today I am sharing my second page using the collection
Jillibean Soup Garden Harvest.
The colours in this collection are so rich and bright,
I think they matched the photos beautifully.
As with my first page, the photos are from the same zoo visit.
My gorgeous 'strawberry blonde' haired niece, doing what she loves.
 

The page started with a clean 12x12 piece of Bazzill Kraft Cardstock.
No background effect today, I've let the colour come from the patterned papers.
Lots of hand cut flowers, butterflies, leaves and words to create the main cluster.


The Pea Pod Bits were great to add small clusters to the page
and helped to fill the main cluster.


The large yellow butterflies were hand cut from a 
3x4 card on the Bite Size Bits paper.
I have used foam tape to create different layers in the main cluster,
with the hand cut words being the top layer and focal point.


The 2 Crafty Lattice Leaves have been covered with
Crushed Olive and Forest Moss Distress Oxide for a two-tone effect.


The 2 Crafty Fine Word Set 2 provided the title to the page.
I've used the word Timeless and covered it with black ink.


Lots of hand cut elements in this page,
but the patterned papers in this collection
 made adding the embellishments very simple.

Thanks for visiting the blog today.
Have a wonderfully, creative weekend
and please join us again on Monday for Fiona's next project.

Products Used:

Photobucket