HOMEABOUT USSHOP HERECROPDATESCURRENT CHALLENGESTIPS&TUTORIALS

Monday, June 29, 2020

Let's Explore with Simple Stories Summer Farmhouse by Fiona Johnstone

Hello everyone

I've got a final share with the Simple Stories Summer Farmhouse.
 It is such an awesome collection with all the bright fun colours. 

Let's Explore
For this page, I started with a plain white cardstock background, once I had cut all my papers and laid out the layout I decided it needed something but I didn't want to take too much away from the white space so I just added some masking through the chicken wire stencil with white texture paste. 

I've added some cute small cherryblossoms in a mix of colours to compliment the floral patterned paper. I've added some diecut leaves in white and then added some stickers with the collection 4x6 stickers and foam phrase stickers. 

For my title I have used a 2Crafty chipboard title - Let's Explore and made it two tone in pale pink and a pink red ink. 


Thanks for stopping by
Till next week
Fiona
x
Photobucket
Products Used:
Simple Stories Summer Farmhouse paper - Sunny Day
Simple Stories Summer Farmhouse paper - Sweet Summer
Simple Stories Summer Farmhouse paper - Perfect Day
Simple Stories Summer Farmhouse 4x6 Stickers
Simple Stories Summer Farmhouse Foam Phrase Stickers
2Crafty Chipboard Let's Explore
Green Tara Cherryblossoms - White
Green Tara Cherryblossoms - Red
Green Tara Cherryblossoms - Pink
Ranger Opaque Texture Paste
White Texture Cardstock
Chicken Wire Stencil 12x12

Friday, June 26, 2020

Live wild & free using Simple Stories Birthday Blast by Kerryn Fry

Hello everyone!
Today's page has been created with 
the gorgeous and colourful collection,
Simple Stories Birthday Blast.
The colours are the stand out in this range
and I have used some photos of Mr H from 2006 to match.
He was always a very busy boy when playing outside,
kept himself amused for ages.
The page started with a plain piece of Bazzill Kraft Cardstock,
which worked really well with the rainbow of colours.
I've then cut horizontal strips of patterned paper with different widths
and stuck them down on the page.
I've left a peek of kraft between each strip.
The photos have been backed with 3 different layers
of paper to define them on the page.
The Journal Bits Pack has provided the tabs
and journal spots on the page.
I've used foam tape to lift each of those elements
to help create layers across the page. 
I love the touches of silver on some of the embellishment pieces.


The Bits & Pieces Pack had all of the cool pieces,
the robot, cogs and stars.
Each of the pieces have been added to the page with foam tape.


I have hand-punched some chevrons from Raven cardstock
and added them to the page with foam tape.
The pop of black ties in with the title 
and works well with the bright colours. 


I have hand-cut some planets and rocket ships from Have a Blast.
Each piece has been added with foam tape.
Then using a black gel pen, I've added a fake stitched
border to some of the papers strips.


has been given a base coat of white gesso.
Once dry, I have added layers of Mustard Seed Distress Oxide.
I love how the gesso has sat in the engraved words
and helps to highlight each letter.


The 2 Crafty title Live wild & free has been covered with black ink
and describes Mr H perfectly.


Thank you for visiting the AAS Blog today.
Have a great weekend, stay warm
and enjoy your crafting.
Join us again on Monday to see Fiona's next project

Products used:


Photobucket

Monday, June 22, 2020

Follow your Dreams
with Kaisercraft Little Treasures
by Fiona Johnstone

Hello everyone

Today I have this super cute page using Kaisercraft Little Treasures starring 
my great niece. 

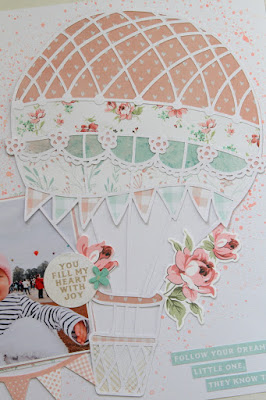
Follow your Dreams, Little One, They Know the Way
 
Love this cute photo, hopefully you can tell they are hot air ballons in the background! With those in mind I decided I wanted to do a big hot air balloon with my Silhoutte Cameo and team it up with the gorgeous colours in the Kaisercraft Little Treasures collection. 
 

Once I had backed the Hot Air Balloon with the Patterned Paper I created my background. I traced around the Hot Air Balloon onto some regular white paper and used it as a reverse mask. Then I got some acrylic paint, watered it down and made splatters around the edge of the Hot Air Balloon outline. 


I layered up some patterned papers under my photo and tucked that under the Hot Air Balloon. Next step was to hit the ephemera pack for the perfect embellishments. Love the flowers and the cute circle quote, over the photo to try and block out some of the people in the background. I've added a little enamel flower - very old Kaisercraft from my stash. 


I've used the ephemera to create my title at the bottom right of the page to finish my layout. 

Thanks for stopping by, till next time
Fiona
x
Photobucket
Products Used:
Kaisercraft Little Treasures paper - Tiny Miracle
Kaisercraft Little Treasures paper - Sweetheart
Kaisercraft Little Treasures paper - Little Gem
Kaisercraft Little Treasures Collectables
Kaisercraft Cardstock - Snow
Paint

Friday, June 19, 2020

Life's good using Kaisercraft Uncharted Waters by Kerryn Fry

Hi everyone!
I'm back today with my second page 
using this fabulous collection, Kaisercraft Uncharted Waters.
And don't forget this collection is a bargain in the clearance section.
The photos look fantastic in B&W amongst the blues and browns.
Mr H was 7 years old 
and you can see how much he loves the beach.


The base is Kraft Cardstock, of course!
I've created the background effect.
These papers look amazing with torn edges
and layered over each other. 


The Shallows paper provided the squares of words,
pictures and quotes.
They have been given another layer
with the Aquatic paper and raised with foam tape.
I've highlighted some of the words with Stickles Crystal Glitter Glue


The Sticker Book provides those extra embellishments for the page
and helped to build the cluster in the left corner.
The ribbon stickers extend to each edges of the page 
and added some sparkle with the glitter glue


I've created the journal spot from the frames on the Shallows paper
and backed it the reverse side of Hook.
More Glitter Glue added to some stickers and words.


The 2 Crafty title Life's good has been covered 
I've then added some shiny 'sand' with Stickles Glitter Glue.
Love the sparkle!


Thanks for visiting the blog today.
I hope you have enjoyed the process.
Have a fabulous weekend
and please pop back on Monday for Fiona's next page.


Products used:


Photobucket

Monday, June 15, 2020

Sweet Memories with Simple Stories Summer Farmhouse Collection

Hello everyone

Another share with Simple Stories Summer Farmhouse collection today.
 I love the summer ranges even if they come out in our winter - I can pretend it is still warm weather here!

Sweet Memories 
This page is a holiday snap from our summer holidays in NZ last year. I've used a 12x12 sunburst mask to create my background, fading out my colour towards the ends using distress oxide ink in Mustard Seed. 

Next I have layered up some of the papers to frame may photo. I've fanned them out rather than keeping them all straight following the angles of the sunburst. 


To embellish my layout I've used the 4x6 sticker book and the foam phrase stickers which have a few cute puffy shapes on them such as the heart and ice-cream. 

I've also used the foam stickers for my title before adding  a small flair button from my stash to complete the page. 


Thanks for stopping by
Till next week

Fiona
x
Photobucket
Products Used:
Simple Stories Summer Farmhouse paper - Backyard BBQ
Simple Stories Summer Farmhouse paper - Perfect Day 
Simple Stories Summer Farmhouse paper - Sunny Day 
Simple Stories Summer Farmhouse paper - Sweet Summer
Simple Stories Summer Farmhouse 4x6 Stickers
Simple Stories Summer Farmhouse Foam Phrase Stickers
Tim Holtz Distress Oxide Ink - Mustard Seed
Sunburst Mask 12x12
White Cardstock 
Misc Flair Button

Friday, June 12, 2020

Day at the Beach using Kaisercraft Uncharted Waters by Kerryn Fry

Good morning everyone.
Today I'm sharing a page using the beach collection,
Kaisercraft Uncharted Waters
The photo is from January 2009, 
a very cheeky Mr H at 4 and 1/2 years old.

I have used Kraft cardstock as the base for the page,
but kept it clean and covered most of it with patterned papers.
The main paper for the background is Droplet.
I've torn the edges and added layers of Tide Pool 
and flipped the torn scrap of Droplet.


I have used Stickles Glitter Glue to highlight 
the bubbles on the Droplet paper.
The photo has been matted with multiple layers of patterned paper
and lifted with cardboard for dimension.


The Sticker Book was perfect to embellish the page.
I've added layers of shells and sea creatures.
The Shallows paper provided the quotes 
and the bottom trim was also used to a quote.
Plenty of foam tape used for more dimension. 


I've added more sparkle detail with Stickles 
to the shells and cute seagull sticker.
Some shells have been hand-cut from the patterned papers.


was given an undercoat of white gesso.
Once dry, I've lightly swiped the chipboard diagonally
with a thin layer of Chipped Sapphire Distress Paint.
The paint layer is thin enough to allow the gesso 
to peek through to the surface.


Thank you for dropping by the blog today.
Hopefully you've been inspired by the page
and get a chance to be creative over the weekend.
Please join us again on Monday for Fiona's next project.


Products used:


Photobucket

Monday, June 8, 2020

New Ride with Uniquely Creative True North by Fiona Johnstone

Hello everyone

Today I've got a share with the new range to the store - Uniquely Creative and their True North collection. When I saw the creative cuts packet I knew they would be perfect for scrapping my new car photos. 

New Ride

For this layout I focused on using the creative cuts to create a background for my layout. I decided to add some swipes of black paint with a credit card - adding a few lines using the side of the card for some interest. 

Next I set about creating the design so the shapes fit around my car photo. I've added some of the patterned papers at this point - I torn the number plates patterned paper (Going Places) and added some strips of red with the Adventure Awaits paper. 

I ended up fussy cutting my photo as I wanted to create a little more focus on the image without all the background. I mounted the fussy cut car photo so that it was slightly elevated off the page and gave it dimension.  

I added a little wood veneer car and my title in some old thickers to finish off the layout.  I love the red, white and black combo on kraft!


Thanks for stopping by
Till next week
Fiona
x

Photobucket

Products Used:

Uniquely Creative True North paper - Going Places
Uniquely Creative True North paper - Adventure Awaits 
Uniquely Creative True North Creative Cuts
Kaisercraft Wooden Shapes
Black Paint
Kraft Cardstock
Thickers

Friday, June 5, 2020

Bloom Baby, Bloom using Simple Stories I am by Kerryn Fry

Hi everyone!
Firstly, I must confess to a little lie two weeks ago.
Back then I said I had created my final page with this collection,
but then I found an inspirational project on Pinterest that I wanted to try
and it made a great use of those smaller scrap pieces.
So here it is, the final, final page using the amazing collection,
Simple Stories I am.
Another photo of the very same Great-Niece who featured
in the previous 'final' page.
This photo was taken in 2011 
and I love that her bib matches beautifully. 
 

The page was started with a plain 
and very clean piece of 12x12 Kraft Cardstock.
I have matted the photo with two of the larger pieces 
of patterned paper that remained
and then cut the remaining patterned paper pieces 
into different lengths and thicknesses.


I had a few practice runs of laying out the strips on the the page
before I started sticking paper down.
Staring from the top left of the page 
and then finishing at the bottom right corner.


What I also loved about this page
was using the remaining stickers on the 12x12 Cardstock Sticker Sheet.
I've added them to the page with foam tape to add some dimension.


The Journal Bits pack also helped to embellish the page,
it was great to add extra words to the page
and provided a balance across the page. 
I have used Stickles Glitter Glue to highlight a few of the elements.


The 2 Crafty Hand Drawn Flowers have been covered with white paint.
I've backed the flowers and leaves with patterned paper
and then added Stickles to the chipboard.

With a black gel pen and ruler,
I have added lines of fake stitching to the strips of paper 
in different areas of the page.
The title for the page is another piece form the Journal Bits pack.
I've used more foam tape to lift it on the page.
That's a wrap for today.
Really love this page and think I will try something similar again.
Thanks for visiting the blog today,
have a wonderful weekend and make sure you get some creative time.
Join us again on Monday for the next project. 
Products used:
Bazzill Kraft Cardstock
Simple Stories I am - 2x2 Elements
Simple Stories I am - 3x4 Elements
Simple Stories I am - 4x4 Elements
Simple Stories I am - 4x6 Elements
Simple Stories I am - Blooming
Simple Stories I am - Dreaming
Simple Stories I am - Strong
Simple Stories I am - 12x12 Cardstock Stickers 
Simple Stories I am - Journal Bits
2 Crafty Hand Drawn Flowers
Ranger Stickles Glitter Glue