HOMEABOUT USSHOP HERECROPDATESCURRENT CHALLENGESTIPS&TUTORIALS

Monday, May 31, 2021

Seriously Cool Cousins with Pinkfresh Studio Some Days by Fiona Johnstone

Hello everyone

I've got one more share with the PinkFresh Studio Some Days paper collection:

Seriously Cool Cousins


Such a stunning collection, love the primary colours together with a little green thrown in the mix. I've gone with the yellow background using the plastic bag technique and tried a little stencil stamping but it is much subtler than last weeks as I used lighter colours. 


After layering up several of the papers I have hit the embellishments, this week adding the floral ephemera from the Some Days collection for all the pretty matchy colours as well as the sticker sheet and the awesome Chipboard Flairs. 


I've used the Pinkfresh Studio Keeping it Real puffy stickers for the work Seriously; 


Then used two lots of alphas from the Some Days collection - the cute mini puffy alpha stickers that are multicoloured and the Blue Alpha Stickers to finish my title. 


Thanks for stopping by
Till next week

Fiona
x

Friday, May 28, 2021

Pretty as a Picture using Echo Park Paper Pool Party by Kerryn Fry


Hi Everyone!
Today's page has been created 
with the gorgeous summer collection,
Echo Park Paper Pool Party
The photo is my beautiful niece,
on holidays from QLD,
having a fun at the playground.


The base is my favourite Bazzill Kraft Cardstock.
I've created the background effect using 
and three different Distress Oxides.
The colours are Speckled Egg, 
Salvaged Patina, and Chipped Sapphire.
I've blended the colours around the page
to extend beyond the paper layers.


Once the Oxide Inks were dry,
I've used the White Gel pen 
and stencil to highlight the pattern of the stencil.
The word 'Fun' has been hand cut from the 
It  has been added to the page with foam tape.


The 'Sunshine on my mind' journal card was cut from the 
I've used foam tape to adhere to the page.
Then added a faux stitch border using a Black Gel Pen.
The 2 Crafty Graceful Butterflies have been covered 
with Spiced Marmalade and Kitsch Flamingo Distress Paint.
Once the paint was dry, I've outlined 
the butterflies with the white gel pen.


The flowers were hand cut from Paradise Floral
and added to the page with foam tape.
I've hand cut the small lemons from 
added them to the Ephemera tag 
'Happy Time & Sunshine'.

The larger lemon and watermelon were
hand cut from the 4x4 Journaling Cards
and added to the bottom of the photo.

I've used more elements from the Ephemera Pack,
the flags, floral circle and 'Summer Lovin' tag.
Most pieces added to the page with foam tape.


The hand made tab has been cut from the 
Made Lemonade paper by tracing around an ephemera tag.
I've added faux stitch borders, with a Black Gel Pen,
around some papers and the hand made tab.

has been covered with Black Soot Distress Paint
and lifted with foam tape.


Thanks for visiting the blog today.
I hope you enjoyed the process of the page
Have a great weekend and join us again
on Monday for Fiona's next project.

Products used:
Bazzill Kraft Cardstock
Echo Park Paper Pool Party - 3x4 Journaling Cards
Echo Park Paper Pool Party - 4x4 Journaling Cards
Echo Park Paper Pool Party - Make Lemonade
Echo Park Paper Pool Party - Multi Journaling Cards
Echo Park Paper Pool Party - Paradise Floral
Echo Park Paper Pool Party - Ephemera Die Cuts
2 Crafty title Pretty as a Picture
2 Crafty Graceful Butterflies
Tim Holtz Layering Stencil
Distress Oxide Inks
Distress Paint
Uni-Ball White Gel Pen
Uni-Ball Black Gel Pen


Photobucket

Monday, May 24, 2021

Good Vibes with Pinkfresh Studio Keeping it Real by Fiona Johnstone

Hello everyone

Back with more Pinkfresh Studio Keeping it Real collection. I've used completely different papers to last week and added paper from an older collection:

Good Vibes


How pretty are the pinks, purple and blues in these papers? Love them!

I teamed them up with some Distress Oxides. I have used a very light watered down Kitsch Flamngo with the plastic bag technique then, once dry, I have grabbed Seedless Preserves and used a Vicki Boutin stencil and technique to create my background by applying the ink directly to the stencil then spraying with water and using as a stamp! Love the effect it gives. 


I've then layered the papers and hand cut a scallop border for my page from another Pinkfresh Studio range - My Favourite Story. To embellish I have fussy cut the arch quote from the Big Mood paper and then added flowers from the Floral Ephemera pack and puffy stickers from the puffy phrase stickers. 


and flowers and enamel dots in the opposite corner:


Then I've added a title from the puffy phrase stickers to finish off the page. I love how the yellow pops against the pinks!


Thanks for stopping by
Till next week

Fiona
x
Friday, May 21, 2021

All Boy using Echo Park Paper Little Dreamer Boy by Kerryn Fry


Morning everyone!
Today's page has been created with
This is a great collection with primary colours and stars, 
just perfect for those 'little boy photos.
My photo is Mr H playing in his sandpit,
way back in September 2009.  


Similar to last week's page, I've created a mixed media background.
This week I've used Kraft Cardstock as the base,
with a combination of red and yellow Distress Oxide inks.
Candied Apple, Fossilized Amber and Crackling Campfire.
The oxides have been applied with packaging and water in separate layers, 
drying with a heat gun between each colour.
I've then used the Fossilized Amber and a Vicki Boutin stencil
to add another layer to the page. 


I've used Raven Cardstock to punch out a border strip,
back the photo and some of the patterned paper layers.
Two of the patterned paper layers have been outlined
with a faux stitch border using a black gel pen.


title, cart and bicycle.
The cart has been covered with Candied Apple 
I've given it a finishing coat of Dimensional Magic
and added a word phrase from the Element Sticker Sheet.


The Braver, stronger, smarter phrase has been hand cut
I've used foam tape to add it to the page
to create dimension.


The speech bubbles have been hand cut from
They have been lifted with more foam tape.
The bicycle from the 2 Crafty 6x6 sheet has been 
covered with Peeled Paint and Black Soot Distress Paint.
The wheels of the bike have been backed with patterned paper
and then finished with Dimensional Magic.


All of the stars have been hand cut from
the reverse side of the 4x4 Journaling Card paper.
The larger stars have been added to the bottom section of the page
and the smaller stars have framed the phrase on the left side of the page.
All of the stars have been lifted with foam tape.
I've added more stickers to embellish the page.

The title All Boy, from the 6x6 sheet,
has been covered with Hickory Smoke Distress Paint 
and then sealed with a good coat of Dimensional Magic.
It has been added to the right bottom corner of the photo.


Thank you for visiting the AAS blog today.
Hopefully, the layout has inspired some crafting fun.
Have a fabulous weekend, keep warm
and join us again on Monday.

Products used:


Photobucket

Monday, May 17, 2021

This is Adulting with Pinkfresh Studio Keeping it Real by Fiona Johnstone

Hello everyone

Another share today with Pinkfresh Studio, Keeping it Real collection. Such gorgeous colours in this collection and when I saw this cute cut file, I knew they would go perfect together. 

This is Adulting


First up I wanted to use the Tiny Victories paper for the main paper to matte my photos and then chose to make it the centre of my stacked tea-cups. It teams up nicely with the A Little Chaos paper. Then I have added complimentary colours along the cut file and added some enamel dots to the flower centres. 


Love the perfect embellishments from this collection, perfect for scrapping both the good and bad - check them here. 


Perfect floral ephemera in the collection - a whole pack of just flowers, love it!! The puffy stickers are perfect for the titles and also have a few little embellishment bits that add that little bit of dimension needed. 


Thanks for stopping by
Till next week
Fiona
x

Photobucket

Products Used:

Pinkfresh Studio Keeping it Real paper - Tiny Victories 
Pinkfresh Studio Keeping it Real paper - A Little Chaos 
Pinkfresh Studio Keeping it Real paper - Real Life
Pinkfresh Studio Keeping it Real paper - Reality Check
Pinkfresh Studio Keeping it Real paper - Big Mood
Pinkfresh Studio Keeping it Real paper - Daily Grind
Pinkfresh Studio Keeping it Real Floral Ephemera
Pinkfresh Studio Keeping it Real Cardstock Stickers
Pinkfresh Studio Keeping it Real Puffy Phrase Stickers
Asstd Enamel Dots
Kaisercraft Cardstock - Snow


Friday, May 14, 2021

Love That Smile using Echo Park Paper Little Dreamer Girl by Kerryn Fry

Good morning everyone.
Today's page has been has been created with the collection
Echo Park Paper Little Dreamer Girl.
The B&W photo pops amongst the beautiful colours
and mixed media background.
Another gorgeous photo of my great-niece
having fun outside drawing with chalk.


The background cardstock is a 12x12 sheet
of Vicki Boutin Foundations smooth paper.
I have applied three Distress Oxide Inks to the background,
using a plastic sheet and water.
The colours used are Worn Lipstick, 
Squeezed Lemonade and Tumbled Glass.
I've applied the colours in layers 
and have dried with a heat gun in between.


Once the original layers of Oxide Inks were completely dry,
I have used the same colours and a Vicki Boutin Stencil
to add another layer of ink to the page.
The colours have been overlapped to tie it all together.
I've then added flicks of each colours to the page.
The rainbow & clouds are both stickers
from the Element Sheet and have been added with foam tape.


The photo has been matted with Raven Cardstock
and then layers of patterned paper added to the page under the photo.
I've used foam tape between two layers to give the photo extra dimension.
and Worn Lipstick Distress Oxide.


The journal card has been cut from the Multi Journaling Cards,
I've outlined the circle wit a black gel pen
and added it to the page with foam tape.
The butterflies have been hand cut from a journal card
and the flowers are cut from Dreamy Floral paper.
The words are from the Element Sticker Sheet.


The larger flower is a stamp from Vicki Boutin Colour Study Hello Set,
I've stamped it with Stormy Sky Distress Oxide
on to Foundations Paper and cut them out.
I've added Stickles Glitter Glue to the centres
of the flowers for a little sparkle.


I've also added some leaves using the 'It's all good' stamp set,
and stamped them with Forest Moss Distress Oxide.
They have been tucked into the floral clusters either side of the photo.
The 'happy' sticker is from the Element Sheet
has been covered with Black Ink.


Thank you for visiting the blog today.
Hope you have found it inspiring.
Have a fabulous weekend
and join us again on Monday.

Products used:
Vicki Boutin Mixed Media Foundations Paper - Smooth white 
Bazzill Raven Cardstock
Echo Park Paper Little Dreamer Girl - Dancing Dots
Echo Park Paper Little Dreamer Girl - Dreamy Floral
Echo Park Paper Little Dreamer Girl - Pocketful of posies
Echo Park Paper Little Dreamer Girl - Rainbow Magic
Echo Park Paper Little Dreamer Girl - Multi Journaling Cards
Echo Park Paper Little Dreamer Girl - Element Sticker Sheet
2 Crafty title Love that smile
Distress Oxide Inks
Vicki Boutin Colour Study Stamp - It's All Good
Vicki Boutin Colour Study Stamp - Hello
Vicki Boutin Stencils


Photobucket

Monday, May 10, 2021

Living the Dream with Pinkfresh Studio Keeping it Real by Fiona Johnstone

Hello

This week I have created a page using Pinkfresh Studio Keeping it Real paper.
I love the pink and greens in this collection. It is so pretty! 

Living the Dream


For this page I started with the gorgeous colours in the Tiny Victories paper - love the colours together and I co-ordinated it with the complimentary teal. 

Next I decided to colour my own cutfile for the background using Distress Oxide Inks to give me the colours I wanted for my page. It makes the cutfile pop on the white. 


I've used the beautiful floral ephemera pack to embellish my page - love how many flowers you get in this set!


I've also used the sticker sheet and the beautiful puffy stickers for my title and as a cute heart emebllishment. I finished the page off with some subtle splatters with the oxide inks. 


Thanks for stopping by
Till next week
Fiona
x


Photobucket

Products Used:
Pinkfresh Keeping it Real paper - Tiny Victories 
Pinkfresh Keeping it Real paper - Real Life
Pinkfresh Keeping it Real Cardstock Stickers
Pinkfresh Keeping it Real Floral Ephemera
Pinkfresh Keeping it Real Puffy Phrase Stickers
Distress Oxide - Kitsch Flamingo
Distress Oxide - Tattered Rose
Distress Oxide - Festive Berries
Distress Oxide - Peacock Feathers
Doily
Cardstock - Kaisercraft Snow

Friday, May 7, 2021

Grateful using Echo Park Paper Welcome Baby Boy by Kerryn Fry

Hi everyone!
Today's page has been created with
Echo Park Paper Welcome Baby Boy.
It's an older photo of a very young Mr H
and I at his friend's birthday party back in 2005.
Love the profile view of both of us.


The page started with my favourite Bazzill Kraft Cardstock.
I've stencilled the background in layers,
and white Brilliance Ink.
The next layer is a second stencil 
and Crackling Campfire Distress Oxide Ink.


I've used the Element Sticker Sheet to help create
parts of the cluster above the photo.
The tag tucked under the top of the photo
has been punched from the reverse side of Milestone Journaling Cards.
The stickers have been lifted with foam tape for extra dimension,
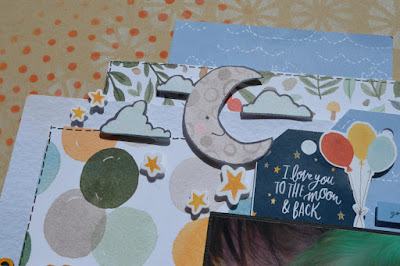
the moon and clouds have been hand cut from Sweet Dreams.


The paper layers under the photo alternate between
a plainish paper to a more colourful pattern.
I have used a black pen to draw faux stitching borders
around the outside of certain papers.
The photo has been matted with Raven Cardstock
and I've also punched a border strip to add to the base of the photo.


The Element Sticker Sheet was also used to add
elements to the lower part of the page.
The 'Oh Baby' sticker, the buttons, words and deers
are all stickers, some lifted with foam tape.


The 2 Crafty Lattice Heart has been covered with 
Wild Honey Distress Paint.
I've backed the heart with patterned paper
and added a sticker to the side of the heart.


The title 2 Crafty Grateful has been
covered with black ink
and glued down under the photo.
The perfect title!


Thanks for visiting the blog today
and I hope you've found the page inspiring.
Have a fabulous, crafty weekend
and please join us again on Monday. 


Products Used:


Photobucket