HOMEABOUT USSHOP HERECROPDATESCURRENT CHALLENGESTIPS&TUTORIALS

Friday, June 29, 2018

It's the Simple Things using Echo Park Paper Co Wish Upon A Star by Kerryn Fry

Good morning all.
Hope you are keeping nice and warm.
Today I'm back to share my second page using the fabulous collection,
Echo Park Paper Co Wish Upon A Star.
I'm sharing the limelight with Mr 14 at the Tour Down Under back in 2013.
Started with plain Black cardstock for this page,
but I've flipped to the smooth reverse side
and just let the patterned papers and photos shine.
I love how crisp the primary colours appear on the black.
It helped that Mr 14 was wearing a black t-shirt as well.


The patterned papers have been layered first.
The embellishments have been hand cut from the papers
or are sitckers from the Element Sticker Sheet
I have added a some faux stitching with a black pen
and a few white borders with a Sharpie Pen


Some of the stickers have been matted with black cardstock
and raised with foam tape.
Love the row of stars from the sticker sheet.
The 'smile' letter have been hand cut from the Border Strips.


The 2 Crafty title It's the Simple Things was given a base coat of gesso 
and then painted with Mustard Seed Distress Paint.


The 2 Crafty Stars have been painted with Candied Apple Distress Paint 
and then doodled with the Sharpie Pen
 The camera and small stars are from the sticker sheet, 
they have been popped up with foam tape.

That's my page for today.
Thank you for visiting the blog today.
I hope you have a lovely weekend,
please remember to drop by Monday for Fiona's next project.
Products Used:
Echo Park Paper Co Wish Upon A Star - Border Strips
Echo Park Paper Co Wish Upon A Star - Magic Castle
Sharpie Pen
Photobucket

Wednesday, June 27, 2018

Mother & Daughter using Echo Park Paper Co Wish Upon A Star by Kerryn Fry

Good Morning everyone.
Today I am sharing my first page creating with the collection,
Echo Park Paper Wish Upon A Star.
I just love the primary colours!
The photo is of my Mum and my big sister taken in Sydney 2015, 
a girls weekend away celebrating my sister's 50th.
This page started with a slight variation of my usual base cardstock,
I think this one is called Dark Kraft.
The colour in the background was the finishing touches added to the page at the end.
I have used the 6x6 Crafters Workshop Template Tiny Circles,
one of my favourites, with Distress Paint and a sponge.
I have built up the layers on this page with plenty of scrap cardboard
and a little foam tape under some embellishments.
Most pieces have been cut from the patterned papers

The sun's rays have been cut from patterned paper
and then a border doodled with black pen.
I have then decorated the smallest of the 2 Crafty Dianne's Doily
with Distress Paint and fussy cut a button for the centre piece.


You can see the dimension that has been created with cardboard under each layer
and to lift the different embellishments.
The houses and picture frame have been cut from the Journaling Cards.


The 2 Crafty title Mother & Daughter has been slightly renovated.
To suit the page, I have cut to title into two pieces.
The chipboard was given a light coat of gesso first.
Once dry, I have covered with Distress Paint Timbled Glass and
then finished with a coat of Dimensional Magic


I've used the title to frame the black & white photo and
the photo has been matted with black cardstock.
I have added faux stitching with a black gel pen on a few different pieces


That's my page for today, I hope you have been inspired.
Thank you for dropping in.
I'll be back on Friday to share my second page.

Products Used:
Echo Park Paper Co Wish Upon A Star - 4x4 Journaling Cards
Echo Park Paper Co Wish Upon A Star - Border Strips
Echo Park Paper Co Wish Upon A Star - Newsprint
Echo Park Paper Co Wish Upon A Star - 4x6 Journaling Cards
Echo Park Paper Co Wish Upon A Star - Best Day Buttons
2 Crafty Dianne's Doily Set
2 Crafty title Mother & Daughter
6x6 Crafters Workshop Template - Tiny Circles
Dimensional Magic
Distress Paint
Photobucket

Monday, June 25, 2018

Alice in Wonderland with Echo Park by Fiona Johnstone

Hello everyone

Ending the month with my final layout using the fun Alice in Wonderland collection 
by Echo Park.

Alice in Wonderland
This blue and white striped paper is so striking, and the perfect background for my photo of Alice and the Mad Hatter with their blue outfits. I decided to tear the paper for texture and break up the blue with some plain white cardstock and a little strip of the yellow floral paper, also torn for texture. 
 A doily provides some texture and a plain background for the busy flower stickers. 

How cute are the teapot and tea cup stickers?
 

Fabulous embellishments from the chipboard stickers and elements stickers are the perfect embellishment and also make for an easy title. The enamel dots add the finishing touch. 

 Thanks for stopping by
Till next week

Fiona
x
Photobucket
Products Used:
Echo Park Alice in Wonderland paper - Magical Adventure
Echo Park Alice in Wonderland paper - Dream Big
Echo Park Alice in Wonderland paper - Daydream
Echo Park Alice in Wonderland paper - Always Curious
Echo Park Alice in Wonderland paper - 3X4 Journaling Cards
Echo Park Alice in Wonderland paper - 4x4 Journaling Cards
Echo Park Alice in Wonderland Chipboard Accents
Echo Park Alice in Wonderland paper - Element Sticker Sheet
Echo Park Alice in Wonderland Enamel Dots
Doily
White Cardstock

Sunday, June 24, 2018

Flash End of Financial Year Sale - Now until midnight 26th June

 
Flash End of Financial Year Sale 
 
 
From now until midnight on the 26th June, get 25% off everything in-store, this includes already Discounted Items in the Massive Clearance Section.
Use the code EOFYS25 in the Coupon Code section of payment screen to receive 25% off all orders over $50.
(Excludes shipping) 
(Sorry no code = no discount)
Use code in checkout process, once entered it will automatically discount order before payment details are entered.  
  All orders must be paid for at the time of ordering,
any payment not received by the 27th June will not qualify  
for discount.
  Sale Conditions:
Sale does not apply to existing orders or backorders.
Sale cannot be combined with any other offer.
Sale applies only to in stock items.
All orders must be paid in full at the time of order processing
Sale ends midnight Tuesday 26th June 2018 

Be quick Shop Now -


Photobucket

Friday, June 22, 2018

Love, by Amanda H

Hi again,

Welcome to my last page share for June. I found a little reserved pile of Cocoa Vanilla Studio More than Words in a pizza box. I'd been saving it. I found it hard to cut into some of these papers, but it was so worth it to create this page.


For the basis of the page I used both patterns on the Sketchbook piece of paper in the range, combined with a panel of Radiant paper. I used these 3 patterned papers in vertical panels down the page.

Then I created clusters all around the photo, using both stickers from the Accessory sheet, and diecuts.
 
I popped some elements on foam tape for some dimension.
For the title I used the word "love" from the Chipboard titles pack.
I also added some dark grey hearts from the same Chipboard titles pack.
  

 To finish the page, I added some fine splatters of: Colour Blast Colour Spray in Roadbase and Colour Blast Colour Shimmer Spray in Steel.
 
Thanks for looking:
Amanda


Products used:
Cocoa Vanilla - More Than Words Paper - Sketchbook
 Cocoa Vanilla - More Than Words Paper - Radiant
Cocoa Vanilla - More Than Words Accessory Stickers 6x12
Cocoa Vanilla - More Than Words Die Cut Ephemera
Cocoa Vanilla - More Than Words Chipboard Titles
Colour Blast - Colour Spray - Roadbase
Colour Blast - Colour Shimmer Spray - Steel
 
 
Photobucket

Wednesday, June 20, 2018

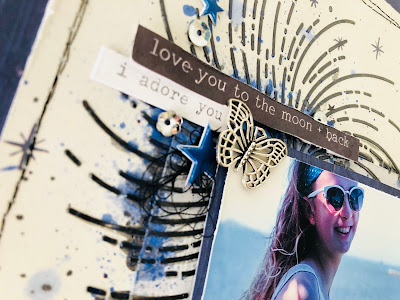
"Live your Adventure" by Amanda H

Hi everyone,

Today's page share uses the Kaisercraft Stargazer collection.
 I love blues so this range is perfect!

I started with 2 papers in the range: Milky Way and Cosmic and layering them for
 the background, and adding some black machine stitching for the edges.
 I also added another panel of paper (Universe) to centre of the page.

I decided to add some interest using the Starburst stencil from the Kaisercraft range - applying Colour Blast Paste in Dusty Charcoal through the stencil in the opposite corners 
of the page. Then I sprayed some Colour Shimmer Spray in Just Blue to these areas.

With the background done, I was ready to add my photo and layer some embellishments.


For the bottom right cluster, I started with the smaller 2Crafty Star circular frame, inked black.

 To this I added some tangles of black thread, sequins, puffy Bella Blvd blue stars and


For the title, I used a 2Crafty word title: Live your adventure. I inked this black and added 
a coat of dimensional magic.


The last final touches are more thread, stars and sequins, plus some stickers: 
Two of the word quotes are taken from the trimmed paper edge of the Kaisercraft papers.


 Thanks for looking today
Amanda

Products used:

Papers:

2Crafty chipboard:

Mixed media:

Embellishments:

Photobucket

Monday, June 18, 2018

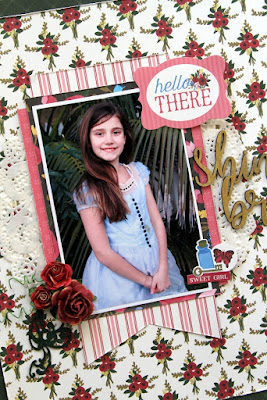
Shine Bright with Echo Park Alice in Wonderland by Fiona Johnstone

Hello Everyone

Back with another share using the Echo Park Alice in Wonderland collection. 

Shine Bright


The papers I have chosen feature lots of roses so although Alice themed can definitely be used for anything feminine. I already had a bunch of Alice style photos printed, but these sides of the papers would work well for many things. 

When using a busy print as a background, I use plainer papers around my photo and this time mounted the busy paper on to a neutral background.  

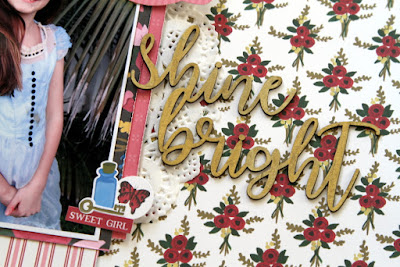
I've continued the rose theme in my embellishments, a mix of EP Alice in Wonderland collection embellishments, 2Crafty chipboard and some roses. 

I love the cool 2Crafty Chipboard title Shine Bright - I have painted this in a gold to match the gold hints in the patterned paper. 


Thanks for stopping by
Till next week
Fiona
x

Photobucket

Products Used:

Echo Park Alice in Wonderland paper - Always be Kind
Echo Park Alice in Wonderland paper - Drink Me
Echo Park Alice in Wonderland paper - Dream Big
Echo Park Alice in Wonderland paper - Tea First
Echo Park Alice in Wonderland Ephemera
Echo Park Alice in Wonderland Sticker Sheet
2Crafty Chipboard title - Shine Bright
2Crafty Design Elements
Asstd Roses 
Doily


Friday, June 15, 2018

Let's hear it for the boys using Echo Park Paper Co Imagine That Boy by Kerryn Fry

Good morning all.
It has been quite miserable here this week, typical winter!
So I was more than happy to stay warm inside and create.
My page this week features the collection Echo Park Paper Co Imagine That Boy.
This range is more suited for the younger males with planes and cars,
but I loved the colour combination, especially the green, so I had to play.
The photo, of my most favourite males in the world,
was taken nearly 4 years ago in Marysville, Victoria
I've given some white cardstock the honors this week for the base.
The background effect has been created using Distress Oxide Inks, 
some plastic packaging and water.
The second layer is some stencilling using black archival ink.


I have used the patterned papers to create the layers under the photo. 
Balancing the busy patterns and colours, but letting the deep orange dominate.
The photo has been with black cardstock to give it a clear outline
and propped up using some cardboard scrapes.
The 2 Crafty Star Circular Frame was used to highlight the boys, 
it was painted with Chipped Sapphire Distress Paint
and the stars backed with patterned paper.


The remaining star from the frame was used as an embellishment.
The journal spot was fussy cut from the 4x6 Journaling Cards.


The 2 Crafty Geometric Arrow was painted with 
Hickory Smoke Distress Paint and the circles backed with patterned paper.
I have used black and bronze gel pens to doodle different parts of the page.


The 2 Crafty Title Let's hear it for the Boys was the perfect title,
both for the photo I used and the collection itself.
I've given the chipboard a base coat using Picket Fence Distress Paint
and then once dry, swiped across the words with Hickory Smoke Distress Paint.
Love the line effect with the white peeking through.
I have finished the title with some doodling using the bronze gel pen.


 And that's the end of another week.
Thank you for visiting the blog today, hopefully you have found the page inspiring.
Have a great weekend, stay warm and happy crafting.
Please join us again on Monday for Fiona's next page.
Products Used:
Bazzill White Cardstock
Bazzill Black Cardstock
Echo Park Paper Co Imagine That Boy - Car Race
Echo Park Paper Co Imagine That Boy - Fish Friends
Echo Park Paper Co Imagine That Boy - Galaxy Quest
Echo Park Paper Co Imagine That Boy - Lost in Space
Echo Park Paper Co Imagine That Boy - 4x6 Journaling Cards
2 Crafty title Let's hear it for the boys
2 Crafty Star Circular Frame
2 Crafty Geometric Arrow
Prima Stencil
Distress Oxide Inks
Distress Paint

Photobucket