HOMEABOUT USSHOP HERECROPDATESCURRENT CHALLENGESTIPS&TUTORIALS

Friday, January 23, 2015

Prima "Epiphany" & Kaisercraft "Blue Bay" by Linda Eggleton

Hi everyone, and happy Friday to you all.
Yay it is almost the weekend....and a long one at that!

Happy Australia Day for Monday to all the Aussies :)

I am back this week with another layout created with the Epiphany collection from Prima.
I have really LOVED working with this collection...and feel that it pushed me a little outside of my normal scrapping style/zone.

My layout is based on this months Prima BAP


"Yesterday's Memories"

I started off with the Manifestation of Love paper and gave it a light dab with a sponge & some Gesso around the centre area of the page...just so that the writing & images on the paper were a little more subtle.  I then added some texture using Prima Flourish stencil & some modelling paste.  After that was dry I added some blobs of mists (one colour at a time) and held the page up so that they ran down the page....I then finished the background off by dabbing more mist randomly over the page with some clingwrap.


I've used the gorgeous flowers that are part of the Epiphany collection....as well as some oldies from my stash.


I've also used more of the Epiphany wood icons - which unfortunately have now sold out....BUT there are other Prima Wood Icons available in the online store that would work & look just as good!


Here is a shot of the gesso covered background & the runs of mist & stain


The "Dream" wood icon at the top of this pic....I lightly dabbed over it with gesso so that it wasn't so black....and the little round frame I coated in TH Distress spray stain - Tattered Rose.


These gorgeous little bird cages are fussy cut from the "At this Moment" paper and I have coloured them with a spray of Glimmermist.


The squares in under the photo area are stamped with Prima Stiched Squares stamps that I cut out from various Epiphany papers....and then I have added some more stamping on some of the squares using a variety of Prima background stamps, plus coloured them with mists as well as adding a few splashes here and there too.

I used a few strands of plain brown twine to create the circle frame around the photo & then used some of the black & white twine that comes in the Ephemera pack to wind around it & hold it all together nice & tight.

The pic is of my mum when she was a little girl about 2-3 years old.
I will be adding some journaling to the back of the page (when I get time!)


Next up I have some of my Kaisercraft DT work using the beautiful
First is a layout...

"This is Me"

This collection comes with quite a few papers that I just loved to cut up to use in my layers around the photo....All the doors that you can see come from the Sky Blue paper....which is covered in all these fabulous looking doors - all different sizes & colours <3 And also one of the specialty papers, having heaps of beautiful frames on it...some with verses inside them, and others just blank. Well, I cut some of those up too, to add in the layers as well....oh such fun! Some of the collectables pieces are doors & frames also.

I've used the Lattice template with modelling paste on the background....with some stamping using Rocks, Grid & Tiny Dot stamps


See how Kaisercraft paper blooms ALWAYS match with their paper collections?!
I think that's so cool...and so very clever! It's not like they produce new flowers to compliment each new paper collection....their paper collections just always go with their existing blooms....way cool!


I absolutely LOVE that ornate clock face that is in the Collectables pack....all that fine detail makes it look so real....and 3D - just magical.


Here you can see some of the frames & doors that I cut out, and a few of the diecut collectables pieces....I also used some of the Sea Breeze Captured Moments cards in my layering as well.


Here's a bit of a close up of the background stencil work & stamping...and one of the new Butterfly clear stickers that I've mounted on to white cardstock.


Blue Bay - Baltic P1736; Sea Breeze P1732; Sky Blue P1730; Azure Specialty paper PS386; Collectabales CT817; Sea Breeze Captured Moments 3×4 cards CM123; Sticker Sheet SS270; Blue Bay clear stamps CS203; Honey paper blooms F628; Sage paper blooms F632; Coconut paper blooms F627; Balloon wooden flourish FL437; Monochrome epoxy stickers ST911; Butterfly clear sticker ST915; Lattice template T610; Rocks clear stamp CS875; Tiny Dot clear stamp CS151; Grid clear stamp CS755

Other – Machine stitching; Twine; Cardstock; Archival Ink; vinyl button; Leaf die & punch; Butterfly punches


Next I have a beachy little mini album.....
"Kioloa 2013"
The cover is just a few layers of paper, with more layers using the Sea Breeze Captured Moments cards...then topped off with a few blooms, Collectables pieces & some punched leaves...and Kaisercraft alpha stickers for the title :)


Now for the inside of the album

I stuck to having photos only on one side of each page.... keeping the other side for journaling etc


I have mostly used papers from the Blue Bay paper pad....and on the journaling side of the page, I've used more of the Captured Moments cards


Some quick & easy journaling strips in a few different colours, helps to keep the page from looking so bland if I'd just used one colour.


Here I've used more of the doors & frames...the doors are cut from the Sky Blue paper & the frame is from the Collectables pack.


More use of the Sea Breeze Captured Moments cards...on both pages.  The photo side I've added the same card in behind the photo, that is used on the journaling side, where I've mounted it on a paper doily & embellished off to the side.


It doesn't take much to embellish the pages in a mini album like this...just a few little flowers (I found flat ones best, as they then didn't bulk up the page & make it difficult to  close), diecuts, chipboard pieces...such as the cute little 2Crafty butterflies, some stickers, and you're done :)


Here's some more 2Crafty chipboard...the circles are cut from the Circular Panel & I've placed them either side of the photo.


Again, using a few flat flowers to create a little cluster...and the butterfly is another from the
Butterfly clear sticker sheet.  I've added one of the Collectables pieces (a key lock), on top of the butterfly with a mini paperbloom on top of that to give the butterfly a bit more depth & definition on the page.


And this is the last page...using pretty much the same embellishments as previous pages, just arranged slightly different on the page.

You can see more closeups of the mini album over on my blog HERE
  
Blue Bay - Baltic P1736, Dew Specialty paper PS385, Paper Pad PP959, Sea Breeze Captured Moments 3×4 cards CM123, Collectables CT817, Sticker Sheet SS270, Blue Bay clear stamps CS203, Butterfly clear stickers ST915, Latte Pearls PL505, Coconut mini paper blooms F644, Iceberg mini paper blooms F647, Honey mini paper blooms F645, Sage mini paper blooms F649, Black mini paper blooms F661, Terracotta paper blooms F635, Black pearls SB793, Black rhinestones RS452
Other – 2Crafty chipboard, Flowers, Flair button, Wooden veneers, Paper clips, Paper doily, Vinyl buttons, Leaf die & punch, Butterfly punches, Skeleton leaves, Buttons, Kraft mini album

The Prima Epiphany collection is available in the AAS store HERE  
and the Kaisercraft Blue Bay collection can be found HERE 
 
I hope you have been inspired & thanks so much for visiting today!
Until next time... xx
 
 
Photobucket
 
Prima Marketing - Alphabet Letters
Prima Marketing - Stamps - Stitched Squares
Prima Marketing - Background Stamps - Various
Martha Stewart - Punch - Frond
Mont Marte - Gesso
Mont Marte - Modelling Paste

Tuesday, January 20, 2015

Kaisercraft XO Collection by Fiona Johnstone

Hello everyone

I have a confession to make... I have about half a dozen unfinished layouts sitting on my desk. They are often the result of being not quite finished at crop days or I push it aside to start something else, and there it sits in a tray on my desk waiting, waiting to be finished. They don't always get finished and sit at the bottom of the pile, almost forgotten about till I have a tidy up of my scrap room. 

Luckily for me todays photo was sitting in that pile, on a half completed layout, mainly because I wasn't happy with the paper I had used and it never came together properly. So I ripped it off that page and started again with these lovely papers from the XO Collection. 

This collection is designed with a  Valentines Day theme but can definitely be used for other styles of layouts as I have done with; 

Sweet Princess


For this layout I have used clear gesso over white cardstock and then created a watercolour background with inks, then adding in some stamping before layering the gorgeous XO papers, with some doilies and finishing it off with some embellishments from the XO range,  as well as a few other complimentary embellishments. 


A couple of close ups:


You can see my watercolour background, where I have used 2 colours - a glimmermist and a colorshine mist. Once dry I stamped over using stazon ink. The first part of my title "Sweet" is a die-cut from the collectibles pack, I have also used Kaisercraft Mini Blooms, a doily, a Green Tara flower and a flair button to embellish. 


On this side of my layout you can see more of the stamping and background work, then embellishments consisting of a paper doily ,  some stickers and collectibles from the XO range, a Heidi Swapp Butterfly and a chipboard key from 2Crafty.

Thanks for stopping by, hope you've been inspired to try out the XO range for more than just romantic layouts. 

Fiona
x


Photobucket
Products Used:
Kaisercraft XO Paper - Kisses
Kaisercraft XO Paper - True Love
Kaisercraft XO Paper - Be Mine
Kaisercraft XO Paper - 
Kaisercraft XO Collectibles
Kaisercraft XO Sticker Sheet
Heidi Swapp Dreamy Ephemera
Heidi Swapp Buzz Words Glitter Epoxy Stickers
Lawn Fawn Sequins
White Cardstock
Glimmer Mist Chalkboard - Cornflower
Heidi Swapp Color Shine - Blush
Stamps - Bo Bunny & Prima
Stazon Ink - Jet Black
Clear Gesso

Friday, January 16, 2015

More Prima Epiphany by Linda Eggleton

Hello everyone....Happy Friday to you all :)
I hate to say it, but the weeks seem to be rolling by way too fast already! 
 
I am back with another layout to share using the amazingly beautiful
 
I have really LOVED working with this range....it is so easy to add your own colours as a fair few of the papers are quite plain & basically like a blank canvas - which gives you the opportunity to experiment and have fun with adding some colour.
 
 
"Miss Molly"
Based on the January mood board at Scrap Around The World
 
 
As I mentioned above....I've used one of the plainer papers for my background & have added some masking with distress spray stain to add the pink netting background....and then some textured stencil work on top of that using Prima stone wall 3 stencil & some modelling paste.  Then to finish the background off, I've added some random stamping & some drips & flicks of a few different mists. 
I have gone for a bit of a vintagey feel to compliment the older photo that I've used.


For the cluster I've used a 2Crafty Leafy Round as the base, then added a variety of Prima, Petaloo & Green Tara flowers, as well as some of the Epiphany wood icons - The fobwatch, birdcage & key.
I coloured the 2Crafty Leafy Round with a light spray of Trunk Bay
glimmermist after coating it in gesso.


Another small cluster at the top of the photo...with more flowers, wood icons & the metal butterfly from the Ephemera pack. 
 

I have also coloured the 2Crafty Vintage border by first coating it in gesso & then giving it a light spray with Trunk Bay glimmermist.
 

Here's a bit of a close up of the background stencil & stamping work....I love my new Prima Stone Wall 3 stencil!
 
 The pic is of my Great Aunt Molly, from Ireland....who sadly I never had the privilege to meet, as she unfortunately died at a very young age :((( 
 
 
Well that brings another week, and another post to an end.
I hope you have been inspired by this GORGEOUS collection.
If papers like this scare you...as they sometimes did for me, I encourage you to take the plunge & explore & have fun with them!  I promise you won't regret it :)
 
Thanks so much for visiting today to view my work :)
Until next time....take care xx 
 
 
Photobucket
 
Prima Marketing - Epiphany paper - Clear as Day
Prima Marketing - Epiphany paper - At This Moment
Prima Marketing - Epiphany paper - Manifestation of Love
Prima Marketing - Epiphany paper - Words to live by
Prima Marketing - Epiphany - Ephemera
Prima Marketing - Epiphany Flowers - Manifest
Prima Marketing - Epiphany - Wood Icons
Prima Marketing - Epiphany Flowers - Unveil
Prima Marketing - Alpha Stickers
Prima Marketing - 12x12 Stencil - Netting
Prima Marketing - 6x6 Stencil - Stone Wall 3
2Crafty - Chipboard - Vintage Border
2Crafty - Chipboard - Leafy Rounds
Green Tara - Apple Blossoms - Ivory
Green Tara - Gardenia - Ivory
Petaloo - Botanica Minis - Teal
Petaloo - Darjeeling Mini Blossoms - Soft Grey
Tim Holtz - Distress Stain Spray - Tattered Rose
Tim Holtz - Distress Ink - Walnut Stain
Tattered Angels - Glimmermist - Trunk Bay
Tattered Angels - Glimmermist - Crushed Shells
Faber-Castell - Big Brush Pens
Unity Stamp - Cooped up Notes
Flair Button
Paper Doiley


Tuesday, January 13, 2015

Kaisercraft Blue Bay by Fiona Johnstone


Hello everyone
 
Continuing on with the Kaisercraft ranges for this month. This week I am creating with Blue Bay collection. This range is beautiful with lots of subdued colours in shades of green, navy, creams and browns. 
 
Loving these Moments


I've used strips of a variety of the papers to create todays page, which i have either torn or distressed. Then I have combined them with some gauze, doilies and stickers to add texture.  
 
The Kaisercraft flowers always go well with the paper collections. I have used sea breeze and  coconut paper blooms to create a small flower cluster, adding some leaves from my stash, threads from the gauze and a wood veneer heart I inked in pinecone.
 
 
I love all the quotes and sayings that come on the sticker sheet for this collection, and I have used one of these as a feature on my layout. You can also see some of the different texture layers I have tucked under the paper.


And last close-up is of my title. I have used a piece of 2Crafty chipboard which I have inked  in a couple of different colours - pinecone, seafoam and white inks to create this cool effect:


Thanks for stopping by
Till next week
Fiona
x


Photobucket 
Product List:
 
Kaisercraft Blue Bay Paper -Baltic
Kaisercraft Blue Bay Paper -Lagoon
Kaisercraft Blue Bay Paper - Placid
Kaisercraft Blue Bay Paper - Sky Blue
Kaisercraft Blue Bay Paper - Sea Breeze
Kaisercraft Blue Bay Paper- Shimmer
Kaisercraft Blue Bay Collectibles
Kaisercraft Blue Bay Sticker Sheet
Kaisercraft Paper Blooms- Coconut
Kaisercraft Paper Blooms - Sea Breeze
Kaisercraft Mini Paper Blooms - Sea Breeze
2Crafty Chipboard Title - Loving These Moments
Studio Calico Wood Veneer
Brown Leaves
Kaisercraft Stamp - Tiny Dots
Bo Bunny Text stamp
Gauze
Paper Doily
inks


Friday, January 9, 2015

Prima Epiphany - By Linda Eggleton

Hello everyone & welcome.
 
Today I'm back to share another page created with Prima Marketing Epiphany collection, this time using one of the papers that has some gorgeous colours through it.
 
 
"The Secret Grotto"
 
This time I've used the "Clear as day" paper for my background, which has these gorgeous subtle golden autumn tones, so I didn't need to add any colour to the background for this one, as these colours suited my photo perfectly :)  I have added some textured stencilling using one of Prima's Flourish stencils & some modelling paste.  I have trimmed a small amount off the outer edges of the Clear as day paper & then mounted it onto the black "Divine exposure"
paper, giving it a thin black border.


Here I've used another of the Ephiphany flowers along with some beautiful Green Tara flowers from my stash to form a cluster, with a 2Crafty Berry Branch that I cut into 2 pieces and branched out either side of the cluster.  I lightly inked the Berry Branch in Kaisercraft Vintage ink.


I've added a few cut up strips of mesh tape that I coloured with Mr Huey's Pumpkin Spice mist by painting it on with a small brush.


I have used more pieces from the Ephimera pack in & around the page...the butterfly that I've placed partly under the corner of the photo & the little card that you can see poking out of both sides of the photo - I cut this in half & placed at both ends.
 
Hopefully you can also see the flourish stencil work on the background here.


For my paper layers, I cut a variety of rectangle shapes & layered them under & over each other until I was happy with the design....I then outlined each with a brown journal pen & also stamped some patterns on some of the plainer papers, before adding the photo & embellishments.
 
And here's more of the stencil work on the background.....plus some of the gorgeous gold sequin's that come in the Ephemera pack <3


 And here's a close up of the main area of the page....I forgot to mention earlier that the little fob watch in the cluster is from the Wood Icon's pack.
 
Thanks so much for taking the time to check out my work...I hope you have been inspired :)
xx
 
 
Photobucket
Products used: 
Prima Marketing - Epiphany paper - Clear as Day
Prima Marketing - Epiphany paper - Words to live by
Prima Marketing - Epiphany paper - Manifestation of love
Prima Marketing - Epiphany paper - At this moment
Prima Marketing - Epiphany paper - Divine exposure
Prima Marketing - Epiphany flowers - Manifest
Prima Marketing - Epiphany - Ephemera pack
Prima Marketing - Epiphany - Wood Icons
2Crafty - Chipboard - Berry Branch
Petaloo - Darjeeling Mini Blossoms - White
Kaisercraft - Mini Paper Blooms - Honey
Green Tara - Organza Flowers - Ivory & Latte
Kaisercraft - Alpha Stickers - Natural
Fancy Pants - Alpha Stickers
Prima Marketing - Stencil - Flourish
Kaisercraft - Stamp - Tiny Dots
Kaisercraft - Stamp - Crackle
Kaisercraft - Stamp - Script
Mr Huey's - Colour Mist - Pumpkin Spice
Mesh Tape
Modelling Paste
Staedler - Journaling Pen - Brown
 

Tuesday, January 6, 2015

Kaisercraft 2 Cool 4 School by Fiona Johnstone

 
Hello and Happy New Year to you all
 
I hope you all had a lovely break over Christmas and the New Year and managed to get some scrappy time! This month I am creating with the latest releases from Kaisercraft, and the first range I will be sharing with you is the school collection: 2 Cool 4 School. 

Obviously this range is very suited to school photos and I do love to get these ones scrapped, and the range is perfect with lots of brights and some black to go with most school uniform colours. But because of the bright colours, it will work perfect with lots of other photos too. 
 
My first layout is: Year 3 


This background chalkboard paper is so cool, I love the chalk duster marks that are already on it. All I have added to the background is a small amount of stamping which I did lightly in white ink so it replicated the chalk style.  I've used Kaisercrafts Number stamp and the Bo Bunny text stamp. 
 
Close up of some of my embellishments. The cute book stack with an apple and the documented tag are from the Kaisercratt Collectibles pack, as always they have the perfect complimentary embellishments. I have added this cute light bulb button from Jillibean Soup.  You can also see a bit more detail of the stamping - the number stamp at the bottom and the text stamp alongside the text paper.
 
 
On the other side, some film strip from my stash, a Flutterby Designs flair button , Maya Road Camera and more Collectibles. I love the cute pencil!!
 
 
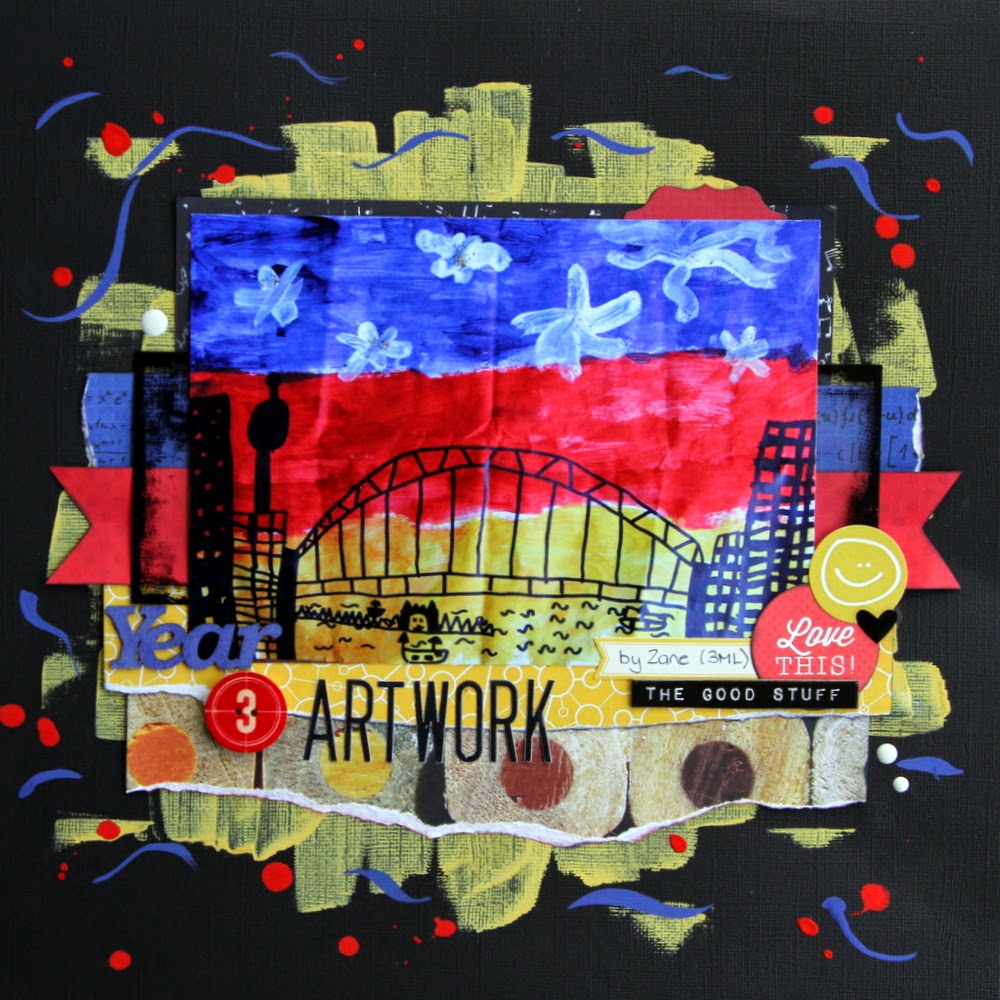
My second layout is: Year 3 Artwork

 Loved this painting that Zane bought home from school amongst all his end of year stuff and it currently has pride of place on our fridge. I was inspired by all the pencils and other arty stuff on the patterned papers to scrap his artwork, so I photographed it and here it is. I splashed some paints around to correspond with the primary colours in his painting.
Some close-ups:

A clusters of a variety of embellishments, sticking to the primary colours theme with the pops of black!


Once again I have used the 2Crafty word "Year" from the Mini School Year Titles pack, combined with a Jillibean button and some alpha stickers to create my title.


Thanks for stopping by and I hope you are inspired to scrap both those school photos and non traditional school photos with this range.

Till next week
Fiona
x
Photobucket 
Products Used:
 
Year 3
 
Kaisercraft 2 Cool 4 School Paper - Art
Kaisercraft 2 Cool 4 School  Paper - English
Kaisercraft 2 Cool 4 School  Paper - Mathematics
Kaisercraft 2 Cool 4 School Paper - Science
Kaisercraft 2 Cool 4 School Paper - Social
Kaisercraft 2 Cool 4 School  Collectibles
Kaisercraft 2 Cool 4 School Sticker Sheet
Jillibean Soup Wooden Nickels - Journal
Maya Road Metal Vintage Trinkets Camera
2Crafty Mini School Year Titles 
Flutterby Design 1" Flair - Design 162 
Studio Calico Wood Veneer
Bo Bunny Stamp
Kaisercraft Texture Stamp - Numbers
White Ink
 
Year 3 Artwork
 
Kaisercraft 2 Cool 4 School  Paper - English
Kaisercraft 2 Cool 4 School  Paper - Mathematics
Kaisercraft 2 Cool 4 School Paper - Science
Kaisercraft 2 Cool 4 School Paper - Drama
Kaisercraft 2 Cool 4 School  Collectibles
Jillibean Soup Wooden Nickels - Travel
Jillibean Soup - Soup Labels
Simple Stories DIT Boutique Insta Clear Stickers
2Crafty Mini School Year Titles  
Heidi Swapp Hello Today Cardstock Stickers - U Rock 
Heidi Swapp Alpha Stickers
Kaisercraft Overlay
 Teresa Collins Santa's List Enamel Dots
Black Cardstock
Paints


Friday, January 2, 2015

Prima Epiphany - By Linda Eggleton

Hello everyone & Happy New Year!!!
I hope everyone has had an amazing Christmas & wish you all a safe & happy 2015.
 
 
Today I have a layout to share using the stunning Epiphany collection from Prima,
and I have to say, that it has been a joy to work with these beautiful papers & patterns.
Sometimes these kinds of papers scare me...lol!  I don't know what it is, perhaps it's the patterns of the papers, or that there's not much of a variety of colours?  I don't know exactly what it is, but I have been pleasantly surprised and loving my finished pages so far....and I think I may have started to overcome my fear of them & have learnt that it is easy enough to add your own colours in both background work & embellishments.  These types of papers are really just like a blank canvas for us to add our own little touch to :)
 
 
" Fun Lovin' "
 
I have used the reverse side of the "words to live by" paper - which is a fairly plain paper, but has a soft subtle dusty pink flourishy kind of pattern over it.  It also has a kind of white-wash effect that covers some of the pattern.  It is a really beautiful paper, hence the reason
I've used it for my background :) 
 
I added some light random stamping to compliment the colours in the photo - Kaisercraft Morocco stamp used with a Blueberry Gelato.  Then I mixed some Butter Cream Gelato with water & used some scrunched up gladwrap to randomly dab it around the page, and also splashed a few drops of different colours mists around as well, before adding a bit of texture with one of the new Memory Box stencil's - Scraped Paint.  I love the soft subtle effect this stencil gives.
 
(see list of products at the bottom of this post with links to each product in the AAS store)


The flowers that are part of this collection are truly beautiful!  I've used a couple on the page & have mixed them with some Green Tara flowers as well.  I cut one of the gorgeous birdcages from the "At this moment" paper to add into the cluster of flowers....and there's also one of the Epiphany wooden icons, which is a cute little bow.


I started off by cutting out some of the postcard type patterns from the same "Words to live by" paper (I'm lucky enough to have 2 of each paper, so I get to use both sides), and then layered them in under the photo and also added some other pieces, including the cut off strips from the bottom of the papers....plus there's some pieces from the Ephemera pack too.
 
It's a bit hard to see here, but hopefully you can see the effect of the scraped paint stencil on the background.


For the main cluster, again I've used Epiphany & Green Tara flowers, along with more of the wooden icons - the little birdcage, the key & the black circular frame.  The ephimera pack also comes with a few metal pieces, and I've used the little clock face that I've placed in the centre of the black frame.


Here is another view of the stamping & stencil work.


The beautiful heart frame is a 2Crafty piece - Hand-Drawn Heart Frame....and comes in a pack of 2.
I have used the larger one & have coated it with Gesso, then coloured it with
Kaisercraft Petal Pink ink.
 
 
This really is a BEAUTIFUL paper collection, and I hope you have been inspired by it.
Thanks so much for dropping by to see my work :)
 
Until next time....Happy Scrapping! xx
 
 
Photobucket
 
Prima Marketing - Epiphany paper - Words to live by
Prima Marketing - Epiphany paper - At this moment
Prima Marketing - Epiphany paper - Manifestation of love
Prima Marketing - Epiphany - Ephemera
Prima Marketing - Epiphany Flowers - Paper Manifest
Prima Marketing - Epiphany - Wood Icons
Green Tara - Apple Blossoms - Ivory
Green Tara - Gardenias - Pink
Green Tara - Cherry Blossoms - Blue
Green Tara - Cherry Blossoms - Pale pink
2Crafty - Chipboard - Hand-drawn Heart Frame
Flutterby Designs - Flair - Design 200
Memory Box - Stencil - Texture Scraped Paint
Kaisercraft - Texture Stamp - Morocco
Tattered Angels - Glimmermists
Prima Marketing - Chalk Ink - Pastel Blue
Prima Marketing - Alpha Stickers
Kaisercraft - Ink Pad - Petal Pink
Modelling Paste
Gesso
Faber-Castell Gelatos
Punchinella