HOMEABOUT USSHOP HERECROPDATESCURRENT CHALLENGESTIPS&TUTORIALS

Tuesday, May 12, 2015

Kaisercraft Scrap Yard by Fiona Johnstone

Hello everyone

Today I am sharing another of the Kaisercraft Collections. Where last weeks was super bright, this weeks is super grungy!

When Life Gets Tough put on your Skates

The background is already super grungy, but I added a bit more with some white gesso, stamping and black gesso flecks and splashes. My title is made from a quote on the sticker sheet, I changed the ending to skates with Thickers.


My layers are ripped pieces from the patterned paper collections, I've torn one that says Life is Good and used the word Good and Life either side of the photo. After the paper layers were down,  I applied some washi tape and some stickers from the sticker sheet to the layers. I applied a quick coat of clear gesso over the sticker and washi to help my stamping to stick to the shiny surface. 

The collectibles pack contains a bunch of cool cogs which make a fab embellishment for grungy pages. I have used the cogs, as well as some black thread and a wood veneers to embellish my layout. On this side a wood veneer geotag teamed up with the cogs and some thread:


The reverse side of my layout, another cog and some more veneer, this time in the shape of chevrons, some more black thread  and then finishing with a flair button. I've added a couple of staples to the layout too for some added texture. 


Thanks for stopping by,

Till next week
Fiona
x
Photobucket
Kaisercraft Scrap Yard Paper - Copper 
Kaisercraft Scrap Yard Paper -  Garage
Kaisercraft Scrap Yard Paper -  Blue Print
Kaisercraft Scrap Yard Paper -  Rusty
Kaisercraft Scrap Yard Paper -  Warehouse
Kaisercraft Scrap Yard - Collectibles 
Kaisercraft Scrap Yard Sticker Sheet
American Crafts Thickers
Studio Calico Wood Veneer Shapes
Washi Tape
White Gesso
Black Gesso
Kaisercraft Texture Stamps - Chevron
Kaisercraft Texture Stamps - Number
Kaisercraft Texture Stamps - Edges
Kaisercraft Texture Stamps - Grid
Bo Bunny Stamps
Black Ink
Pinecone Versacolor
Black Cotton Thread
Flair Badge

Friday, May 8, 2015

More Echo Park "Jack & Jill" by Linda Eggleton

Hi everyone & welcome to another week of creating :)

I am back with another layout that I've created using the Boy side of 

Again, there's lots of gorgeous colours used...grey's, blue's & orange, which all make up a 
fab masculine colour combo.


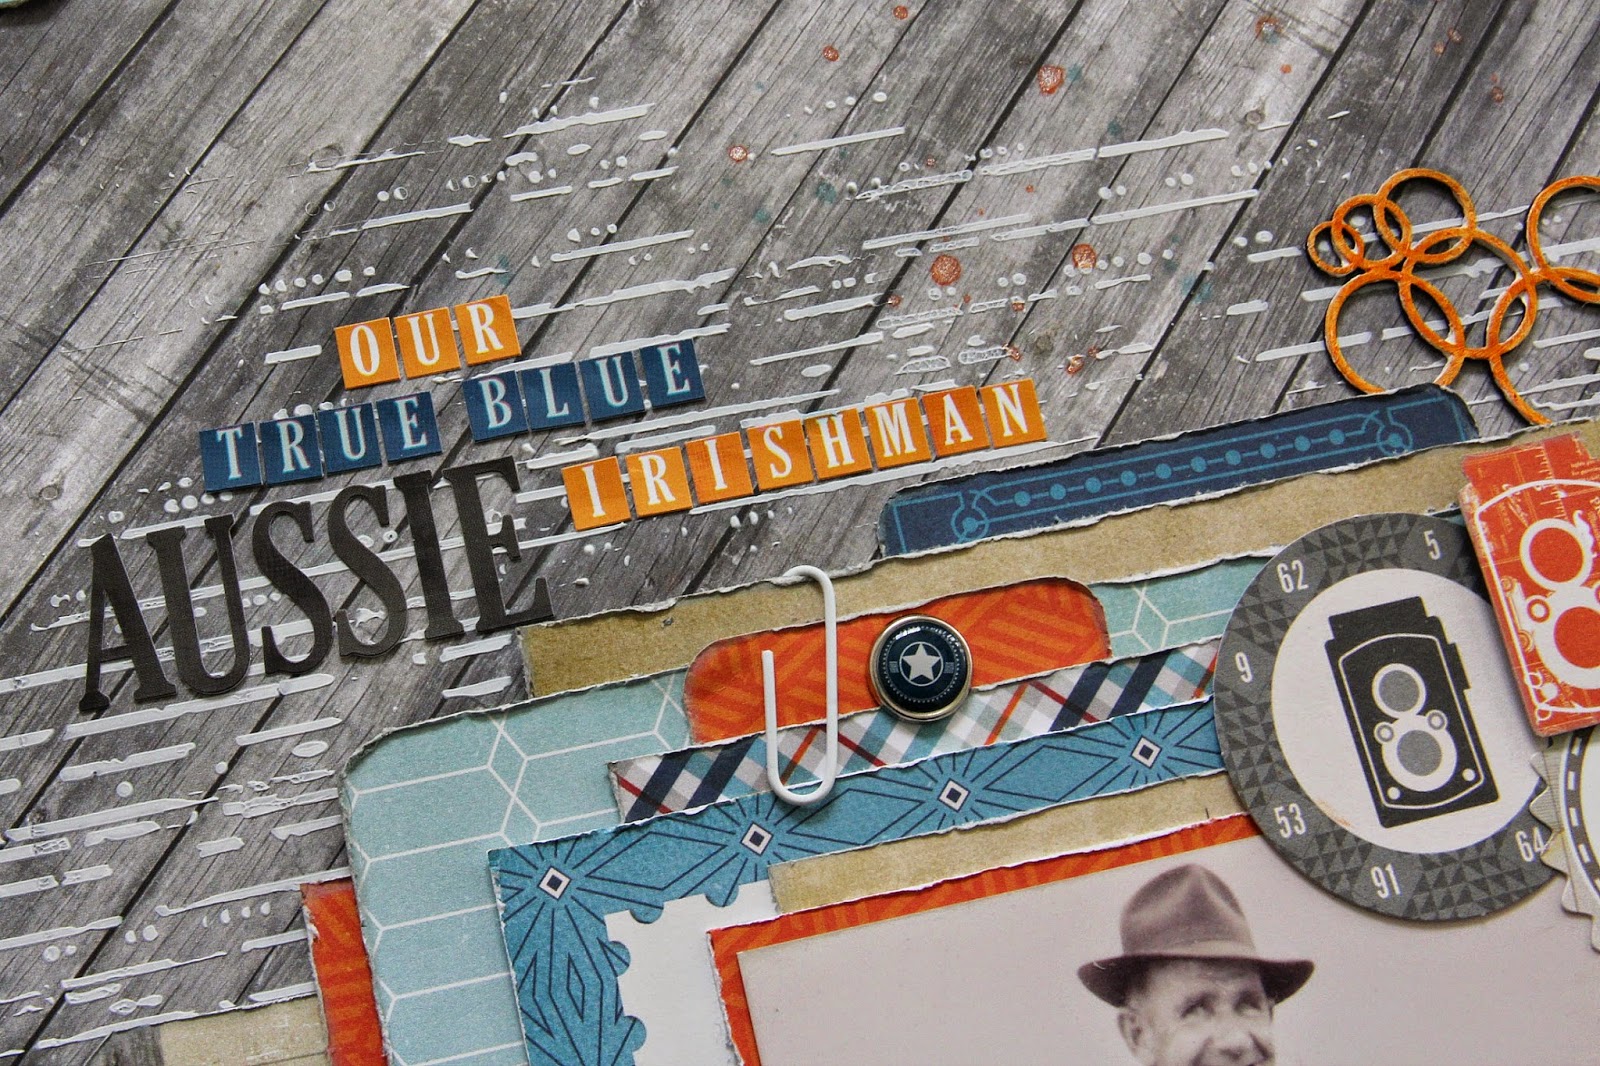
"Our True Blue Aussie Irishman"

I have used the reverse side of the Stamps paper for my background piece...which has all those super cool weathered timbers running diagonally across the page!  I then added a small amount of stencil work with modelling paste once I worked out where my photo & papers would go. 


I layered up a variety of papers & diecut pieces from the Ephemera pack, distressing all the edges...and then playing around with them until I was happy with the look.  I then started adding my embellishments....here you can see some pieces from the Ephemera pack, sticker sheet & camera cut from the Camera paper....and of course, some 2 Crafty chippies - Bubble Clumps, that I've coated in gesso & then coloured with an orange big brush pen....which is just like colouring in! :)

I have placed a few of the pieces in the cluster up on foam tape for some added height.


The grey tag was cut from the Adventure paper, and I then used another tag from the Ephemera pack to group them together.  The little horse piece was cut from the tag that is tucked in under the grey tag....I didn't want this hidden in under the layers, as horses were a huge part of my Great Uncle's life, so I felt it was very fitting to be part of the page.  I've also used more of the 2 Crafty Bubble Clumps & some of the Decorative Brads & another camera cut from the Camera paper.


The "Take Note" piece was a frame from the Ephemera pack that I cut in half & placed a piece at either end of my paper layers.  I've also added a few stickers from the Alpha Sticker Sheet & a 2 Crafty arrow that has been coloured with the big brush pens.  

I have added a few torn strips of the Ruler Decorative Tape in amongst the layers.


The title is using all the different alpha's from the Sticker Sheet.
I have used a corner punch to round the corners on a few of the papers in my layering...and also to create a few little tabs that are poking out here & there.  I've also added another of the decorative brads grouped with a paper clip over one of the tabs.


Across the top of the page I've added a strip of paper from the Explore paper & then added one of the diecuts from the Ephemera pack & another camera cut from the Camera paper, which is up on foam tape to add some height.


Here is a close up of the main area of the page.
To finish the page off, I decided to add a few flicks of glimmermist to the background, so I covered the photo area with a scrap piece of paper & then started adding the orange & blue mists.
I have my main journaling on the back of the page.


I do hope you have been inspired :)
You can find this fantastic collection in the AAS store HERE

Thanks so much for dropping by today...xx


Photobucket
Products used:-
Echo Park - Jack & Jill Boy - Stamps paper
Echo Park - Jack & Jill Boy - Bicycle paper
Echo Park - Jack & Jill Boy - Travel paper
Echo Park - Jack & Jill Boy - Pool paper
Echo Park - Jack & Jill Boy - Plaid paper
Echo Park - Jack & Jill Boy - Explore paper
Echo Park - Jack & Jill Boy - Camera paper
Echo Park - Jack & Jill Boy - Ephemera Die Cuts
Echo Park - Jack & Jill Boy - Decorative Brads
Echo Park - Jack & Jill Boy - Alpha Stickers
Echo Park - Jack & Jill Boy - Decorative Tape - Ruler
2Crafty Chipboard - Bubble Clumps
2Crafty Chipboard - Assorted Arrows
Memory Box Stencil - Scraped Paint
Tim Holtz Distress Spray Stain - Tumbled Glass
KAISERmist - Orange
Mont Marte Modelling Paste
Faber-Castell - Big Brush Pens
Paper Clip
Twine

Tuesday, May 5, 2015

Kaisercraft Say Aloha by Fiona Johnstone

Hello everyone
 
 
New month, new KC releases. Three very different collections this month. To start the month off I am using the Say Aloha collection. I hope you are ready for BRIGHT!!
 
Do Your Thing:
 

When I took this photo of Lily before her Dance Concert this year, I thought it might be near impossible to scrap, then along came this perfect collection, using a colour combo I adore, but rarely scrap - Pink & Green!! Love how this very bright version of this colour combination just pops with the addition of black. 
 
A couple of close-ups. 
 
 
How cute is this flamingo? Love them and there are quite a few in the collectibles pack, as well as being on the sticker sheet and on a patterned paper . So fun! I've teamed it up with a circle quote from the collectibles pack which I have matted from the B side of one of the patterned paper. 


And a final close-up, a few more pieces from the collectibles pack and the heart from the sticker sheet, then finished off with another daisy part and some cotton thread in hot pink. 
 
 
Thanks for stopping by
Till next week
Fiona
x
Photobucket
Products Used:

Kaisercraft Say Aloha Paper - Island 
Kaisercraft Say Aloha Paper - Papaya 
Kaisercraft Say Aloha Paper -Pina Colada
Kaisercraft Say Aloha Paper - Flamingo
Kaisercraft Say Aloha Paper - Rainforest
Kaisercraft Say Aloha Sticker Sheet
Kaisercraft Aloha Collectibles 
Crate Paper - Fabric Bow
Studio 490 Embossing Paste - Translucent
Tim Holtz Distress Spray - Pickled Raspberry
Crafters Workshop Tile Texture 12 x 12
American Crafts Thickers
Kaisercraft Green Daisy
Cotton Thread

Friday, May 1, 2015

Echo Park Jack & Jill & Kaisercraft Oh So Lovely - By Linda Eggleton

Good morning everyone & welcome to May!  
Eeeek, this year seems to be flying by at an incredible pace....soon it will be you.know.what!

This month I will be creating with the fabulous boy side of Jack & Jill from Echo Park.
This collection would suit any kind of masculine page....whether they be little boys or big boys, it has a great range of papers/patterns & embellishments to suit both.  I am really looking forward to playing with it over the coming weeks :)

So here is my first layout for the month....


"Summer of 63"

I have used the reverse side of the Camera paper for my background & once I worked out the placement of my photo & paper layers, I then added some random stamping using Kaisercraft stamps & my Big Brush Pens -  The KC stamps are Tiny Dots & Numbers.  I then splashed around a few different coordinating colours of mists/spray stains

I was lucky enough to get 2 of these papers, as I also wanted to be able to use the front side with all those fabulous cameras on them. They are perfect for cutting out to use as embellishments.  I always try to get 2 of a particular paper when I really like both sides - especially if it is suitable to use as a background piece!


There are so many fabulous embellishments that come with this collection....here I've used pieces from the Ephemera pack, decorative brads, stickers & the ruler decorative tape...which I love!
There is also one of the cameras that I've cut out from the Camera paper in amongst my small cluster.


The little banners are a mixture from both the Ephemera pack & sticker sheet.


How gorgeous is the big square sticker with the saying about wanting to be like Dad when I grow up!!
I normally would struggle with a sticker this size, but it seemed to fit just perfectly there on my page!
I have coloured the 2Crafty mini hot air balloon with my Big Brush Pens after giving a coat of gesso first.  I love that these pens allow you to colour things without losing the detail of the chipboard!

At the top left is another of the cameras cut out from the Camera paper....there is a great variety of different styled & coloured cameras on this piece.....you can be sure to see lots of 
them over the coming weeks :)


Again I've coloured the 2Crafty fast forward arrows with a grey big brush pen....and I've backed each of the pieces with some of the orange PP to help them stand out more on the page.

The white grid piece behind the photo is actually the packaging cardboard 
that comes in the Ephemera pack :)


Here's a bit of a close up of the stamping on the background.


After I had finished the page, I wasn't quite happy with the look of it, so I decided to add some strips of the Ruler decorative tape extending out from the sides of the paper layers....which I think finished it all off nicely :)


Next I have some of my Kaisercraft DT work with the very pretty 

This is a super pretty collection....just gorgeous in colour, patterns & all the bits & bobs that come with in the Collectables pack, sticker sheet etc etc.


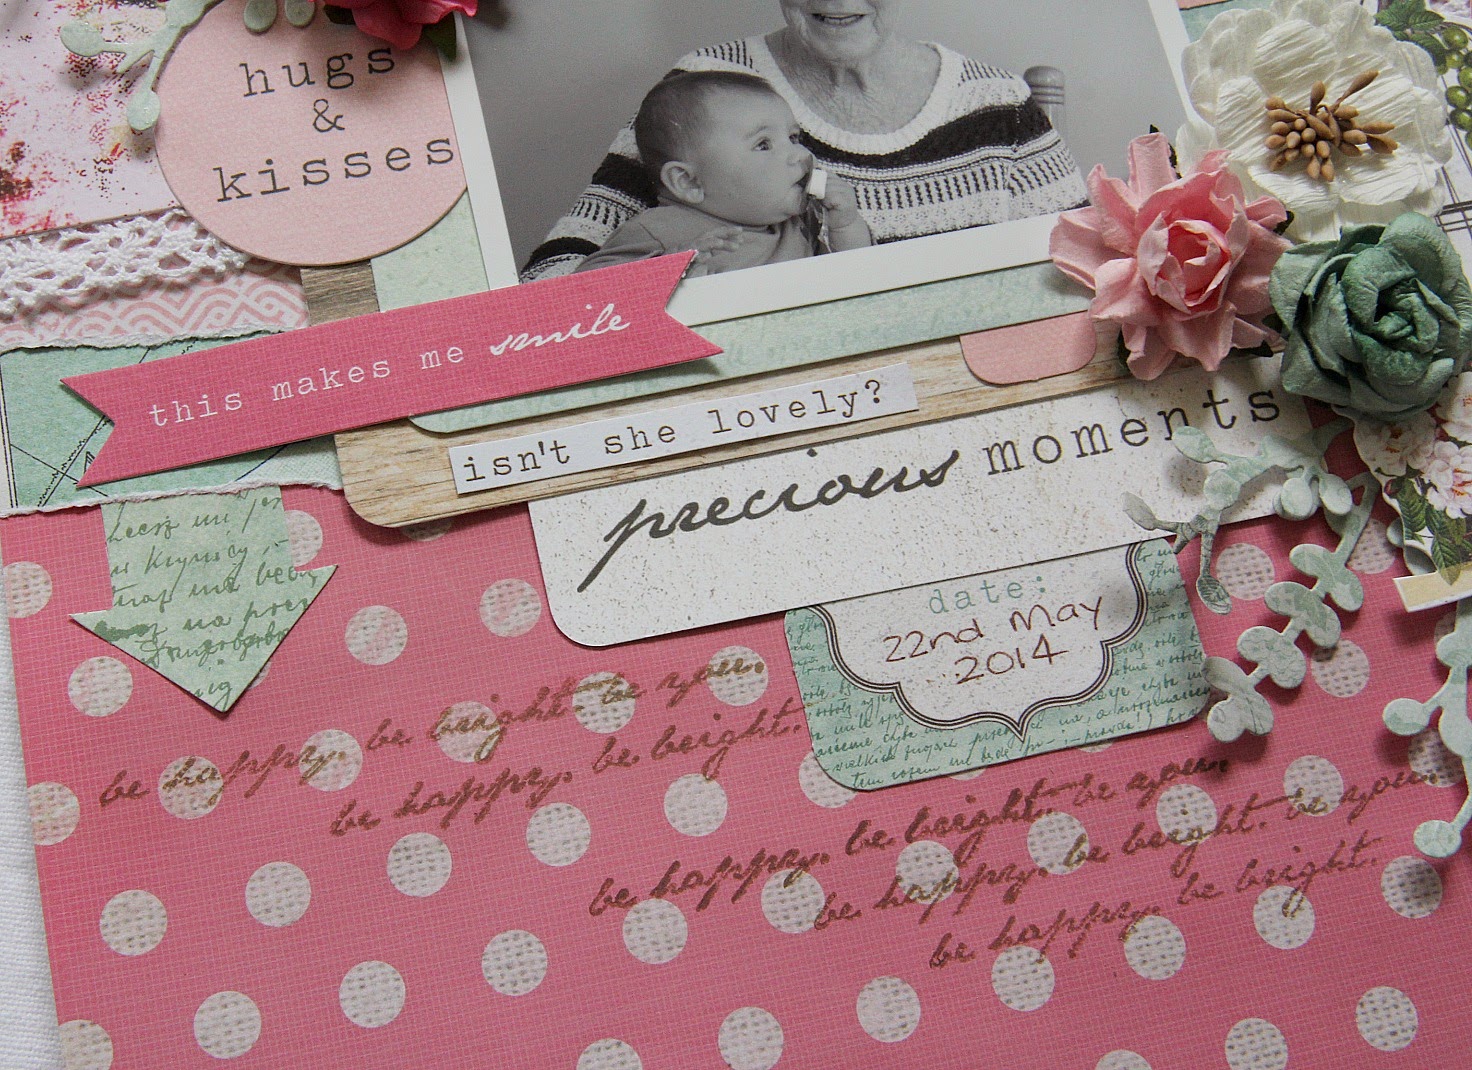
"Precious Moments"

I couldn't go past using the gorgeous pink & white spotted Femme paper 
as my main background piece.


And how adorable is this cute little diecut birdcage from the Collectables pack?!?
I've used it as the main piece for my cluster, with some added blooms, diecut leaves using the Berry Vine Decorative Die & some more Collectables & Sticker pieces.


I added some random stamping on the background using one of the stamps from the Oh So Lovely clear stamp set....and here you can also see more collectables & sticker pieces layered in with the papers.  I have also used a few of the 6x4 Pretty Little Things 
Captured Moments cards under the photo.


Another small cluster of blooms, Collectaables pieces & diecut Berry Vine leaves.
AND how totally gorgeous is that printed map paper at the top of the page?!?  It is on the reverse side of the Lass paper - Love it!


I have added a strip of KC white lace in between my paper layers for a bit of added texture & I've also used one of the cut off strips - the deep pink ruler piece for a 
little bit of added contrast & interest.

The cute little dragon flies are from the Collectables pack & I've popped them up on some foam tape to give them a bit of height off the page.


Kaisercraft Products:  Oh So Lovely – Femme P1790, chic P1793, Ladylike P1788, Lass P1795, Paper Pad PP965, Captured Moments 4×6 cards – Pretty Little Things CM327, Collectables CT823, Sticker Sheet SS278, Clear Stamp Set CS211, Berry Vine decorative die DD522, White Lace EM926, Fairy Floss paper blooms F640, Hot Pink paper blooms F663, Sage paper blooms F632

Other: Flowers, Tag, Border Punch, Brown Big Brush Pen, Twine


Next is a card....

Using lots of yummy pretty things from this beautiful collection.
The birdcage this time is one of the stamps that comes with the Oh So Lovely clear stamp set - this is one of those must have type stamps!  


A few different blooms & Collectables diecuts, as well as the diecut pieces from the paper pad, and stickers from the sticker sheet.


Again I've used a few of the Pretty Little Things Captured Moments cards to create my layers .

Kaisercraft Products:  Oh So Lovely – Lass P1795, Chic P1793, Collectables CT823, Sticker Sheet SS279, Paper Pad PP965, Clear Stamp Set CS211, Captured Moments 4×6 cards – Pretty Little Things CM327, Fairy Floss paper blooms F640, Sage mini paper blooms F649, Hot Pink mini paper blooms F668,  Berry Vine Decorative Die DD522,  Foam Tape T303

Other: Flower, Border Punch, Cardstock, Archival Ink
That is all from me for another week :)
I do hope you have been inspired by both of these collections....one for the boys & one for the girls!
The Jack & Jill collection is available in store HERE
There is also a list of products used with links at the bottom of this post.
And the Kaisercraft Oh So Lovely is available HERE
Thanks so much for stopping by to see my work :) xx
Photobucket
Products used - "Summer of 63" layout
Echo Park - Jack & Jill Boy - Camera paper
Echo Park - Jack & Jill Boy - Pool paper
Echo Park - Jack & Jill Boy - Plaid paper
Echo Park - Jack & Jill Boy - Adventure paper
Echo Park - Jack & Jill Boy - Alpha stickers
Echo Park - Jack & Jill Boy - Ephemera die cuts
Echo Park - Jack & Jill Boy - Ruler decorative tape
Echo Park - Jack & Jill Boy - Decorative brads
2Crafty Chipboard - Mini hot air balloons
2Crafty Chipboard - Fast forward arrows
Flutterby Designs - Flair Button
Kaisercraft Texture stamp - Tiny Dots
Kaisercraft Texture stamp - Numbers
KaiserMIST - Orange
Tim Holtz Distress Spray Stain - Weathered Wood
Tim Holtz Distress Spray Stain - Tumbled Glass
Faber-Castell - Big Brush Pens

Tuesday, April 28, 2015

Kaisercraft Chase Rainbows by Fiona Johnstone

Hi everyone
 
Back with my last pages for this month and today I have a layout to share using the new Kaisercraft Chase Rainbows from their April release. If you love super bright fun papers then this collection is for you! I'm a big fan of brights and love these papers. There are a few ready made background papers in this collection too, so all the work is done for some quick layouts.
 
 
Dream Big:
 
I enjoy getting messy so have created my own background here with some Dylusions and water and some blue sploshes using watered down gelato. Then I've added some stamping in navy and green to compliment my bright orange background.


Lots of paper layering, and I've also used some of the collectibles pack to add some more layers.
 
Some close-ups:
 
 
Layers, stamping and fabulous 2Crafty title Dream Big.
 
And love these quotes on the latest sticker sheets:
 
 
The collectibles are always great for a few wise words too:
 
I've also got one last Disney inspired page to share. This one is using the Say Cheese II collection, just can not get enough of it.
 
Meeting Pluto
 
 
Another character meeting, Pluto this time, just with Lily as we'd just visited Goofy and were off to go on some rides, so Zane wasn't interested. These papers were perfect colours of course and I love the touches of gold, so couldn't go past using them.
 
Embellishments from the Say Cheese Collection and some glittery stars from Studio Calico that added a nice touch.


The stickers are from the original Say Cheese collection, anything from the previous range will go perfectly with version II. I've used some lush, red velvet Thickers for my title.
 
 
 Thanks for stopping by and I hope I've inspired you this month to scrap some Theme Park layouts and check out the new Kaisercraft collections.
 
Back again next week for a new month and new goodies!!
 
Fiona
x
 
Photobucket

Friday, April 24, 2015

My Minds Eye Hello World & Kaisercraft Antique Bazaar by Linda Eggleton

Hi everyone :)

Today I am back to share one last layout for April using My Minds Eye - Hello World.
Plus I have a few of my Kaisercraft "Antique Bazaar" DT work to share as well.


Using some of the leftovers from the Hello World collection, I've created a page titled

"Leaving on a Jet Plane"

I have used the My Travels paper for the background & added some textured template work & stamping.  I started off with the circle pieces that I cut from the reverse side of the World Map paper & then worked my layers up from there until I was happy with the placement, 
before I started embellishing.


The layers mostly consist of varying sized strips of different patterned papers and I've used a corner punch to round off the corners.  Here you can see a small cluster of pieces from the Mixed Bag of diecuts, as well as some 2Crafty Fast Forward Arrows & the airplane from the 
Hello World Wood Veneer pack.  I have coloured the 2Crafty Fast Forward Arrows using my new Faber-Castel big brush pens.


Again, more pieces from the Wood Veneer pack (This pack has HEAPS of pieces in it, so there's plenty to go around!), the Mixed Bag diecuts & some stickers from the pack of 6 sticker sheets.


I have also created another cluster at the opposite corner of the photo using more pieces from the Mixed Bag, Sticker sheets & Wood Veneer pack.


Here I have used a HEAP of the banner & tag pieces from the Mixed Bag to create a travel themed banner across the top of the page with some twine.

Title is made up of alpha stickers from the Sticker Sheets.


And here is a close up view of the main area of the page.

I hope you have been inspired by this fun collection!


Next up is my DT work for Kaisercraft using the new release for April, Antique Bazaar.

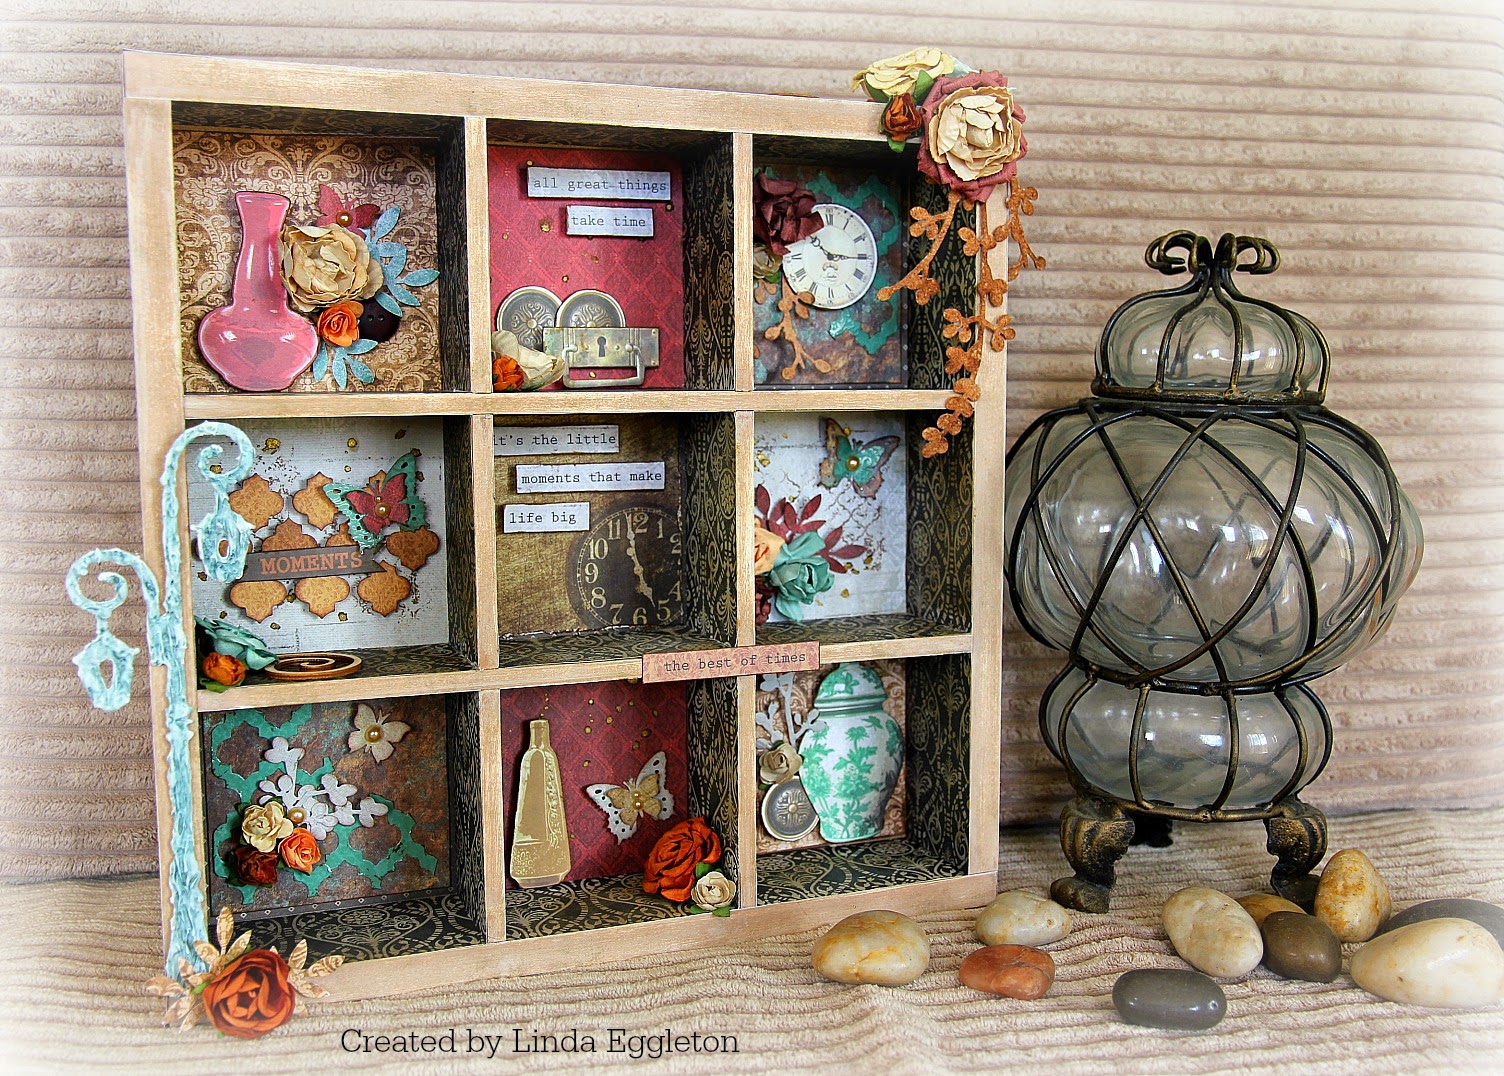
My first project is a BTP  Shadow Box shelf

I've used a variety of papers from the paper pad as the background for each of the divided squares in the shadow box & then have embellished each one differently using mostly pieces from the Collectables pack....which is full of fabulous pieces, such as items 
one might expect to find at an antique bazaar :))))


I painted all the front edges of the shadow box in 2 different Kaisercolour paints - Antique White & Mocha...and then finished it off by lightly inking with Kaisercraft Bark ink pad.  

I covered the outside edges of the box in the Barter paper and the inside columns 
& shelves with the Gather paper.


Here is a close up of some of the decorated squares of the shadow box.
More closeups of all of the decorated squares can be seen over on my blog HERE


Here I've used the new Lattice decorative die that I've cut into a smaller piece to use on the background with a Collectables clock face, more paper blooms & some Berry Vine die cut leaves.


I have added some random stamping on the plainer paper and also splashed around some of the new Kaisermist in Antique gold....which goes perfectly with the colours of this collection!
Again I've used the Lattice decorative die to make the background for this box....but this time I've used the negative pieces of the lattice that would normally just get thrown away!  I've popped them up on some foam tape to give a bit of dimension and finished off with a another Collectables piece & some punched butterflies.


This is my favourite of the urn pieces....and I've added some more diecut Berry Vine leaves, along with another Collectables piece & a mini paper bloom.


Across the top right hand corner of the box I've added a small cluster using a few different coloured paper blooms, a wooden flourish & some more of the Berry Vine decorative die leaves that I cut from a piece of Kaisercraft cork sheeting.


Kaisercraft Products: Antique Bazaar – Gather P1803, Barter P1805, Paper Pad PP966, Collectables CT824, Sticker Sheet SS279, Lattice Decorative Die DD709, Berry Vine Decorative Die DD522, Street Lamp Decorative Die DD513, Honey paper blooms F628, Sage paper blooms F632, Ruby paper blooms F636, Terracotta paper blooms F635, Honey mini paper blooms F645, Terracotta mini paper blooms F652, Latte Pearls SB715, Flutter clear stamp CS853, Antique Gold Kaisermist KM102, Cork Sheet CB152, Flourish Swirls pack SB729, Antique White Kaisercolour KC002, Mocha Kaisercolour KC049, Bark Ink IP724, Foam Tape T303
Other – Butterfly punches, Leaf punch, Button, Distress Ink, Modelling Paste, Mists


"The Acropolis"
Oh how I love these colours!
I used the Restore paper for my background & have added some template work using the Kaisercraft Lattice template and Kaisermist Antique Gold that I sponged on randomly....and I really love the subtle effect this gives, rather than the bold effect given when spraying the mists directly over the template.  I've also added some random stamping on the background using the Antique Bazaar clear stamp set.
And this time I've used a much larger piece of the Lattice decorative die as a background feature in behind the photos - this is a really cool die that I know will get lots of use from me!  
It's definitely a must have :)))


A few paper blooms in coordinating colours to match the papers, with a few Collectables pieces, Stickers & some diecut leaves using the Leaves decorative die.


Here's a close up of the Lattice decorative die.  I have randomly cut off a few of the edges so that it wasn't a straight edged rectangle piece, and I've also randomly inked it with some distress ink.


Here's a bit of a close up of the sponged Antique Gold Kaisermist used with the Lattice template....plus the random stamping.


Kaisercraft Products: Antique Bazaar – Unearth P1802, Restore P1798, Collectors P1800, Paper Pad PP966, Collectables CT824, Sticker Sheet SS279, Clear Stamps CS212,  Lattice Decorative Die DD709, Leaves Decorative Die DD312, Antique Gold Kaisermist KM102, Lattice Template T610, Red Alpha stickers AS258, Terracotta paper blooms F635  Sage paper blooms F632, Red mini paper blooms F669, Stone cardstock CD188
Other – Button, Flower, Distress Ink


And lastly....a card
"The Best of Times"

I've layered a few papers & collectables frame pieces for the main part of the card & then added a small cluster of blooms, Collectables & diecut Berry Vine leaves.  And again I've been using the fabulous new Lattice decorative die...this time as a strip across the card.


Kaisercraft Products: Antique Bazaar – Paper Pad PP966, Collectables CT824, Sticker Sheet SS279, Lattice Decorative Die DD709, Berry Vine Decorative Die DD522, Terracotta paper blooms F635, Sage paper blooms F632, Kraft C6 Card & Env. CD512
Other – Flower, Distress Ink

That is all from me for another week.
Thanks so much for dropping by & I hope you have been inspired by these 2 fabulous collections.
You can find the Antique Bazaar collection in store HERE 
and the Hello World collection HERE 
stocks are a bit low on this at the moment, but Vanessa has more on order, 
so keep your eye out for it coming in!
Until next time....xx

Photobucket
My Minds Eye - Hello World paper - We are Here
My Minds Eye - Hello World paper - Bonjour
My Minds Eye - Hello World paper - Suitcases
My Minds eye - Hello World paper - Here & There
2Crafty Chipboard - Fast Forward Arrows
EK Success - Border Punch
Faber-Castell - Big Brush Pens
Dark Room Door - Stamp - Scratches
Mont Marte - Modelling Paste
Foam Tape
Twine