HOMEABOUT USSHOP HERECROPDATESCURRENT CHALLENGESTIPS&TUTORIALS

Monday, December 18, 2017

Harry our Reindeer with MME Oh What Fun! by Fiona Johnstone

Hello everyone

Another Christmas page to share today, this time using the funky Oh What Fun! 
collection by My Minds Eye. 

Harry our Reindeer
 
I adore the Christmas Tree paper on black and wanted it to feature so have used a large strip to create my design with a pops of red to match the antlers. The gorgeous gold spotted Kraft cardstock (by Pebbles) added a touch of Christmas shine to a plain background. 

I've created my embellishments with the Pebbles Ephemera and used some 2Crafty chipboard - they have lots of cool Christmas themed chipboard. 
 

Love this flying reindeer! He's been painted in gold. 

 
I finished my page with some gorgeous gold thicker stickers.
 They are the perfect shiny touch to the Christmas page!

Thanks for stopping by
Till next week
Fiona
x
Photobucket
Products Used:
Pebbles Merry Merry Gold Glitter on Kraft Specialty paper 
MME Oh What Fun Paper - Wonderland
MME Oh What Fun Paper - Wreaths
MME Oh What Fun Paper - Minty 
Pebbles Merry Merry Ephemera Die-Cuts
2Crafty Mini Bauble Tree
2Crafty Prancing Reindeer
Gold Thickers
Simple Stories Alphas
Simple Stories Brad

Friday, December 15, 2017

Happiness is this with ModaScrap Viaggi Vintage by Kerryn Fry

Hi everyone!
Can you believe how quickly these last few weeks are flying by?
It's Friday again, one of the last few remaining for the year and I have another page to share with you.
Today's project features the collection kit ModaScrap Viaggi Vintage
A great kit, 12 single sided papers with the reverse side being a fantastic creme cardstock,
perfect for die-cutting a few different elements on the page.
The photos are from school camp last year for Mr 13.
Starting with a kraft cardstock background, 
I've used a Crafters Workshop Temple and Distress Ink 
to add the first layer to the page, randomly adding some colour. 
The clouds were die-cut using the reverse side of the papers 
and then I have used a black pen to add some faux stitching.
I have also used the back of the patterned paper to create my journaling strips.
I have used Tim Holtz word stickers to extend the title.
I have hand cut some chevrons from one of the patterned papers to a layers to the paper


The embellishment features at the side and bottom of the page 
have been created using a few different dies.
Kaisercraft dies were used to cut out the frame and month.
I have used the reverse side of the papers again for the date
and then painted them with Distress Paint to match.
Random dies were used for the stars and seaweed.


The Kaisercraft Lucky Dip Wooden Arrows were the perfect addition
to the embellishment clusters and the natural colour worked well with the page.


Thank you for visiting the blog today.
I hope you have been inspired by the page and
have the opportunity for plenty of creative time over the weekend.
Fiona will be back on Monday to share her next project.
Have fun!

Products Used:
Tim Holtz stickers

Photobucket

Wednesday, December 13, 2017

Adventure by Amanda H

Hello again!
 
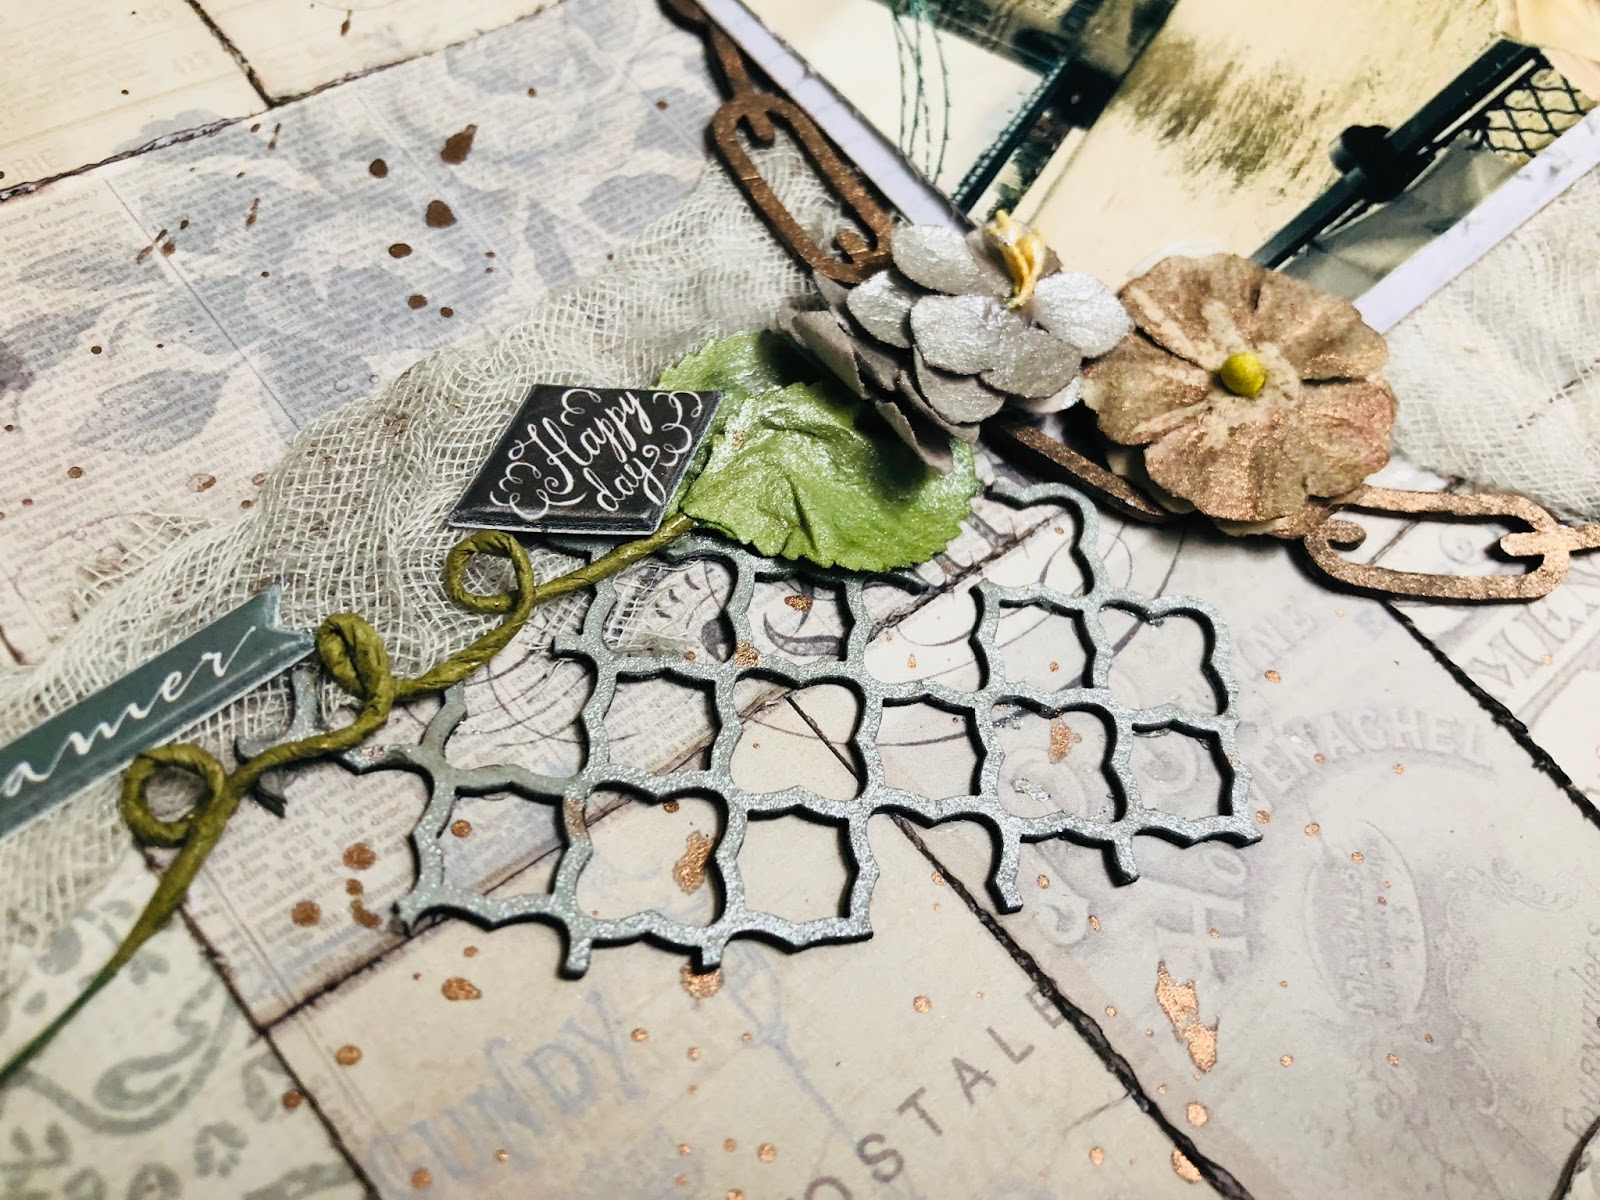
Today I am sharing a page with some more travel photos, from my recent trip to London. I love the neutral colours in the Kaisercraft Romantique Collection, and knew it would be perfect for travel photos. I then added some 2 Crafty chipboard and Prima to finish the page.
 
I started with the Parisian sheet of paper as the base.
 
I mounted each of the photos using reverse grey side of the RSVP paper.
 
Next I used the other side of the RSVP paper. This paper had postcard and notes designs throughout it. I cut out each note, distressed and inked the edges and then pieced the paper back together like a puzzle. You can see the patchwork effect it created.


Behind the centre photo, I have added a layer of muslin. I sprayed the muslin with some Colour Blast Colour Shimmer Spray in Steel, for a soft grey effect.
 
Next I used a 2 Crafty Frame chained circle around the photo. The chipboard was inked dark brown, before being sprayed with Colour Blast Colour Shimmer Spray in Leather. This gave the frame a lovely shimmer!
 
For the title I used the "adventure" word from the 2 Crafty Arrow word set. This got the same ink and Colour Blast treatment.
 
I used some flowers from the Prima - Zella Teal Flowers - Wanderer set. The grey ones I sprayed with Colour Blast Colour Shimmer Spray in Steel - which gave them a lovely shine. The cream flower was sprayed with  Colour Blast Colour Shimmer Spray in Leather.
 

Here you can see a piece Moroccan 2Crafty chipboard layered to the side of the cluster. I inked this grey, before I sprayed with a coat of Colour Blast Colour Shimmer Spray in Steel.
 Throughout the page I have added puffy stickers from the Prima Zella Teal collection.  There were lots of grey tones in this collection and they matched perfectly!


Finally, I added some splatters of the Colour Blast - Colour Shimmer Spray - Leather 
by taking the wand from the spray bottle and tapping it gently.
It is fun and different to scrap these new travel photos!
 Makes a change from girls and pink!
I hope you like it!

Products used
Papers:
2Crafty Chipboard:
Mixed media:
Embellishments:

Thanks for looking today!
Amanda 
 
Photobucket

Monday, December 11, 2017

Elf Surveillance with Doodlebug Milk & Cookies by Fiona Johnstone

Hello everyone

Time to share some Christmas pages! Lots of fabulous Christmas ranges in the store now. Today I have created my layout using the bright and fun Doodlebug Milk & Cookies papers &  Bella Blvd Santa Stops Here embellishments:

This House is Under Elf Surveillance
 
Every year for the past 6 years, these elves have been paying us a visit, so I like
 to create a layout of their antics! It's so much fun.
 These Doodlebug papers were just perfect with the fun colour scheme & the
 Elves and Santa in the Bella Blvd ephemera were the cutest & went perfectly
 with the Doodlebug papers.  I've added some of the epoxy icon stickers to finish
 off my embellishing. 

 
How perfect is this title?
 Love it! It's a new release from 2Crafty Chipboard.
 I have used Stickles over ink to create a bright, fun and glittery title!
 
 
Thanks for stopping by
Till next week

Fiona
x
Photobucket
Products Used:
Doodlebug Milk & Cookies Paper - Dear Santa
Doodlebug Milk & Cookies Paper - Holiday Cheer
Doodlebug Milk & Cookies Paper - Tree Festival
Bella Blvd Santa Stops Here Expoxy Icon Stickers
Bella Blvd Santa Stops Here - Ephemera Die-Cuts
2Crafty Chipboard Title - This House is Under Elf Surveillance
Stickles 

Friday, December 8, 2017

A Christmas to Remember Using Kaisercraft Mint Wishes by Kerryn Fry

Good morning AAS Fans and Followers
It's Friday and that means it's my turn to share another project.
I thought while I was awaiting for my next delivery, I would squeeze one more page 
out of the gorgeous collection by Kaisercraft, Mint Wishes.
With Christmas fast approaching, I chose to do another festive page 
with an older photo of the Mr 3.
He was super cute back then, still is and was more than happy to pose, not so much now.

After my clean page last week, I thought I would go back to being messy!
Starting with Kraft cardstock, I worked out the basic plan for the layout 
of my page and put the patterned papers aside.
The background effect is some simple stencilling with Distress Oxide Ink 
and then some paint splatters also using Picket Fence Distress Paint and gold paint.


To help balance the page, I have cut the 2 Crafty title A Christmas To Remember in half.
It was then base coated using gold paint and allowed to dry.
The final coat is a thick layer of gold Stickles for that Christmas sparkle.


The 2 Crafty Fir Xmas Tree has been sponged with different shades of green Distress Paints.
The star and base have been painted gold and then a little Stickles added to the star.
I have combined the two colours of green and gold to decorate the 2 Crafty Presents.
Painted first and then more Stickles added to the gold parts.


The cluster of embellishments in the top right corner is a combination of 
the Kaisercraft Collectables and Christmas baubles from the wooden flourish pack.
I have used foam tape to some pieces to stagger the layers.


I have finished the page with some doodled faux stitching with a gold pen.
Thank you for visiting the blog today.
Hope you have a fabulous weekend and enjoy some crafting time.
Don't forget to join us again on Monday for Fiona's next project. 

Products Used:


Photobucket

Wednesday, December 6, 2017

Girls Rule by Amanda H

Hello everyone!
 
Welcome to my first page share for December. This week I am sharing a page of my girls, using the awesome new collection from Pink Paislee: Wild Child. With gorgeous bright papers and a huge fun collection of sticker accessories, this page came together easily. Do you have a "wild child" who would suit this range? I have used the girl side of the collection, but there are even more options with the boy range!
 
 
Starting with a white cardstock base, I layered up a couple of papers in the range. I also mounted the photo with white cardstock plus two extra layers of paper. I also used foam tape for the photo to give it a bit of dimension!

The bottom layer of this cluster has some goodies from my stash: a paper doily, some white muslin fabric and some teal loose thread.

The centre of the main cluster is using the cute 2 Crafty Gigi Flower. I have covered the base of the flower with the blue paper from the range, and then inked the top part of the flower in turquoise.

Then I have loaded on some stickers from the Wild Child collection. I used stickers from both the puffy sticker set and the chipboard thickers set. I love to buy packs of stickers from the ranges I am working with. Firstly, the colours are always perfect, and secondly there are always so many left over for new projects!

For the title I used the "girls rule" sticker from the chipboard thickers set
I love the shine on these stickers.
I also created one last little cluster in the bottom corner of the photo, using muslin, thread and more of the cute stickers. 
Products used:
 
Papers:
White Cardstock
 Pink Paislee - Wild Child Paper - 03
Pink Paislee - Wild Child Paper - 04 
 
2 Crafty chipboard:
 Gigi's Flowers
 
Embellishments:
 Pink Paislee - Wild Child Thickers - Girl Power
Pink Paislee - Wild Child Puffy Stickers - Girl 22/Pkg
 
Thanks for looking today,
Amanda
 
Photobucket

Monday, December 4, 2017

Beautiful with Cocoa Vanilla Studio Bohemian Dream by Fiona Johnstone

Hello everyone

Back this month with the stunning Bohemian Dreams collection by the always popular Cocoa Vanilla Studio. I've had this collection for a while, just admiring it before I could cut into it to create:

Beautiful 
 
For this page I wanted to create a frame around my photo using the die-cut ephemera and vellum flowers from the Bohemian Dreams collection. I've used a LOT of the flowers, a few branches and butterflies along with a couple of the feathers to create my heart. 


I've matted my photo with some patterned paper and added a simple chipboard title - Beautiful to finish off my page.


Thanks for stopping by
Till next week
Fiona
x
Photobucket
Products used:
Cocoa Vanilla Bohemian Dream Paper - Kaleidoscope
Cocoa Vanilla Bohemian Dream Paper - Wild & Free
Cocoa Vanilla Bohemian Dream Paper - Dreamer
Cocoa Vanilla Bohemian Dream Die-cut ephemera pack
Cocoa Vanilla Bohemian Dream Vellum Accents
Cocoa Vanilla Bohemian Dream Chipboard Stickers

Friday, December 1, 2017

A Moment to Treasure using Carta Bella Welcome Home by Kerryn Fry

Good morning everyone.
I'm back today to share my second project using 
Carta Bella Welcome Home collection.
Such a lovely collection, rich in colour and simple homely patterns,
just perfect for family memories.
I have pulled out an older photo taken when celebrating Dad's birthday in 2011. 
A simple page this week, I have started with a Kraft cardstock base.
Then using the paper Forever Home as my next layer.
I have roughly torn the edges down to a 11in x11in piece.
A small piece from the paper Flower Market has been used on the side. 
I have used black cardstock to back the photo and 
then layers of light and dark patterned paper to build under the photo.
The 2 Crafty title A Moment to Treasure has been covered with gold ink.
I have also doodled around some elements with a gold gel pen.
The paper Farm Sweet Farm was used to create the perfect journal strips.
The Ephemera pack was perfect to build a cluster in one corner of the photo.
I have used more black cardstock to back some stickers from the Element Sticker sheet 
and added foam tape to define the layers in the cluster. 
The Kaisercraft Wooden Flourishes were the final touches to highlight the lighter shades in the papers.

That's it for today, a simple page that I hope you have enjoyed.
Hope you all have a great weekend with plenty of crafting.
Please pop back on Monday to see Fiona's next project.
Thanks for visiting today.


Products Used:

Photobucket