HOMEABOUT USSHOP HERECROPDATESCURRENT CHALLENGESTIPS&TUTORIALS

Monday, April 29, 2019

Create your own Happiness
with Pinkfresh Studio Joyful Day
by Fiona Johnstone

Hello everyone

Back this week with another new collection from Pink Fresh Studios - Joyful Day! Love the colours in this collection, pinks and purples and greens, so pretty!!

Create your own Happiness


My focus for this page was to create a title going across my page using the big puffy sticker words and the awesome mini puffy stickers alphas. These are just perfect for titles! I decided to use white cardstock as my base so my alphas stood out - so many fun colours. 


I chose papers that matched my photo and went with a simple vertical design of paper on the right, before matting my photo with some different patterned papers and adding my large title to the left. 

My photo has a lot of white space which was perfect to embellish around without compromising the image. I've used the cardstock stickers and some of the puffy sticker embellishments on the puffy word stickers. 


Thanks for stopping by
till next week
Fiona
x

Photobucket
Products Used:
Pinkfresh Studio Joyful Day - Fresh Start paper
Pinkfresh Studio Joyful Day - Being Us paper
Pinkfresh Studio Joyful Day - True Story paper
Pinkfresh Studio Joyful Day Puffy Phrase Stickers
Pinkfresh Studio Joyful Day Puffy Mini Alpha Stickers
Pinkfresh Studio Joyful Day Cardstock Stickers
White Cardstock
Simple Stories Word Stickers

Friday, April 26, 2019

Crazy About You using My Minds Eye Happy Days by Kerryn Fry

Hi Everyone, happy Friday!
Today I'm sharing my third page created with the beautiful collection,
My Minds Eye Happy Days.
I have really enjoyed this collection, 
especially the yummy combination of bright colours.
I've actually created a 4th page with this collection to share at some stage.
This is a gorgeous photo of my eldest Great-Niece,
it was taken a few years ago at Christmas time.
 
The page started with my favourite Kraft Cardstock.
The background has been given a pop using a Crafters Workshop Template 
and a mixture of Ripe Permisson & Victorian Velvet Distress Paint.
Once the paint had dried, I have highlighted some of the circles with a white pen.
I've hand cut a few different pieces from the patterned papers to embellish the page.
The flowers, hen and house were all elements cut from different papers,
Free Range, Glad Garden and Ice Cream Dreams.
I have used foam tape to lift each piece to create some depth in the page.
The white pen was used again to add some finishing touches.
I've also used some embellishments from the Ephemera Pack
to create clusters either side of the photo.

Two great 2 Crafty pieces used on this page.
The 2 Crafty title Crazy About You was base coated with gesso.
Once dry, I have roughly swiped Broken China Distress Paint
across the surface, allowing the gesso to peek through.
The title has been given a border with the white pen.

The 2 Crafty Topiary Tree has been painted with colours to match the papers.
The pot was coloured with a mixture of Mustard Seed and Crushed Olive Distress Paint.
The stem was painted with Mowed Lawn
and the flowers with the earlier mixture of Ripe Permisson and Victorian Velvet.
I've outlined the pot and flowers with the white pen.


A simple girly page to finish off the week.
Thank you for visiting the blog today.
I hope you have a fabulous weekend,
filled with plenty of crafting time.
Please join us again on Monday for Fiona's next project.


Products used:


Photobucket

Wednesday, April 24, 2019

"Dream a little dream", by Amanda Hartmann

Hi everyone!
 
I am here today to inspire you with some absolute cuteness!
 I used the beautiful Hello baby girl collection from Echo Park - and it's perfect
 when paired with a cute niece photo.
 

I used two patterned papers for the background: the top angled yellow patterned paper, with a repeated strip along the bottom, and the pink spots paper at the back.

This paper range has the most awesome set of solid colour papers that coordinate with the whole collection. I used 3 of them to matte the photo 3 times.

Then I went to town with stickers - I used loads of different animals, florals and shapes from the large Element Sticker sheet.


I grouped a few clusters of animals and shapes, as well as scattering stickers around the page too.

For the title, I used the 2 Crafty chipboard title.
 I painted it white with gesso, before embossing with gold. By painting it white first, it
 gave the chipboard a softer gold tone, which I love for this page.
And you can see that I finished the page with some gold splatters!

I love the gatherings of animals on this page! So cute!
Thank you for looking!
Amanda


Products used:
Echo Park - Hello Baby Girl Paper - Girl Alphabet Blocks
Echo Park - Hello Baby Girl Paper - Light Pink/Yellow
Echo Park - Hello Baby Girl Paper - Dark Pink/Light Blue
Echo Park - Hello Baby Girl Element Sticker
Colour Blast - Colour Shimmer Spray - Bling
Dream A Little Dream
 
Photobucket

Monday, April 22, 2019

Coffee All Day with Pinkfresh Studio Everyday Musings by Fiona Johnstone

Hello everyone

Another share with the fun and cool Everyday Musings collection by Pinkfresh Studios.  Love the cute little coffee cups on the Full of Joy paper and they inspired my layout:

Coffee All Day

So I may drink a lot of coffee, so much so that my eldest daughter bought me this coffee mug when she saw it in the shops. 

After starting with the Full of Joy paper, I decided to give the layout lots of texture, starting with some masking at the bottom of the layout. I then added some watered down paints to add a little colour to the bottom of the page... I took the mauve colour from the small flowers on the coffee cups. 

Once the background was done, I went to work tearing my paper layers, adding a doily and then digging through my stash for some fun ribbons and lace with lots of texture:
Of course Pinkfresh have fabulous embellishments to compliment the papers and I have used lots of ephemera, puffy stickers and puffy alphas. 

and finishing off with some rose ribbon, twine and buttons!


Thanks for stopping by
Till next week
Fiona
xx

Photobucket
Products Used:
Pinkfresh Studios Everyday Musings - Full of Joy
Pinkfresh Studios Everyday Musings - Happy Place
Pinkfresh Studios Everyday Musings - Time for Fun
Pinkfresh Studios Everyday Musings - Small Things
Pinkfresh Studios Everyday Musings - Ephemera Pack
Pinkfresh Studios Everyday Musings - Puffy Alphabet Stickers
Pinkfresh Studios Everyday Musings - Puffy Stickers
Dylusions Paint  Laidback Lilac 
Transparent Texture Paste
The Twinery Twine Lilac Twine
Cocoa Vanilla Studio - Love Always Bits & Pieces
The Crafters Workshop 12x12 Template - Microbial
Buttons, Ribbon, Lace from stash 

Friday, April 19, 2019

Embrace Today using Kaisercraft Breathe by Kerryn Fry


Hi everyone!
Hope you are enjoying the start of the long weekend.
This week I went back to the beautiful collection,
It's my second page using this collection, 
but this time the page I've created is more feminine
and it highlights the gorgeous flowers in the papers. 
Yes, there are more photos from our visit to the Adelaide Zoo in January,
once again my gorgeous niece is my model.
On the day, Adelaide's pandas, Wang Wang and Fu Ni were in hiding,
but we still managed to have a little fun with the panda statues.


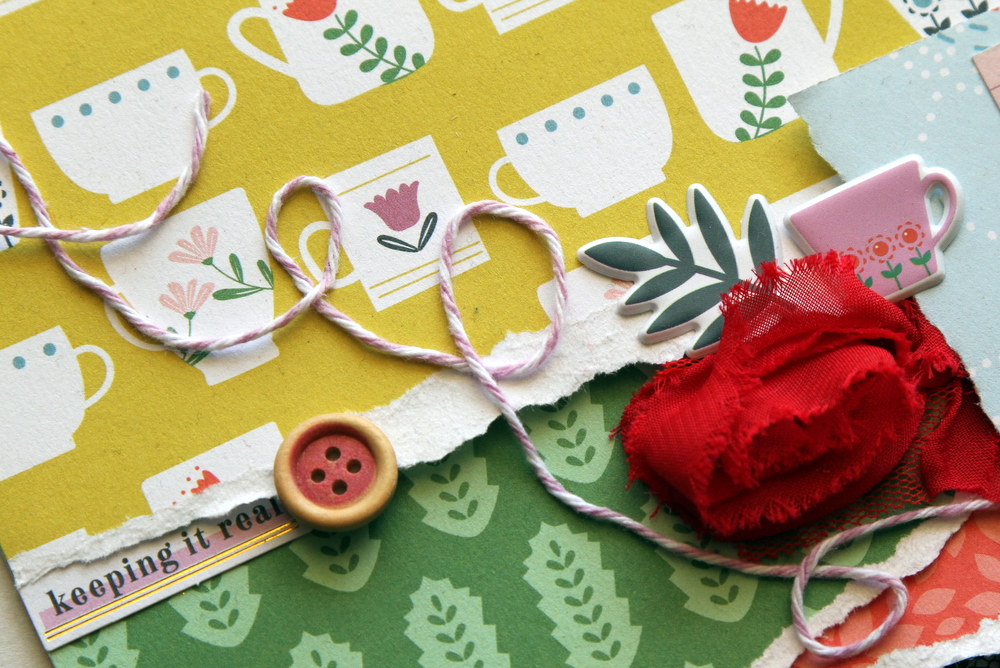
This page started with the patterned paper Soft Pastel as the base.
The big flower in the top left corner of the page has been hand cut from the reverse side,
I've then covered the hole in the base with some white Bazzill Cardstock.

I've used the large flower and the surrounding flowers 
to create a embellishment cluster for the title to sit on.
The grey flowers have been hand cut from Blue Blush
and then I've added a few flowers from the Collectables.
The 2 Crafty title Embrace Today has been covered with 
Picket Fence Distress Paint and Dimensional Magic.


There are simple layers of patterned papers in the centre of the page,
the photo has been matted with Efflorescene.
and then I've used the Collectables to embellish around the edges.
Plenty of foam tape used to lift certain elements.
I've cut strips from Clear Skies to use for my journaling.


The main cluster at the bottom right corner of the page 
has been created with a combination of hand cut flowers 
from Blue Blush and Navy Night.
Then more foam tape added to create layers 
and more elements used from the Collectables.
I've used a white pen to add the date & place on the petal of a flower.


Thank you for visiting the blog today,
I hope you have enjoyed the process.
Have a wonderful Easter
and please join us again on Monday for Fiona's next page.

Products used:


Photobucket

Wednesday, April 17, 2019

"Old City Wall"
by Amanda Hartmann

Hi AAS fans,

Last year I travelled to the Netherlands, and this year, I get to share my favourite photos 
combined with great papers and chipboard.
 Today I combined the new Studio Light - Industrial papers, with some chipboard
 and background details.


I started this page with Paper No. 12 as the background.
On this I layered a piece of Kraft Cardstock. I added interest to the Kraft cardstock with some stencil work, stamping and splatters.
Next I added a panel of Paper No. 14 . I even added a strip from one of the paper edges across the page.
Now it was time to add layers under the photo- I used more papers, more Kraft cardstock and 2 Crafty chipboard.


This corner includes a Charms Creations book paper arrow from my stash and some muslin that I have sprayed black with Dylusions Black Marble.  On top of this I added a sticker word from Cocoa Vanilla Studio Accessory sheet - I swiped gold ink lightly across this so it wasn't so white! I also added the 2 Crafty Chipboard word- "delight" - on the photo - this has been inked black and given a coat of dimensional magic. "Old city walls" title is written with some old Pinkfresh alphabet stickers.

Above and below the photo I added some 2 Crafty chipboard - Fiddlesticks and the circles from the Mini Sampler pack. For the Fiddlesticks, I cut off the boarder and embossed it. The circles are simply inked black.
More CVS word stickers and a few book paper circles from my stash too!
Now more close ups!

Thanks for looking,
Amanda
Products used:

Photobucket

Monday, April 15, 2019

Family with Jillibean Soup Garden Harvest & 2Crafty by Fiona Johnstone

Hello everyone

This week I have created a page with the gorgeous Jillibean Soup Garden Harvest papers and lots of lovely 2Crafty chipboard pieces. 

Family


I've created some layers with the Jillibean Soup Garden Harvest papers, focusing on those colours that suit my busy coloured photo.  I've focused on the red and greens for this page. 


I've just used inks on my chipboard pieces for this layout - layering up my colours to add a variety of colour tones to the pieces. I've chosen colours that compliment the "Gather the Goods" paper. I've then collected several different flowers to co-ordinate with the colours in the papers. 


I've finished my layout with some word stickers and thread. 

Thanks for stopping by
Till next week

Fiona
x
Photobucket

Jillibean Soup Garden Harvest Paper - Gather the Goods
Jillibean Soup Garden Harvest Paper - Bite Sized Bits
Jillibean Soup Farmhouse Stew Paper - Bless Your Heart
2Crafty Chipboard - Family title 
2Crafty Chipboard Addys Butterflies
2Crafty Chipboard Foliage Set 1
2Crafty Chipboard 6" Circle Revolution
Green Tara Azaleas
Green Tara Cherry Blossoms - Blue/Cream
Flowers - other
Cocoa Vanilla Studio Happiness Collection - 6x12 Accessory Stickers
Pinkfresh Studios Everyday Musings Puffy Stickers
OA Alpha Stickers
Cotton Thread

Friday, April 12, 2019

Good Friends Good Times using
Photo Play To The Moon and Back
by Kerryn Fry

Good morning everyone!
Today I am sharing my first page created using 
Photo Play To The Moon and Back.
What a gorgeous collection, I love the primary colours
and such a fun theme.
The photos are from the archives again this week,
a much younger Mr 14 and his mate from our Mother's Group.
They have known each other since they were 6 weeks old.
The Kraft cardstock base has been left neutral for this page.
I've done a heap of fussy cutting from the patterned papers
and the Elements Sticker sheet has helped build the embellishments.
I changed the photos to B&W to allow the colours in the papers to be the star.
The photos have been placed on black cardstock for an extra layer.
I have stuck the papers down first
and then shuffled around the other elements for a short time.
I cut-out planets, stars, astronauts and monsters.
The paper 'Out of this world' had some 6x4 horizontal cards on the reverse side.
It was perfect to use one of them for journaling 
and it also provided a base for the title.
The title piece Good Friends Good Times 
has been painted with Distress Ink Candied Apple.
Most of the elements have been added with foam tape for a little lift. 
 I have created a tag with a punch and 'Reach for the Stars' paper,
then more foam tape has been added to lift the tag
and then finished off with some string.


The Element sticker sheet helped to fill the gaps on the page.
I love the stars and planets, they work really well with the goofy photo.


A reasonably simple design, but lots of fussy cutting.
Thanks for visiting today,
hope the weekend is kind to you all.
Please pop back on Monday for Fiona's next project.


Products used:


Photobucket

Wednesday, April 10, 2019

"Snow Monster", by Amanda Hartmann

Hi all,

I have a little snow monster to share with you today! And she is settled amongst the My Minds Eye, Happy Days collection! I used the papers and stickers to create this page, with a few extras!


For the background, I layered these papers:
Cheery Disposition, at the back;
then In Bloom.
Across the page, I added a strip of reverse of In Bloom paper too.
These layers are the basis of my background.

Then I add the photos with papers, and stickers and other bits!

On the either side of the photo, I added some black die cuts from the Kaisercraft texture rugged die. I added stickers  and a green doily amongst the die cut and in the cluster.


Within the circles of the die cut, I added stickers, as well as some enamel dots


For the title, I combined some sticker sets..... PinkFresh Mini alphabets, and PinkFresh white alphabets. The mint plus white letters combine perfectly for my little snow monster!
So that is today's share - full of fun and happy days!
Thanks for looking,
Amanda

Products used:

Photobucket