HOMEABOUT USSHOP HERECROPDATESCURRENT CHALLENGESTIPS&TUTORIALS
Showing posts with label Distress Paints. Show all posts

Friday, February 3, 2023

Love using Simple Stories The Simple Life by Kerryn Fry

Hey everyone!
My layout today has been created with
the collection, Simple Stories The Simple Life.
The beautiful photo is my Father and his youngest 
Great-Grand daughter at her first birthday party.


The base of the page is a 
I have layered the photo onto the reverse 
The two main paper layers under the
photo are Happy Together and Our Story.
I've used a gold pen to outline 
the darker paper Our Story.


To add some interest on the right side of the photo,
I have hand cut the pattern of the paper and then 
 stuck down the reverse side of the pattern.
In the top right corner of the photo I have added the 
'heart this' ephemera piece from the Journal Bits Die Cuts pack.


In the bottom right corner of the photo are some
more ephemera pieces from the Die Cut pack.
There are two floral pieces and the quote
all lifted with foam tape.
The leaves have been hand cut from a 
journal card on the Journal Elements paper
and the butterflies have been cut from Our Story.


To the left of the photo I have added layered three
journal cards from the Journal Elements paper
The larger 'Family' card is first, with the 'Memories' 
card added to the left side with foam tape 
and the date card added at the bottom.
The floral pieces have been highlighted with gold pen.


At the top of the layered journal cards
I have added another hand cut butterfly
and two more pieces from the Die Cuts pack.


The title of the page is the to the left of the photo 
with Forest Moss Distress Paint and backed 
with the reverse side of the 4x6 Elements paper.
I have highlighted each letter with
a gold pen to pop on the page.

The finishing touch to the page is the
splashes of the Tsukineko All Purpose
Gold Ink to tie in all of the gold touches.


Thank you for dropping by today,
I hope you have been inspired by the page.
Have a great weekend and 
join us again on Monday.
Happy Crafting!

Products used:


Friday, January 27, 2023

Winter Wonderland using Simple Stories Simple Vintage Winter Woods by Kerryn Fry

Hello everyone!
The layout I'm sharing with you today 
has been created with the collection
Simple Stories Simple Vintage Winter Woods.
The photos of Mr H were taken in 2018
on our last trip to Lake Mountain in Victoria.


The base of the page is Bazzill Kraft Cardstock.
The background effect has been created in two stages. 
The first layer is Distress Oxide Inks 
Evergreen Bough and Salvaged Patina.

I've combined both colours on a plastic scrap,
sprayed it with water and mixed them together.
With a round paint brush I've added 
splashes to the outer area of the cardstock.

Once dry, I've used the Vicki Boutin Evergreen & Holly
Snowflake stencil and white paint to add
some random flakes to the background.


At the top of the photos I've added the smaller 
bird embellishment from the Page Pieces pack.
The embellishment has been lifted
with foam tape for extra dimension.


The 'Day to Remember' piece on the 
left side of the photos has been hand cut 
from 4x4 Elements paper. I've added it to 
a journal card cut from the Journaling Elements paper.


covered with white gesso and then
Salvage Patina Distress Paint.
Once it was dry, I've added
to some of the branches.


On the right side of the photos, I've used
more embellishments from the Page Pieces.
The 'Snow' card has been tucked under
the photo layer with the top edge lifted
with foam tape. The larger bird has been added
with foam tape and then a little Glitter
Glue to the star on the card.


At the base of the snow card I've added
and another hand cut embellishment.
The 'Love this most' embellishment was
hand cut from 4x6 Elements paper.


The title for the layout Winter Wonderland
is from the Page Pieces pack.
I've added it to the page with foam squares
and the decorated it with Ranger Stickles Glitter Glue.


Thank you for dropping by the Blog today.
I hope my page has inspired you to create
or at least cooled you down a little.
Have a great weekend and
join us again on Monday.

Products Used:
Bazzill Kraft Cardstock
Simple Stories Simple Vintage Winter Woods
Simple Stories Simple Page Pieces Winter Woods
2 Crafty Winter Twig Branches
Distress Oxide Inks
Distress Paints
Ranger Stickles Glitter Glue
White paint


Friday, January 6, 2023

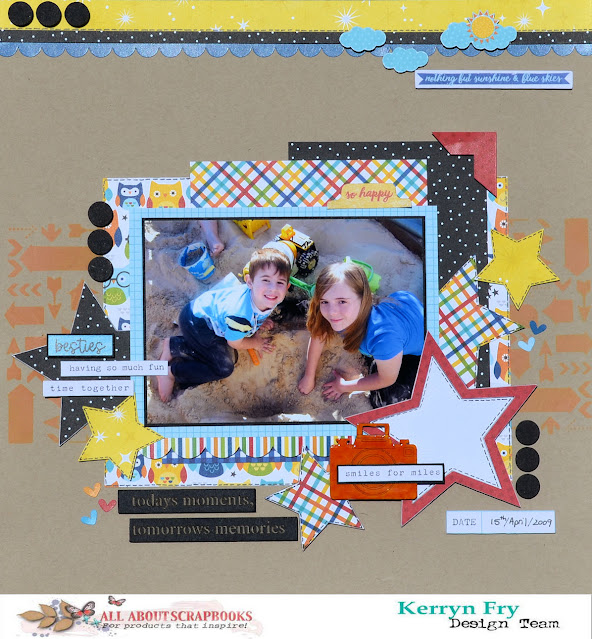
Todays moments using Bella Blvd School is Cool by Kerryn Fry

Hello crafters!
Happy New Year from me!

My first page for the year has been created
with the collection, Bella Blvd School is Cool.
The papers were picked for their colours, 
not the theme, they match the photo perfectly.

The photo of Mr H, at nearly 5 years old
and his cousin Nicole hanging in the 
then sandpit, now our veggie garden. 


The base of the page is my absolute 
The background effect has been created
with the Simple Stories Arrow Stencil
and Spiced Marmalade Distress Oxide Ink.
It pops the small amount of orange
in the photo and patterned papers.


Across the top of the page I have added 
a strip of Simple Stories Say Cheese at the Park
Meet Me on Main, a thin strip of Daily Details
and a scalloped sticker from the Cardstock sheet. 

The sun and clouds have been hand cut from
the Daily Details paper and the sticker is
from Cocoa Vanilla Sunkissed Accessory Stickers
I've used foam tape to lift each piece.


The 2 Crafty Stars Pack was used to embellish 
the page and to create a journal spot.
The chipboard stars have been covered with
patterned paper and the extra stars are patterned paper.

The black chipboard dots on the page are 
the dot centres from the 2 Crafty Photo Corners.
They have been covered with black ink
and lifted with foam tape.

The 2 Crafty Mini Camera has been covered
with Spiced Marmalade Distress Paint.
After drying, I have then covered it with 
Spiced Marmalade Oxide Ink and hit it with a heat gun.
The final layer is Dimensional Magic
which had a great reaction with the Oxide.
Love the marbled finish.


The photo has been matted with Bazzill Raven Cardstock,
with patterned papers layers added underneath.
I have raised the photo and first two paper
layers with foam tape to create extra layers. 
I've used a black pen to add borders to some 
of the paper pieces and stars.

To the left of the photo I have added 
two more stars and words from both 


The title for the page has been created
Using 'todays moments, tomorrows memories'.
The chipboard has been swiped with black ink,
layering the colour without colouring the words.
I have cut the phrase into two pieces and
then added them to the page with foam tape.

The finishing touches are the small hearts
from the DooHickey Sticker sheet. 


Thanks for visiting the blog today.
I hope you have been inspired to spend 
some time crafting over the weekend.
Please join us again on Monday for 
Fiona's next project.

Products used:
Bazzill Kraft Cardstock
Bazzill Raven Cardstock
Bella Blvd School is Cool - Daily Details
Bella Blvd School is Cool - Paperclips
Bella Blvd School is Cool - School Uniform
Bella Blvd School is Cool - Wise One
Bella Blvd School is Cool - DooHickey Cardstock Stickers
Simple Stories Say Cheese at the Park - Meet Me on Main
Simple Stories Hello Today Stencil - Arrows
Cocoa Vanilla Sunkissed Accessory Stickers
2 Crafty 6x4 Phrase Stick Set 5
2 Crafty Stars Pack
2 Crafty Mini Camera
2 Crafty Photo Corner Dots
Distress Paint
Distress Oxide Inks
Dimensional Magic


Photobucket

Friday, December 30, 2022

Father & Daughter moment using Echo Park Paper Let's Create by Kerryn Fry

Good morning everyone!
My page today has been created with 
the collection Echo Park Paper Let's Create.
The colours in the collection were 
perfect for this gorgeous photo of my 
Nephew and Great-Niece at her Christening.


The base of the layout is a clean
sheet of Bazzill Kraft Cardstock.
I've layered the patterned papers
and outlined some of the layers
using a gold pen.

The butterflies and tab in the top right 
corner are stickers from Cocoa Vanilla
The butterflies have been lifted 
with foam tape.


The embellishment cluster to the left
of the photo has been created with stickers
from the Cardstock Sticker Sheet
and Cocoa Vanilla.

The Let's Create Stickers have been
modified with words from Cocoa Vanilla
and Tim Holtz sticker book.


The 2 Crafty Rose Set has been covered 
with Distress Paints Evergreen Bough,
Bundled Sage and Stormy Sky.

I have backed the roses with scrap
paper and then outlined the flower part
with a gold pen. Each flower has been
lifted with foam tape for dimension.


The 2 Crafty title Father & Daughter Moment
has been covered with Gold Ink.
The 'Moment' part of the title
has been lifted with foam tape as well.


A simple, sweet page for this week.
Thank you for visiting this blog today,
I hope you have been inspired.

Have a fun, creative weekend
and I will catch you next year, sound strange!
Join us again on Monday!

Products used:
Bazzill Kraft Cardstock
Echo Park Paper Let's Create - Get Crafty
Echo Park Paper Let's Create - Craft Room
Echo Park Paper Let's Create - 4x6 Journaling Cards
Echo Park Paper Let's Create - 12x12 Cardstock Sticker Sheet
Echo Park Paper Let's Create - Stash of Stems
2 Crafty title Father & Daughter moment
2 Crafty Rose Set
Distress Paint
Cocoa Vanilla Stickers


Photobucket

Friday, December 9, 2022

Be You using Celebr8 Just Be You by Kerryn Fry

Good morning everyone!
Today I'm sharing another page created with 
the beautiful collection Celebr8 Just Be You.
A rare selfie taken after a short hair cut
in August last year. It's long again now! 


The page has started with a 12x12 piece 
of Bazzill Kraft Cardstock for the base.
I knew I intended to use the wreath hand 
cut from the patterned paper on the page.

The simple background effect has been created 
to appear around the outside edge of the wreath edge.
Using the Crafters Workshop 6x6 Mini Tiny Circles and 
white ink, I have added some light details on the cardstock.

Using a white paint pen, I have added
some splashes across the page as well.


I've hand cut some of the half oranges
to add some extra dimension to the wreath.
Some of the leaves on the wreath have
been outlined with a gold pen.

The quote 'Beauty Begins' is from the barcode strip,
I have cut it into two pieces and cut flags each end.
I've used foam tape to add it to the page.


The large 2 Crafty Anthea's Butterfly frame has been 
covered with black ink and backed with patterned paper.
I have only used adhesive in the centre of the butterfly 
frame and paper, to allow it to have some movement & dimension.

cut into smaller pieces and covered with Mowed Lawn 
& Rustic Wilderness Distress Paint.

been covered with black patterned paper
and the smaller frames have been backed 
with a lighter patterned paper.


I have added a few more hand cut elements
from the collection to the page.
The orange bloom to the left of the photo
and a cluster of oranges to the bottom
of the photo under the butterflies.

have been covered with a combination of 
Mustard See, Fossilized Amber and 
Spiced Marmalade Distress paint.
I've finished the butterflies with a layer of
Dimensional Magic for a shiny finish.

The title is the Be You banner
hand cut form the patterned paper.


Thanks for visiting the blog today.
Hopefully you have been inspired to create.
Enjoy your weekend, do something you love
and join us again on Monday.

Products used:


Friday, August 19, 2022

Amazing Journey using Echo Park Paper First Day of School by Kerryn Fry

Hello everyone!
The page I'm sharing with you today
has been created with the collection,
Echo Park Paper First Day of School.

The two photos on this page capture 
a very special moment of Mr H, 
showing his very first day of school and 
his last 'first day' of school, 12 years apart.
Where has the time gone?


The base for the page is a clean
12x12 sheet of Bazzill Kraft Cardstock.
The bright primary colours and patterns in this 
collection are layered under the photos and then 
the page is embellished with chipboard and ephemera.

At the top of the photo, I've used
a 2 Crafty Arrow covered with 
Faded Jean Distress Paint
and added a tag with foam tape.
The tag has been outlined with a black gel pen.


The left side of the photo, I have added
covered with Chipped Sapphire Distress Paint.


There is a second tag lifted with foam tape
and black alpha stickers from my stash
to create a sub-title along the photo edge.


At the bottom of the page,
the smaller photo has been framed
It has been covered with patterned paper
and decorated with the hand cut elements,
apples and school bag from the patterned papers.
The embellishment pieces are


The Journal spot is a frame piece
from the Frames & Tags pack that 
has been backed with white cardstock.
I've used a black gel pen to create
a border around the cardstock piece
and added another embellishment
with more hand-cut elements.

The dates on both photos have 
been created with black stickers.


The title for the page has been created
with two 2 Crafty chipboard pieces.
The chipboard has been covered with black ink
and added to the bottom right corner of the page.
I've used a third 2 Crafty Arrow
to highlight the title.


Thank you for dropping by the blog today,
I hope you have enjoyed the page.
Have a lovely weekend and 
may you enjoy plenty of crafting time.
Please join us again on Monday.

Products Used:
Bazzill Kraft Cardstock
Echo Park Paper First Day of School - School Day Plaid
Echo Park Paper First Day of School - Teacher's Apple
Echo Park Paper First Day of School - Multi Journaling Cards
Echo Park Paper First Day of School - Classroom Supplies
Echo Park Paper First Day of School - Back to School
Echo Park Paper First Day of School - Frames & Tags
2 Crafty Mini Word Set 1 - Amazing
2 Crafty Fine Word Set 3 - Journey
2 Crafty Arrows
2 Crafty Mini Fast Forward Arrows
2 Crafty Polaroid Asst. Frame
Distress Paints


Photobucket

Friday, August 12, 2022

Cheeky using Celebr8 #YOLO by Kerryn Fry

Morning all!
I'm back today to share my final page with 
the cool collection, Celebr8 #YOLO.
This paper pack has been so versatile to craft with,
a great mix of colours to use for any subject.
The B&W photos on today's page 
were taken a few years ago, one of my beautiful nieces, 
being super cute and very cheeky in her jumper.


I've used the reverse side of the beige 
chevron paper for the base of the page.
I love the small details of flowers & scribbles
in the corners of the paper.

The top left corner has been
embellished with a hand cut element.
I cut banners in each end
and used foam tape to lift the word.
 

The cut-apart cardstock sheet was used
to add layers under the photos
and the floral paper has been used
as the main pattern on the page.

The speech bubbles have been hand cut
and raised with foam tape to embellish
the top corner of the photo.


The large bracket on the right side
of the photo was cut from the 
Bonus Fussy cut sheet.

to add some sparkle to the bracket
and flower centres on the page.

been coloured with Distress Paint
and added to the flower clusters.


The hand cut star elements have been 
clustered to the right side of the photos
to extend the embellishments down 
along the bracket.
 

The large 'Just Chillin' banner has been 
cut from the Bonus Fussy Cut Sheet
and added to the base of the photos.

To the left of photos, I have created
a second embellishment cluster
with hand cut flowers, camera and quote.


covered with white ink first
and then finished with

The Glitter glue was used to add
a little sparkle to all of the flower centres 
in the patterned paper and hand cut flowers.


So much fun creating this page,
I hope you have enjoyed the steps.
Thank you for dropping by blog today,
have a fabulous weekend and may
there be plenty of crafting.

Products used:


Photobucket