HOMEABOUT USSHOP HERECROPDATESCURRENT CHALLENGESTIPS&TUTORIALS

Friday, December 30, 2022

Father & Daughter moment using Echo Park Paper Let's Create by Kerryn Fry

Good morning everyone!
My page today has been created with 
the collection Echo Park Paper Let's Create.
The colours in the collection were 
perfect for this gorgeous photo of my 
Nephew and Great-Niece at her Christening.


The base of the layout is a clean
sheet of Bazzill Kraft Cardstock.
I've layered the patterned papers
and outlined some of the layers
using a gold pen.

The butterflies and tab in the top right 
corner are stickers from Cocoa Vanilla
The butterflies have been lifted 
with foam tape.


The embellishment cluster to the left
of the photo has been created with stickers
from the Cardstock Sticker Sheet
and Cocoa Vanilla.

The Let's Create Stickers have been
modified with words from Cocoa Vanilla
and Tim Holtz sticker book.


The 2 Crafty Rose Set has been covered 
with Distress Paints Evergreen Bough,
Bundled Sage and Stormy Sky.

I have backed the roses with scrap
paper and then outlined the flower part
with a gold pen. Each flower has been
lifted with foam tape for dimension.


The 2 Crafty title Father & Daughter Moment
has been covered with Gold Ink.
The 'Moment' part of the title
has been lifted with foam tape as well.


A simple, sweet page for this week.
Thank you for visiting this blog today,
I hope you have been inspired.

Have a fun, creative weekend
and I will catch you next year, sound strange!
Join us again on Monday!

Products used:
Bazzill Kraft Cardstock
Echo Park Paper Let's Create - Get Crafty
Echo Park Paper Let's Create - Craft Room
Echo Park Paper Let's Create - 4x6 Journaling Cards
Echo Park Paper Let's Create - 12x12 Cardstock Sticker Sheet
Echo Park Paper Let's Create - Stash of Stems
2 Crafty title Father & Daughter moment
2 Crafty Rose Set
Distress Paint
Cocoa Vanilla Stickers


Photobucket

Monday, December 26, 2022

Christmas at Martin Place with Bella Blvd North Pole collection by Fiona Johnstone

Hello everyone

Hope you all had a very Merry Christmas and are enjoying the Christmas Break. 

I have another Christmas layout to share with you all, this time using Bella Blvd North Pole collection for my layout of the Martin Place Christmas Tree this year. 

Christmas - Martin Place


Love the Bella Blvd North Pole collection for it's adorable patterns and embellishments. I wanted a clean background for this layout as the tree itself is quite busy. I have layered up some patterned paper and mounted the cardstock onto a patterned paper, offset rather than centred for a little extra interest to the page. 


Love the cute little chipboard embellishments in the range and have teamed them up with some bling 


and finishing off with a cute title - the main Christmas word is from the chipboard sheet and I have added some small Jillibean alphas from my stash. 


Thanks for stopping by 
Till next week
Fiona
x


Bella Blvd The North Pole Collection - The Perfect Tree
Bella Blvd The North Pole Collection - You Warm my Heart
Bella Blvd The North Pole Collection - Traditions
Bella Blvd The North Pole Collection - Here Comes Santa
Bella Blvd The North Pole Collection - Chipboard Stickers 
Jillibean Soup Alpha Stickers
White Cardstock
Gemstones

Friday, December 23, 2022

Yesteryears using Celebr8 Just For You by Kerryn Fry

Hi everyone!
Today I'm sharing another page created 
with the collection Celebr8 Just for You.
Thought I would try a vintage look 
with this range and I'm happy with the result.

The photo was taken in the early 1920's,
a family snap of the maternal ancestors of my family.
The two ladies on the left side are my 
Grandmother and Great-Grandmother.


I've used the black spot patterned 
paper as the base for this page.
Then I have layered patterned papers
with torn edges on the top.

The hexagon pieces have been hand cut
from one of the patterned papers, along with a tag.
This pieces have been tucked under the torn layers.

The tab was also hand cut
from one of the patterned papers.
I've used foam tape to lift each element.


On each side of the photo I have added
hand cut embellishments with foam tape.
I've added some of the remaining hexagons
left over from the previous layout.


Love the simplicity of the oranges, blossoms
and the leaves to frame the photo.
The photo has been layered on a black
patterned paper and then another layer of 
the lighter orange patterned paper.

The photo has been lifted with foam tape
and I have added a border strip under the photo.
The strip is a barcode strip hand cut 
from the patterned papers


covered with patterned paper and
then backed with lighter paper.
I will use this as a journal spot
for the page to add some heritage details.


I've added some extra detail to certain
elements on the page with a gold gel pen.
I have outlined some of the hexagons,
outlined the tag and added some details to
the smaller hexagons pieces. 
 

covered with gold ink and added to the
base of the photo. 


Thank you for visiting the blog today.
I hope you have been inspired by the page.
This collection is just amazing, I am loving it!

Have a great Christmas weekend
and hopefully, once the crazy time is over
you get a chance to relax and craft.

Please join us again on Monday
for Fiona's next project.

Products used:
Gold Ink
Gold Pen


Photobucket

Monday, December 19, 2022

Deck the Halls with Vicki Boutin Evergreen and Holly by Fiona Johnstone

Hello everyone

Back with another festive layout using Vicki Boutin Evergreen and Holly

Deck the Halls


I started this page with the idea to fussy cut the poinsettias from the Trimmings paper as they feature on my Christmas Tree. I've cut about 5 out of various sizes and tucked them in various ways - some under the paper, some under the photos and then one as a feature. 


I've used torn paper layers under my photo in lighter colours over my dark green background to match my tree. To lighten up the background I have splashed some white ink over the background and then added some gold stars from Sticker Book.


I've used a mix of stickers from the sticker book and ephemera from the die-cut Icons to embellish my page before finishing with the cute thicker words for my title and mounting the bow from the ephemera icons pack above the title. 


Thanks for stopping by
Till next week

Fiona
x

Friday, December 16, 2022

Love You using Celebr8 Just For You by Kerryn Fry


Hello crafters!
Today's page is another one created with
the gorgeous collection pack Celebr8 Just For You.
In the pack there is a full sheet of different sized
hexagons in a variety of colours and patterns.
I just had to cut them out and put a page together.

The B&W photos are of my absolutely,
amazing younger sister who lives in Queensland.
Just wanted to highlight how incredible she is.


I've used my usual Bazzill Kraft Cardstock as the 
neutral colour works so well with this collection.
I've used a hexagon 6x6 stencil from my stash 
and gold ink to create the background effect
around the outer edge of the cardstock.

The the fun began!
Cutting out all of the hexagons, big and small.
I made a plan of the layout and then started 
sticking the hexagons to the page,
using with double-sided tape and 
some foam squares for dimension.


The words and quotes have been hand cut
from another paper in the collection.
I have outlined the darker hexagons
with a fake stitch border using a gold pen.


The photos were also cut into hexagon shapes.
The larger B&W photo was layered onto patterned 
paper before sticking it to the page.

I've also hand cut some hexagon clusters
from another patterned paper and cut
out some bees to add to the page.


I have overlapped some of the pieces
and spaced others evenly apart.
The smaller black hexagons worked well
to fill some of the gaps and balanced 
out the black across the page.


Lots of positive quotes on some of the shapes
and beautiful colours and patterns.
The bees were a great addition across the 
page and have been lifted with foam squares.


All of the photos have been framed
with a gold pen border and lifted with foam.
I love the pop of green across the page too.


The title of the page has been created
I've used foam squares on alternating letters
to stagger the title.


Thank you for dropping in to the Blog today.
I hope all of the fussy cutting hasn't scared
you away, I love the result.
Have a fabulous weekend!
Please join us again on Monday
for Fiona's next project.

Products used:
Gold Ink
Hexagon Stencil
Gold Pen


Photobucket

Monday, December 12, 2022

Dear Santa with Vicki Boutin Evergreen & Holly by Fiona Johnstone

Hello everyone

Time for the Christmas layouts! This week I've used Vicki Boutin Evergreen and Holly:

Dear Santa


I snapped this photo of Lily earlier this month when we were walking around the city. 

For the layout, I have used the traditional Red and Greens to tie in with my photo. Lots of white so it's not too dark . Love the green check for a frame around my white cardstock which I have inked then added some masking with Vicki Boutin Print Shops stencil - Pattern Maker in various grades of green. 


Next I've layered a few papers, adding some tags from the Merriest Days paper and fussy cutting some poinsettias from the Trimmings paper.  Finally I added some large ephemera pieces to embellish. 


I finished my layout with some gold thickers in Christmas phrases - this one was perfect for my photo!


Thanks for stopping by
Till next week

Fiona
x


Products Used:
Vicki Boutin Evergreen & Holly paper - Evergreen
Vicki Boutin Evergreen & Holly paper - Gifts of Joy
Vicki Boutin Evergreen & Holly paper - Holiday Cheer
Vicki Boutin Evergreen & Holly paper - Merriest Days
Vicki Boutin Evergreen & Holly paper - Making Spirits Bright
Vicki Boutin Evergreen & Holly paper - Trimmings
Vicki Boutin Evergreen & Holly Ephemera Cardstock Diecut Icons
Vicki Boutin Print Shop Stencil - Pattern Maker
Distress Oxide Ink - Mowed Lawn
Distress Oxide Ink - Rustic Wilderness
Thickers


Friday, December 9, 2022

Be You using Celebr8 Just Be You by Kerryn Fry

Good morning everyone!
Today I'm sharing another page created with 
the beautiful collection Celebr8 Just Be You.
A rare selfie taken after a short hair cut
in August last year. It's long again now! 


The page has started with a 12x12 piece 
of Bazzill Kraft Cardstock for the base.
I knew I intended to use the wreath hand 
cut from the patterned paper on the page.

The simple background effect has been created 
to appear around the outside edge of the wreath edge.
Using the Crafters Workshop 6x6 Mini Tiny Circles and 
white ink, I have added some light details on the cardstock.

Using a white paint pen, I have added
some splashes across the page as well.


I've hand cut some of the half oranges
to add some extra dimension to the wreath.
Some of the leaves on the wreath have
been outlined with a gold pen.

The quote 'Beauty Begins' is from the barcode strip,
I have cut it into two pieces and cut flags each end.
I've used foam tape to add it to the page.


The large 2 Crafty Anthea's Butterfly frame has been 
covered with black ink and backed with patterned paper.
I have only used adhesive in the centre of the butterfly 
frame and paper, to allow it to have some movement & dimension.

cut into smaller pieces and covered with Mowed Lawn 
& Rustic Wilderness Distress Paint.

been covered with black patterned paper
and the smaller frames have been backed 
with a lighter patterned paper.


I have added a few more hand cut elements
from the collection to the page.
The orange bloom to the left of the photo
and a cluster of oranges to the bottom
of the photo under the butterflies.

have been covered with a combination of 
Mustard See, Fossilized Amber and 
Spiced Marmalade Distress paint.
I've finished the butterflies with a layer of
Dimensional Magic for a shiny finish.

The title is the Be You banner
hand cut form the patterned paper.


Thanks for visiting the blog today.
Hopefully you have been inspired to create.
Enjoy your weekend, do something you love
and join us again on Monday.

Products used:


Monday, December 5, 2022

Sweetest Moments with 49 & Market Alena Collection by Fiona Johnstone

Hello everyone

This week I'm creating another layout with the stunning 49&Market Alena Collection:

Sweetest Moments


These background papers are just so perfect for backgrounds. I have added some of the rubons - the flowers behind the photo top left and right as well as the bottom left of my photo. Such amazing quality rubons, very easy to use and add the perfect touch!


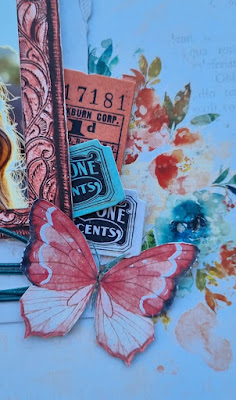
For my photo I have mounted it on some of the larger pieces from the ephemera pack, love the orange frame piece. I've then added some tickets and ephemera pieces around my framed photo. I've added some fussy cut pieces - the butterflies and the flower 


Love the cute string piece from the laser cut elements, it just adds the perfect detail. 


and I finished off the page with another rub-on for my title. 


Thanks for stopping by
Till next week
Fiona
x


Products Used:
49&Market Alena 12x12 Collection Pack
49&Market Alena - Ephemera
49&Market Alena - Laser Cut Elements
49&Market Alena Rub Ons 6x8