HOMEABOUT USSHOP HERECROPDATESCURRENT CHALLENGESTIPS&TUTORIALS

Monday, July 30, 2018

Beautiful with Pink Fresh Studio Simple & Sweet by Fiona Johnstone

Hello everyone

This month I have a couple of layouts to share with the gorgeous new colection by Pink Fresh Studio - Simple & Sweet.  Great fresh, citrus and pink colour palette. 

Beautiful

I've started off with some white cardstock and used yellow and pink paints watered down to create my background using the plastic bag techinque, then I have added a few splatters of paint. Once dry I have added some stamping in yellow to give some extra definition to the background. 


For my paper layers I have layered my different patterned papers out in a fan design across the page, and then added some stickers underneath for added depth before adding my embellishment clusters - epoxy badges and puffy stickers from Pinkfresh, veneer by Cocoa Vanilla Studio, flowers by Kaisercraft and a Flutterby designs flair. 

The puffy stickers are super cute and add perfect dimension!


I've finished my layout with a couple of enamel dots and a wood veneer title from Cocoa Vanilla Studio. 


Thanks for stopping by
Till next week
Fiona
x
Photobucket
Pinkfresh Studio Simple & Sweet paper - Good Things
Pinkfresh Studio Simple & Sweet paper - Simplicity
Pinkfresh Studio Simple & Sweet paper - Fresh Air
Pinkfresh Studio Simple & Sweet Epoxy Badges
Pinkfresh Studio Simple & Sweet Puffy Stickers
Pinkfresh Studio Simple & Sweet Enamel Dots (Similar to what I've used)
CVS Wood Veneer
CVS Love Always Bits & Piece
Bazzil Cardstock - white
Kaisercraft Texture Stamp - Grid
Kaisercraft Paper Blooms - Cream
Flutterby Designs Flair Button
Paint


Friday, July 27, 2018

Dream a little dream using Kaisercraft Hide & Seek by Kerryn Fry

Good morning all.
I just can't stop creating with the gorgeous collection, 
Kaisercraft Hide & Seek!
This would be one of my all time favourite collections from Kaisercraft.
Today I am sharing a page featuring my great niece, 
a very girly design, but loving it.

I've started the page with patterned paper this week.
The white text on a grey background was a perfect base to build on.
I have then layered the oinks, green and gold papers under the colourful photo.
The photo has been matted with black cardstock to define it on top of the paper layers.


I have used some of the Collectables to build the embellishment clusters.
With lots of hand cut elements from the patterned papers.
Using a black gel pen, I have outlined most of the paper layers
and a few of the words and wood veneer leaves.


The 2 Crafty Delicate Butterflies have been painted with 
Picket Fence Distress Paint and Worn Lipstick.
I have used both butterflies to frame the photo 
and form the centre piece of the clusters.
Most elements have been lifted with foam tape to give the page more dimension..


The wooden leaves and bunny are super cute, 
Apart from the pen outline on the leaves, I have left the veneer natural as
the colour highlights the gold in the papers. 


The 2 Crafty title Dream a little dream was covered with 
Black Soot Distress Paint.
Once the paint had dried, I have outlined the letters with a white pen.
Love the pop the outline has given the title.

That's my page for this week.
Have a great weekend with plenty of crafting.
Join us again on Monday for Fiona's next project.
Products Used:
Kaisercraft Hide & Seek - Clouds
Kaisercraft Hide & Seek - Deer 
Kaisercraft Hide & Seek - Fawn
Kaisercraft Hide & Seek - Trees
Kaisercraft Hide & Seek - Wild Fields
Kaisercraft Hide & Seek - Woods
Kaisercraft Hide & Seek - Sticker Sheet
Kaisercraft Hide & Seek - Mountains
Kaisercraft Hide & Seek Collectables
Kaisercraft Lucky Dip Wooden Flourish Pack - Woodlands
2 Crafty title - Dream a litttle dream
2 Crafty Delicate Butterflies
Distress Paint
Photobucket

Wednesday, July 25, 2018

"Cool", by Amanda H

 Hi all,
 
Here is my last page for July... and I had the chance to work with some more of 
the My Minds Eye collection - Good Vibes. 
Bright and patterned, it worked perfectly teamed with a black background for today's page.
 
 
I started with the black cardstock background, and mounted the 3 photos on white cardstock.
 Then I added some panels of the patterned papers from the 6x6 paper pad in the
 Good vibes range behind the photos.  
 
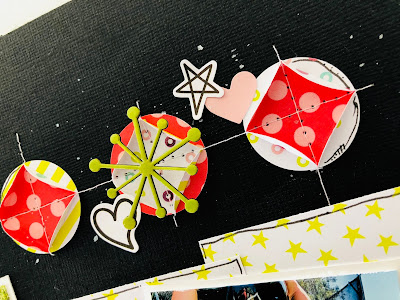
To create the circle effect, I punched 30 x 1.5inch circles from the 6x6 paper pad in the 
Good vibes range. I stacked two circles together, glued them lightly and then machine 
stitched across and down them. Then I folded up the sides of the top circle.
 
 
A fairly simple, yet effective technique that I haven't done in years! It was super fun to try it out again for this page, as I felt it matched the design on niece Isla's shirt.
 
For the title, I used the word "cool" from the Good Vibes sticker sheet.
 

More stars and hearts, and a cool little camera from the Good vibes sticker sheet were
 used for some more detail.

I also added some 2Crafty chipboard. I took the centres from the Sakura Flowers , inked
them, added a coat of Dimensional Magic and stacked them on a few of the circles.

I also decided to add some black pen doodling, around the paper panels and on some 
edges of the circles.
That's it from me today!
Thanks for looking,
Amanda


Products used:


Photobucket

Monday, July 23, 2018

Cocoa Vanilla Studio Boys Rule - Awesome by Fiona Johnstone

Hello everyone

Hope you've all had a great weekend. I have just come back from a 3 day scrapbooking retreat where All About Scrapbooks shop was set up. Lots of fun & shopping and lots of layouts to share in the coming weeks! But first, a layout created with the cool Boys Rule collection by Cocoa Vanilla Studio:

Awesome


A page about my youngest nephew who we recently visited on a spur of the moment trip to Queensland. Middle of winter, but that didn't stop the kids from splashing about in the water then going in fully clothed!!

I started my layout with this cool paper for my base - all the background work has been done and you can leave it like that, but I have added some stamping and masking for a little more texture and grunge.


Fantastic embellishments as always from Cocoa Vanilla make it easy to finish off your page - I love the "What the?" quote - perfect for this page! It is from the ephemera pack. The flair is from an early CVS collection - You Rock!


I've also used a piece from the ephemera pack for my title - it is indeed Awesome!!

I've added some coloured gauze threads to my page to add a little bit more green colour and some texture to my layout.  I've finished off with some journaling from the sticker sheet. 


Thanks for stopping by
Till next week

Fiona
x
Photobucket
Products Used:
Cocoa Vanilla Studio Boys Rule paper - Messed Up
Cocoa Vanilla Studio Boys Rule paper - Straight & Narrow
Cocoa Vanilla Studio Boys Rule paper - Happy Go Lucky
Cocoa Vanilla Studio Boys Rule paper - Star Fall
Cocoa Vanilla Studio Boys Rule Accessory Stickers
Cocoa Vanilla Studio Boys Rule Die-Cut Ephemera
Cocoa Vanilla Studio You Rock Flair Buttons
Kaisercraft Texture Stamp - Tiny Dot
Kaisercraft Texture Stamp - Triangles
Texture Paste
Green Gauze
Star Mask

Friday, July 20, 2018

You Shine using Kaisercraft Hide & Seek by Kerryn Fry

Good morning everyone!
Today I have created another page using the divine collection,
Kaisercraft Hide & Seek.
Once you start using this collection,
you will not want to stop.
Perfect for both girls and boys.
The black & white photo is from 2015,
a special moment captured between cousins.
I've started with Kraft Cardstock.
Using gold ink and Kaisercraft Designer Template Dotted Lines,
I have added a soft effect randomly to the background.


The 2 Crafty Medium Filmstrip has been painted with Black Soot Distress Paint.
I have then backed the filmstrip with patterned paper to create another layer.


The flowers, journal spot and quote have been hand cut from the patterned papers.
The 6x4 photo and the quote have been matted with Black Cardstock 
to help define them on the page.
Scrap cardboard and X-Press It Foam Squares have been used 
to lift some of the elements


Totally in love with the Kaisercraft Lucky Dip Flourish Pack,
especially love how well the wood veneer matches the page.
A few mountains added for the outdoor feel.
The Sticker Sheet always provides those extra small elements to finish off the page,
the arrows and black circle chains across the page.
I have hand cut a few small arrows from the papers.


The 2 Crafty title You Shine was chosen to highlight our amazing boy.
Regardless of their age difference, he is patient and takes care of his cousins.
The title was painted with Cracked Pistachio Distress Paint
and then gently swiped with gold ink.

That's all from me today.
I have already started the next project with this collection, 
can't stop! Told you I love it!
Thanks for visiting the blog today, have a fabulous weekend
and please join us again on Monday with Fiona's next project.
Products Used:
Bazzill Kraft Cardstock
Bazzill Raven Cardstock
Kaisercraft Hide & Seek - Bears
Kaisercraft Hide & Seek - Deer
Kaisercraft Hide & Seek - Fawn
Kaisercraft Hide & Seek - Mountains
Kaisercraft Hide & Seek - Wild Fields
Kaisercraft Hide & Seek - Collectables
Kaisercraft Hise & Seek Sticker Sheet
Kaisercraft Designer Template
Kaisercraft Lucky Dip Wooden Flourinh Pack - Woodlands
2 Crafty title You Shine
2 Crafty Medium Filmstrips
Distress Paint
X-Press It Foam Mounting Squares
Photobucket

Wednesday, July 18, 2018

"Happy" by Amanda H

Hi everyone,
 
Today I am sharing a page with a photo by the pool (perfect for a flamingo!) using the fun Heidi Swapp Pineapple Crush collection.
 
I layered three papers in the range for the background: Cabana, Flamingle, and Aloha.
Before I added my photo, I decided to add some more texture. I added the pink hearts using a stencil and some Colour Blast Colour Paste in Punch. I also added some black stamping with a script stamp.
Then I added my photo and started embellishing the page. I used lots of die cuts from the Heidi Swapp - Pineapple Crush Ephemera pack.
Amongst the leaves, flamingo, flowers and spot, I added one pink flower from my Prima Havana pack of paper flowers.

In the top corner I added a die cut to house some journaling. In this close up you can also see that you had inked the edges of the paper and die cuts with some black ink.

And a few sprinkles of sequins also help to finish the page.
Thanks for looking today!
Amanda

Products used:


Photobucket

Monday, July 16, 2018

Lap Dog with Cocoa Vanilla Studio Boys Rule by Fiona Johnstone

Hello everyone

This week I have created a page with the amazing new collection from Cocoa Vanilla Studio -  Boys Rule:


I love the woodgrain paper and it was the perfect base paper for my photo as the colours match my pooch!! I have taken inspo from my t-shirt for the colours and the star theme. 

I have gone with some clean lines for my design, focusing on the patterns showing. 


For my title I have used some thickers in black so they stand out against the star patterned paper. I've embellished my layout with some more stars and then some quotes and finishing off with a flair button. 


Thanks for stopping by
Till next week

Fiona
x


Photobucket
Products Used:
Cocoa Vanilla Studio Boys Rule Paper - Fun & Games
Cocoa Vanilla Studio Boys Rule Paper - Happy Go
Cocoa Vanilla Studio Boys Rule Paper - Straight & Narrow
Cocoa Vanilla Studio Boys Rule Paper - Star Fall
Cocoa Vanilla Studio Boys Rule Accessory Stickers
Cocoa Vanilla Flair Button
Pink Fresh Studios Escape the Ordinary Ephemera
Pink Fresh Studios Escape the Ordinary Sticker Sheet
American Crafts Thickers 

Friday, July 13, 2018

Cherish using Kaisercraft Hide & Seek by Kerryn Fry

Good morning everyone.
Today I'm sharing my first page created with 
the beautiful collection Kaisercraft Hide & Seek.
The photos are of my youngest great-niece on New Years Eve 2015.
She is such a cutie!
The page started with the plain Kraft Cardstock base.
I've then layered the patterned papers in the lower section of the cardstock.
The top of the page has been decorated using the Sticker SheetCollectables
and clouds cut from the patterned paper.
My black gel pen features again with a little faux stitching to highlight
a few features across the page.
I have fussy cut some flowers and leaves from the papers
and popped them up with foam tape.
I've built the bottom of the page up using the Collectables
and hand cut elements.
The Sticker Sheet was perfect for the borders
and finishing touches on the page.

in two colours Worn Lipstick and Tarnished Brass.
The 3 photos have been matted using the patterned paper Trees
and then lifted with cardboard for dimension.


The journal spot was hand cut from the Explorer paper
and lifted with foam tape.
More Collectables with the arrow and flowers.


The 2 Crafty title Cherish was painted with Worn Lipstick Distress Paint
and then stamped using Kaisercraft Texture Stamp and gold ink.
The final layer is Dimensional Magic.


That's my page for this week.
I hope you've enjoyed the process today.
Have a fabulous weekend and stay warm.
Fiona will be back on Monday with her next project,
I hope you can drop by.

Products used:
Bazzill Kraft Cardstock
Kaisercraft Hide & Seek - Wild Fields
Kaisercraft Hide & Seek - Trees
Kaisercraft Hide & Seek - Woods
Kaisercraft Hide & Seek - Fawn
Kaisercraft Hide & Seek - Clouds
Kaisercraft Hide & Seek - Explorer
Kaisercraft Hide & Seek - Collectables
Kaisercraft Hide & Seek - Sticker Sheets
Kaisercraft Textured Stamp
2 Crafty title Cherish
2 Crafty Freda's Butterflies
Dimensional Magic
Distress Paint
Photobucket