HOMEABOUT USSHOP HERECROPDATESCURRENT CHALLENGESTIPS&TUTORIALS

Monday, November 13, 2017

This is Us with Pink Paislee Turn the Page by Fiona Johnstone

Hello everyone

Back again with the stunning Pink Paislee Turn the Page collection by Paige Evans. It is so beautiful. I have created a page today of me and one of my best friends. She lives on the other side of the globe but we usually see each other once a year. Problem is we usually never get a photo of the two of us. I remembered this year!

This is Us


For this page I have created a mixed media background using Dylusions paints as watercolours. I did this by adding a tonne of water then applying with a paintbrush and dabbing the excess with paper towel. This gives me the lighter effect. I've added some sploshes of pink once the teal has dried. 


Besides the  usual paper layers, I have tucked some ephemera flowers under the papers and also used part of an ephemera frame from the previous PP collection, Oh my Heart!. I've journaled onto some cardstock, cut up the strips and then added some paint sploshes. 


Title is 2Crafty of course, painted with Dylusion Paint in Rose Quartz, and a flair from an older Fancy Pants collection. 

Thanks for stopping by
Till next week

Fiona
xx

Photobucket

Products Used:

Pink Paislee Turn the Page paper -#4
Pink Paislee Turn the Page paper - #13
Pink Paislee Turn the Page paper - #18
Pink Paislee Turn the Page paper - #15
Pink Paislee Turn the Page Ephemera
Pink Paislee Oh My Heart Ephemera
Dylusions Paints - Rose Quartz
Dylusions Paints -  Peony Blush
Dylusions Paints - Vibrant Turquoise
Fancy Pants Flair
2crafty Title - This is Us (custom)
White Cardstock 

Friday, November 10, 2017

You make me Happy with Carta Bella Welcome Home by Kerryn Fry

Morning All!
November brings two new collection for me to feature this month.
Today's project has been done using the gorgeous Carta Bella collection Welcome Home.
I need to say straight out that I LOVE Carta Bella papers!!!
The thickness, texture and smell always excites me 
and yes I did say smell LOL.
This collection is filled with good wholesome colours, rich and inviting.
The boys in my life are the stars once again.

This week I've gone back to my favourite background effect, 
starting with a Kraft cardstock base.
I picked three matching Distress Ink colours from the papers and 
three different Tim Holtz Layering Stencils.
The stencils and inks have been randomly applied around the main focus.


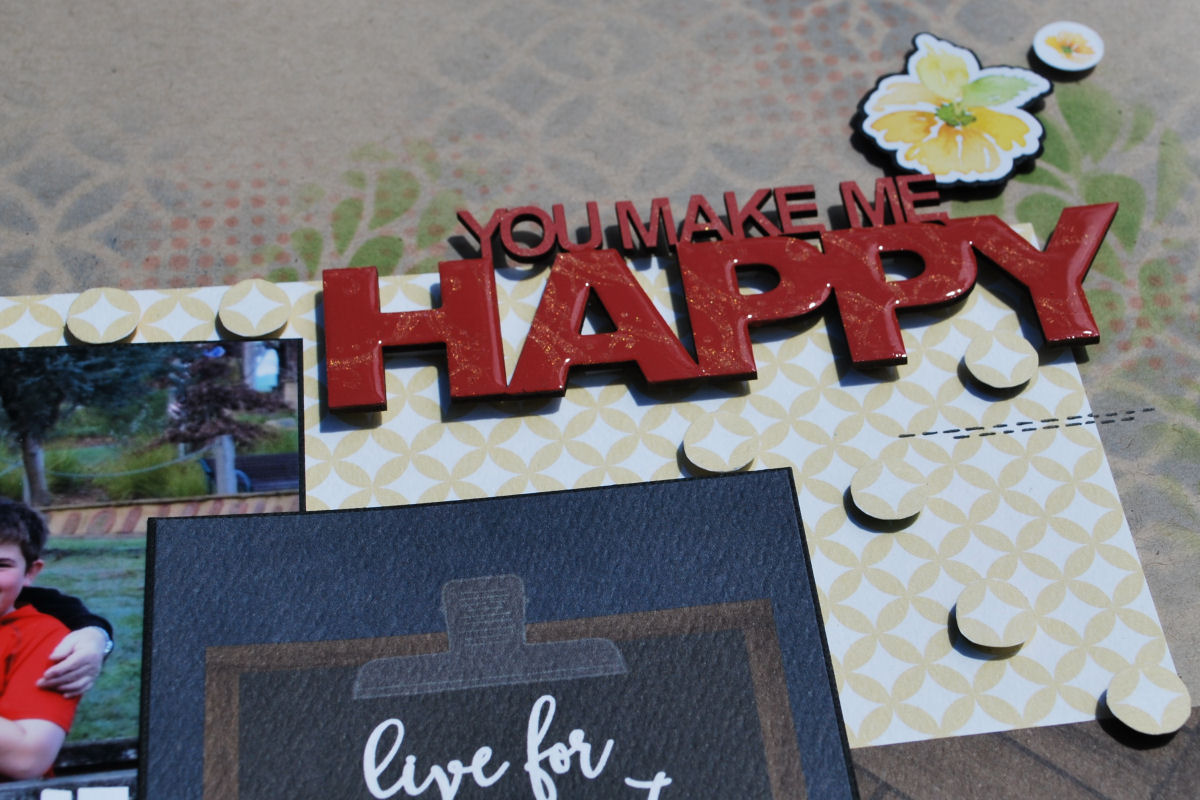
The 2 Crafty title 'You make me Happy' has been covered with Distress Paint Fired Brick.
Once the paint was dry, I have used a metallic gold ink and a stamp to add a pattern to the words.
Then I've given part of the title, the word 'Happy', a coat of Glossy Accents.
Love how the Glossy highlights the sparkle of the ink. 


I have used a combination of the Ephemera Die Cuts and Sticker Sheet to build the clusters on the page.
Each piece has been matted with black cardstock to give them clear definition.
Foam tape helps to give the elements a lift around the photo, creating dimension.


I love the pop of red throughout the page, I have used the Sticker Sheet to balance
it with the photo and papers.
I have finished the page off with some doodling with a black pen and 
twine to decorate the basket and banner.


Thank you for visiting the blog today.
I hope you have enjoy my project.
Hope to see you back here on Monday for Fiona's next project.

Products Used:
Carta Bella Welcome Home - Forever Home
Carta Bella Welcome Home - 3x4 Journaling Cards
Carta Bella Welcome Home - Ephemera Die Cuts - Icons 
Carta Bella Welcome Home - Element Sticker Sheet
2 Crafty title You make me Happy
Tim Holtz Layering Stencil
Distress Inks
Distress Paint
Glossy Accents
Photobucket

Wednesday, November 8, 2017

Christmas Eve and Christmas Day, by Amanda H.

Hello everyone!
 
Welcome to my Wednesday share! Today I am scrapping some Christmas photos.
 There are so many lovely Christmas ranges in store, there are no excuses to not scrap Christmas!!!
 
I have used the Simple Stories, Oh What Fun! collection. Combined with some white cardstock and machine stitching and this range was perfect for my Christmas Eve and Christmas Day photos.
 
These pages were not designed as a double layout, but they will sit side by side in the album.
 I copied the same design elements for both pages.


Here is page 1: Christmas Eve.


I started with a white cardstock base.
 Then I used the "Hey Santa" paper (oh so cute!), finishing with machine stitching. I cut
 a banner strip of the 4x6 vertical elements paper, using the red "B" side of the paper, and
again more machine stitching.
Then to finish the page, I used clusters of the amazingly sweet Stickers in the range. I added
 most of these on foam tape, so they had some dimension on the page. There is a great
assortment of stickers on this sticker sheet - from banners, to sticker words to Christmas
 characters - all perfect to finish a Christmas layout or card.

Here is page 2: Christmas Day.

For this page, I again started with white cardstock. I used a second panel of the 
4x6 vertical elements paper, using the red "B" side of the paper, with machine stitching.

Above and below the panel, I stuck the small stamp sized stickers from the Sticker sheet.
 For interest, I machine stitched around these stickers.


Then I finished with more of the stickers from the Sticker sheet.  I added many of these
 on foam tape, so they had some dimension on the page. 


Oh what fun! It was really fun to scrapbook these photos of my kids enjoying 
Christmas Eve and Christmas Day!


Products used:
Papers:

Embellishments:
 
Thanks for looking today!
 
Amanda
 
 
Photobucket

Monday, November 6, 2017

You'll Move Mountains with Pink Fresh Studio Escape the Ordinary by Fiona Johnstone

Hello everyone

Today I have another layout created with the funky Pink Fresh Studios Escape the Ordinary collection. Love these gorgeous big butterflies from the ephemera packet. 

You'll Move Mountains
 
The background paper is just gorgeous with the colourful shapes running down the side, creating a bit of interest to the background. To this I have layered several of the pattern papers to co-ordinate. 
 

These stunning butterflies look amazing with their pops of gold, I've added some pretty sequins in gold and steel to compliment them. The flowers and leaves from the ephemera pack add that little extra colour to the page. 


The You'll Move Mountains die-cut makes the perfect title, and I have finished off the page with some Cocoa Vanilla Studio rubber charms. 

Thanks for stopping by
Till next week
Fiona
x
Photobucket
Products Used:
Pink Fresh Studio Escape the Ordinary Paper - Chase
Pink Fresh Studio Escape the Ordinary Paper - Dare
Pink Fresh Studio Escape the Ordinary Paper - Transform
Pink Fresh Studio Escape the Ordinary Paper - Wander
Pink Fresh Studio Boys Fort Paper - Thumbs Up
 Pink Fresh Studio Escape the Ordinary Ephemera Pack
Cocoa Vanilla Studio Rubber Charms - You Rock 
Cocoa Vanilla Studio Rubber Charms - Wild at Heart
Asstd. Sequins

Friday, November 3, 2017

Raising the Bar with Pinkfresh Studios Boys Fort by Kerryn Fry

Morning everyone!
Back today to share my second page featuring Pinkfresh Studios Boys Fort.
I love this collection, a fabulously masculine collection, with great colours and patterns.
The photos are of Mr 13 at his first sport's day at his new school.
He did well on the day and fitted in with his peers really well, proud Mum moment! 

There were no fancy background effects to this page. 
I started with a Kraft cardstock base and then built layers using just the patterned papers.
The paper 'You Rule' was the first layer with the rich rust colour.
Then the cutting began!
The circles have been cut from the paper 'Tough'
I've then arranged the circles to surround the photos and flow across the page.
Plenty of foam tape used to add depth to the layers.


The papers 'Game On' & 'High Five' were also used to hand cut a few elements.
The Ephemera & Phrase Stickers were a great source for those little extra pieces
to complete the clusters.
Using a black pen, I have doodled some faux stitching around some of the circles


Now call me crazy, but I was enjoying the fussy cutting process so much, 
I decided to cut a few hexagons from the paper 'Bold' to add to the page.
They have been mounted on foam tape to form another layer.
I have used the Chipboard Alpha Stickers for the title Raising the Bar, 
Each letter has been outlined with white pen to define the edges sitting on the black & white photos.


The cut circles were also a great place for some added journaling.
I love the pops of colour the circles gave the page.

That's my page for this week, hope you have enjoyed it.
Have a fabulous weekend and 
remember to check back on Monday for Fiona's next project.
Products Used:
Bazzill Kraft Cardstock
Pinkfresh Studios Boys Fort - Bold
Pinkfresh Studios Boys Fort - Game On
Pinkfresh Studios Boys Fort - High Five
Pinkfresh Studios Boys Fort - Tough
Pinkfresh Studios Boys Fort - You Rule
Pinkfresh Studios Boys Fort - Ephemera
Pinkfresh Studios Boys Fort - Chipboard Alpha Stickers
Pinkfresh Studios Boys Fort - Phrase Stickers
Photobucket

Wednesday, November 1, 2017

"Sightsee" using Prima Zella Teal
by Amanda H.

 Hello AAS fans!
 
Welcome to November... and my first page share for the month.
 
Today I have some travel photos and I used the new Prima Zella Teal Collection.
 

I started with a piece of Kraft Cardstock for the background.
Then I used Tim Holtz Distress Oxide Ink Pad. I pressed some ink onto a piece of plastic
 packaging and then sprayed with water. Then I smooched the ink onto the page.
Next I mixed some Colour Blast White Heavy Gesso with a little water and used it to
 splatter some white on the background, and paint on the outer edge of the page.
Here is a close up of the Distress Oxide and Gesso effects on the background.

Then, I used the 6x6 Paper Pad in the Prima Zella Teal range. I cut various strips and panels
 in the different papers to create an interesting patchwork of papers behind my photos. I did
 skinny strips along the left side as a platform for the title. Each piece of paper, had the edge
 inked with the Tim Holtz Distress Oxide Ink Pad.

In this cluster, I used:
For the leaves, I inked them with Tim Holtz Distress Oxide Ink Pad and painted the centre with Colour Blast White Heavy Gesso.


I repeated more of the same elements here:
plus some sequins.


And more here on this side, with the title.


The title is a 2Crafty chipboard word, which I inked it with Tim Holtz Distress Oxide Ink Pad 
and then splattered paint with Colour Blast White Heavy Gesso.
 
 
 Products used:
 
Papers:
Kraft Cardstock
Prima - Zella Teal 6x6 Paper Pad
 
2Crafty Chipboard:
Lattice Leaves
Sightsee word
 
Embellishments:
Prima - Zella Teal Flowers - Wanderer
Prima - Zella Teal Puffy Stickers
Prima - Zella Teal Word Stickers
 
Background created with:
Tim Holtz - Distress Oxide Ink Pad - Cracked Pistachio
 Colour Blast - White Heavy Gesso


Photobucket

Monday, October 30, 2017

Fairytale Wish with Pink Paislee Turn the Page by Fiona Johnstone

Hi Everyone

This week I am sharing a layout created using the beautiful Turn the Page collection by Pink Paislee. We are also back to Disneyland photos! The colours in this collection are just stunning and I have teamed them up with the gorgeous new release colours from Dylusions Paints - Peony Blush and Rose Quartz. 

Fairytale Wish
To create my page I have started with the lighter Dylusions Paint, Rose Quartz and used a paint brush to swipe it across my cardstock, then I've used a mix of the two colours for the middle before finishing up with the darker Peony Blush. Once dry I've added some splatters of Dylusions Paints in White Linen. 

Once this was dry I focused on layering up some of the beautiful patterned papers in the Tune the Page collection , adding a doily for some softness. 

Embellishing with some of the flowers and the cute Magical arrow from the Turn the Page ephemera pack , I've added some 2Crafty chipboard stems which I've painted using the Dylusions Paints Slate Grey and Lemon Zest. 


I've dug into some of my older Simple Stories Enchanted collection for the crown brad and white sticker, some Echo park clouds and Fairytale sticker and then added the foam wish word. 


Thanks for stopping by
Till next week 
Fiona
x
Photobucket
Products Used:
Pink Paislee Turn the Page paper #2
Pink Paislee Turn the Page paper #15
Pink Paislee Turn the Page paper #18
Pink Paislee Turn the Page paper Ephemera
Dylusions Paint - Peony Blush 
Dylusions Paint - Rose Quartz
Dylusions Paint - White Linen
Dylusions Paint - Slate Grey 
Dylusions Paint - Lemon Zest 
White Bazzil Cardstock
2Crafty Chipboard - Shrub Set 1
Simple Stories Enchanted Enamel Brad & White Sticker
Echo Park Perfect Princes stickers 

Friday, October 27, 2017

Merry & Bright using Kaisercraft Letters to Santa by Kerryn Fry

Morning Everyone!
It's Kerryn here and today I'm sharing my last project for October.
This week I've gone back to the traditional Christmas collection
 from Kaisercraft, Letters to Santa. 
Every year at Christmas, Mr 13 and I head to a college nearby to visit their amazing 
Christmas light display with a choir and nativity scene.
Our boy may be getting older, but he still loves Christmas.

Starting with Kraft cardstock background, 
I have sponged Picket Fence Distress Ink through a 
6x6 Crafter's Workshop Template to decorate the background.
Once the ink was dry, I have added Diamond Stickles to the stencil pattern.


The flowers have been fussy cut from Letter to Santa Carolers and Dear Santa.
I've highlighted the flowers and added a faux stitched border with a gold gel pen.


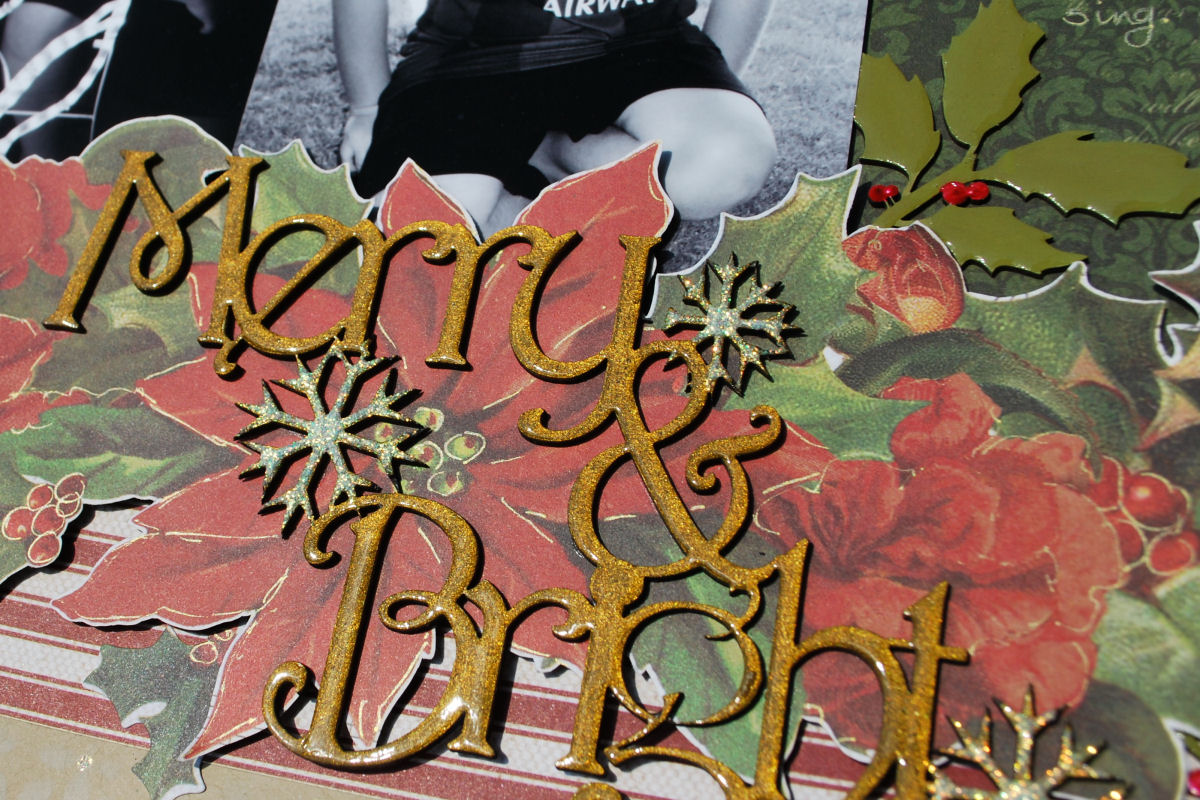
The 2 Crafty title Merry & Bright has been painted with Tarnished Brass Distress Paint. 
I have covered the snowflakes in the title with Diamond Stickles.
The words have been given a coat of Glossy Accents.
 The 2 Crafty Holly Twig Branches were painted, coated with Glossy Accents 
and then added Dimensional Paint for berries.


I have created another layer to the flower arrangement by using some holly branches
from the Sticker Sheet and putting them around the edges.
More stickers have been used for a word cluster on the side of the photos.


That's my project for this week.
Thank you for dropping by the blog today.
I hope you have been inspired.
Please pop back on Monday to check out Fiona's next project.

Products Used:

 
Photobucket