I finished the page with 2Craftys Life's Good title which I have inked in Distress Oxide Chipped Sapphire and Tsukineko Ink in Atlantic.
Monday, January 30, 2023
Life's Good with Pinkfresh Simply the Best by Fiona Johnstone
I finished the page with 2Craftys Life's Good title which I have inked in Distress Oxide Chipped Sapphire and Tsukineko Ink in Atlantic.
Friday, January 27, 2023
Winter Wonderland using Simple Stories Simple Vintage Winter Woods by Kerryn Fry
The base of the page is Bazzill Kraft Cardstock.
The background effect has been created in two stages.
The first layer is Distress Oxide Inks
Evergreen Bough and Salvaged Patina.
I've combined both colours on a plastic scrap,
sprayed it with water and mixed them together.
With a round paint brush I've added
splashes to the outer area of the cardstock.
Once dry, I've used the Vicki Boutin Evergreen & Holly
Snowflake stencil and white paint to add
some random flakes to the background.
At the top of the photos I've added the smaller
bird embellishment from the Page Pieces pack.
The embellishment has been lifted
with foam tape for extra dimension.
The 'Day to Remember' piece on the
left side of the photos has been hand cut
from 4x4 Elements paper. I've added it to
a journal card cut from the Journaling Elements paper.
The 2 Crafty Winter Twig Branches has been
covered with white gesso and then
Salvage Patina Distress Paint.
Once it was dry, I've added
to some of the branches.
On the right side of the photos, I've used
more embellishments from the Page Pieces.
The 'Snow' card has been tucked under
the photo layer with the top edge lifted
with foam tape. The larger bird has been added
with foam tape and then a little Glitter
Glue to the star on the card.
At the base of the snow card I've added
a second 2 CraftyWinter Twig Branch
and another hand cut embellishment.
The 'Love this most' embellishment was
hand cut from 4x6 Elements paper.
The title for the layout Winter Wonderland
is from the Page Pieces pack.
I've added it to the page with foam squares
and the decorated it with Ranger Stickles Glitter Glue.
Thank you for dropping by the Blog today.
I hope my page has inspired you to create
or at least cooled you down a little.
Have a great weekend and
join us again on Monday.
Monday, January 23, 2023
Fav Photo with Vicki Boutin Printshop by Fiona Johnstone
I've used a Vicki Boutin stencil as a stamp for this background using Distress Oxide in Saltwater Taffy. I've stamped the ink on to the stencil, sprayed a little water then stamped the pattern onto my kraft cardstockl
Next I have fussy cut multiple hearts from the Cross My Heart patterned paper and I have added some hand stitching to each heart.
I've added some paper layers to my photo and adhered the hearts to either side of my photo. Next I have used the embellishments from the ephemera and sticker sheets to add extra details to my page.
Torn paper strips top and bottom of my page and the advertising strip off one of the papers used before adding my title - Vicki Boutin stickers from an earlier collection.
Friday, January 20, 2023
One of a Kind using Celebr8 Just Be You by Kerryn Fry
The base of the page is my usual
I've layered the patterned paper
pieces under the photo, balancing
the solid colours with the lighter patterns.
At the top of the page, I've added a torn strip
of the foliage paper and some hand cut pieces,
the Hive, the orange and some leaves.
Using a gold pen, I've add some
fake stitch lines to random elements.
I've created three main embellishment
clusters on the page using with the
hand cut elements from the papers.
The quote is from the barcode strip and
has been cut into 3 parts and added to the
'blank area' of the photo with foam tape.
I've then used Ranger Stickles Glitter
Glue in Crystal to highlight each letter.
The hand cut hexagons in varies sizes
have also been lifted with foam tape
and the 'Unstoppable' tab.
On the the left side of the photo,
there are some patterned paper banner
pieces that have been outlined with gold pen.
I've added a leafy corner piece
to frame the left side of photo and added
some Tim Holtz quote pieces.
At the bottom left corner of the photo,
there are larger hexagon pieces
and orange slices. More gold highlights
Love the sparkle!
The third cluster is the bottom
right corner of the photo.
More orange slices, a hive piece,
leaves and the title piece.
All of the elements have been
hand cut from the patterned papers.
The title 'One of a Kind' fits perfectly.
I've added a border with gold pen
and lifted the piece with foam tape.
There are a few more Tim Holtz pieces
added under the title.
As a finishing touch to the page,
I've add extra highlights with the
Stickles Glitter Glue in the flower centres
and spots on the patterned papers.
Thank you for visiting the blog today.
I hope you have been inspired by the page
and have a relaxing, crafty weekend.
Join us again on Monday for
Fiona's next project.
Products used:
Tim Holtz Small Talk Words
Monday, January 16, 2023
Floriade with Vicki Boutin Printshop by Fiona Johnstone
For this layout I've created a mixed media background using colours to match my photo and papers. I've used some Distress Oxide in Tumbled Glass and then some texture paste masking with Distress Oxide Seedless Preserve and a Vicki Boutin stencil.

Another fussy cut flower and sticker embellishments combined with a Pinkfresh Studio chipboard flair.
Friday, January 13, 2023
Treasure This Moment using Simple Stories Say Cheese at the Park by Kerryn Fry
This base of the page is a sheet
of 12x12 Bazzill Kraft Cardstock.
The main patterned paper layer is the
reverse side of Magical Day paper.
I've hand cut a scalloped strip of Gang's All Here paper
and added a strip of the Magical Day paper.
The top left corner cluster of the photo
is some hand cut Tags layered and some
punched stars from Meet Me on Main paper.
The words are from Bella Blvd
and Cocoa Vanilla Studios.
The It's a Happy Day balloons were
hand cut from the Tags Paper.
To the right of the photo are some
hand cut balloons from Worth the Wait paper.
The have been raised with foam tape
and then extra words added from Cocoa Vanilla.
The bottom right corner is a hand cut journal
card for the Journal Elements paper.
The 'Having a Blast' words and fireworks
were hand cut from a 3x4 Journal Card
on the 3x4 Elements paper.
Under the left bottom corner of the photo
is hand cut camera from the Tags paper
and journal piece from the Journal Elements.
The words are from Cocoa Vanilla Studios.
The title of the page is from the
Using the Treasure this moment stick
swiped with black ink to make sure
the words stay neutral and pop.
To finish off, I've used a black pen
to outline different elements on the page.
Thanks for visiting the blog today,
hopefully the process has inspired
you to set aside some crafting time.
Have a lovely weekend
and join us again on Monday.
Monday, January 9, 2023
Game On! with Pinkfresh Studio Simply the Best Collection by Fiona Johnstone
Thanks for visiting
Friday, January 6, 2023
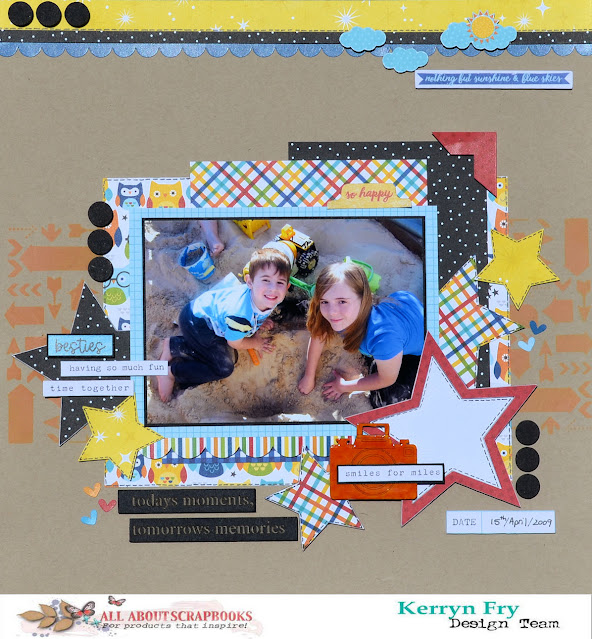
Todays moments using Bella Blvd School is Cool by Kerryn Fry
The base of the page is my absolute
favourite, Bazzill Kraft Cardstock.
The background effect has been created
with the Simple Stories Arrow Stencil
and Spiced Marmalade Distress Oxide Ink.
It pops the small amount of orange
in the photo and patterned papers.
Across the top of the page I have added
a strip of Simple Stories Say Cheese at the Park
Meet Me on Main, a thin strip of Daily Details
and a scalloped sticker from the Cardstock sheet.
The sun and clouds have been hand cut from
the Daily Details paper and the sticker is
from Cocoa Vanilla Sunkissed Accessory Stickers
I've used foam tape to lift each piece.
The 2 Crafty Stars Pack was used to embellish
the page and to create a journal spot.
The chipboard stars have been covered with
patterned paper and the extra stars are patterned paper.
The black chipboard dots on the page are
the dot centres from the 2 Crafty Photo Corners.
They have been covered with black ink
and lifted with foam tape.
The 2 Crafty Mini Camera has been covered
with Spiced Marmalade Distress Paint.
After drying, I have then covered it with
Spiced Marmalade Oxide Ink and hit it with a heat gun.
The final layer is Dimensional Magic
which had a great reaction with the Oxide.
Love the marbled finish.
The photo has been matted with Bazzill Raven Cardstock,
with patterned papers layers added underneath.
I have raised the photo and first two paper
layers with foam tape to create extra layers.
I've used a black pen to add borders to some
of the paper pieces and stars.
To the left of the photo I have added
two more stars and words from both
The title for the page has been created
from the 2 Crafty Phrase Stick Set 5.
Using 'todays moments, tomorrows memories'.
The chipboard has been swiped with black ink,
layering the colour without colouring the words.
I have cut the phrase into two pieces and
then added them to the page with foam tape.
The finishing touches are the small hearts
from the DooHickey Sticker sheet.

Subscribe to:
Comments (Atom)


