HOMEABOUT USSHOP HERECROPDATESCURRENT CHALLENGESTIPS&TUTORIALS

Monday, October 19, 2015

Coco Vanilla Studio Tis the Season - Merry & Bright layout and Project Life:


Happy Monday everyone!

I admire those who do weekly project life albums, there is a lot of commitment involved! I do a monthly album (year in review album) so with my left overs I have created some project life cards for December. I have approached each 6x4 inch card as a 'page' to embellish and created some to add journalling (which is one of the feature concepts I like about PL). I have added bows, wood veneers, 2Crafty chipboard (snowflake and word sentiment 'Merry Christmas'),  enamel dots, die cuts and stickers. I have foamed taped a significant amount to create a 3D effect. Splashes of colour shine and inking chipboard have been added for visual impact. And for card makers this collection is just perfect!


Here are a few close ups of individual cards.


Here is another Christmas layout using this lovely collection. I do love the pastel colours! I found this photo of my boy stacked high with presents and this created the theme of my layout. I coloured the 2Crafty chipboard frame with Versa ink. The chipboard framing of the smaller photo ensures it remains the focus of the layout. The bow, flairs and wood veneer heart add texture and a 3D effect. 

This collection is so versatile and would suit project lifers, traditional scrapbookers and card makers alike! 

Happy scrapping everyone x


Coco Vanilla tis the season - enamel dots
Coco Vanilla tis the season -little stars
Coco Vanilla tis the season - bitty bows
Coco Vanilla tis the season - die cut ephemera
Coco Vanilla tis the season - flair buttons
Coco Vanilla tis the season - all is bright paper
Coco Vanilla tis the season - holly jolly paper
Coco Vanilla tis the season - merry bright paper
Coco Vanilla tis the season - very merry paper
2Crafty chipboard- Christmas polaroid frames
Coco Vanilla tis the season - sticker sheet
2Crafty chipboard - nordic snowflakes
2Crafty chipboard - word circle set christmas
Cocoa vanilla tis the season - wood veneer shapes
Photobucket

Friday, October 16, 2015

Cocoa Vanilla Hello Lovely Layout by Tam

Good morning everyone
 
I'm back and have a very pretty layout to share today.....I got to play with the
 Hello Lovely range from Cocoa Vanilla. 
 These products are gorgeous! They have the most wonderful ephemera/diecuts that co-ordinate beautifully with the papers.  They really make putting the page together so simple.
 

I started by spritzing the background with a pretty stencil, not too much, just a hint peeking out from my planned layers/clusters.  I selected a gorgeous photo taken of my brand new beautiful niece and her big sister, who live in Texas.
  This photo makes my heart swell! It just captures that moment of love so perfectly.
  Having a photo like this also makes the photo come together easily.
I then began layering and clustering and finished it off with a couple of pieces of  gesso
 sprayed 2Crafty Chipboard, and a few sequins.
 
Here's a close up:
 
 
I can highly recommend Cocoa Vanilla's products.  One of the biggest bonuses is that they are Australian!! How awesome is that.  I hope you get a chance to play with some too.
 
See you again soon!
Tam
xx
 
 
 Products Used:
Cocoa Vanilla Made of Awesome Boys Rule Paper
Cocoa Vanilla Hello Lovely Life Story Paper
Cocoa Vanilla Hello Lovely Lucky Dip Paper
Cocoa Vanilla Hello Lovely Sequins
Cocoa Vanilla Hello Lovely Ephemera
2 Crafty Word Circle Set 1 Chipboard
Prima 6x6 Stencil Circular Lattice
Heidi Swapp Color Shine - Pink


Photobucket

Wednesday, October 14, 2015

Crate Paper Wonder "Live it Up" by Fiona Johnstone

 
Hello everyone
 
Another layout to share with you today using the Crate Paper Wonder papers. I mentioned last week this was a versatile collection, this time I have used some of the "plainer" papers to create this layout of my son:
 
Live it Up
 
 
Firstly I created a unique background using my favourite spray inks, Dylusions. I have used Postbox Red, Vibrant Turquoise and White. Then I have added some masking and stamping in black to add some contrast to all that gorgeous colour. 

My papers I have torn and roughed various edges before layering onto each other, adding some chipboard fencing wire and cotton thread for texture. I've added a simple Flair badge and a star as embellishments finishing off with my Live it Up title sprayed in Turquoise Dylusions. 
 
A couple of close-up of each side, masking and stamping
 
 
complimenting each other on the other side:

Thanks for stopping by
Till next week 
Fiona
x
Photobucket 
Products Used:
Crate Paper Wonder -  Brave paper
Crate Paper Wonder -  Wonderful paper
Crate Paper Wonder - Happy Hello paper 
2Crafty Chipboard Title - Live it Up
2Crafty Chipboard - Fencing Wire Panel
Dylusions Spray Inks
Black Ink
Fancy Pants Everyday Circus Flair Badges  
Crafters Workshop 12x12 Template - Harlequin Circles
Misc Stamp
Cotton Thread
Charms Creations Star
 

Monday, October 12, 2015

Bella BLVD - Rover Collection:

Hi all, Rachel here today.
This week I have designed a layout using a dog themed collection by Bella BLVD. 
 Our dog is a very beloved family member and I love the opportunity to scrap him.
 This collection was perfect and can be used to create 'fun' layouts or more classic
 as I have done here.


I have used the fab chipboard hand-drawn heart frame and word sentiment by 2Crafty.
 To colour co-ordinate I inked them with Lime Green Versa Colour ink pad.


I used the sticker sheet and keeping my colour theme in mind created a cluster
 and some of these foam taped for a 3D effect.
I hope this has inspired you to scrap your fur baby.

You can also purchase the cat collection by Bella BLVD Riley which is also in store.
 (Bella Blvd - Riley paper)


2crafty chipboard - frame hand drawn heart
2crafty - chipboard multipacks word circle set 2
Rover paper - borders
Rover paper - puppy prints
Rover - treasure text sticker sheet
Rover - trinkets sticker sheet


Photobucket

Friday, October 9, 2015

Bella Boulevard Just add Color Layout

Hi everyone!
Tammy here, back to share another project I've been working on.
 
This time I played with a few bits and pieces from the fun
 Bella Boulevard Just Add Color range.  
 
Recently my son was in his final Sports Day at Primary School.  He was a House Leader for the Green Team - not only did they win the day but he won Boy Champion! An awesome finish to his primary school years which I definitely needed to scrap!  The black and white star paper was a perfect match for this story....and I added green! An easy choice as this was his house colour. 


I started by swiping some Dylusions Paint straight onto my paper - I wanted to keep it to one side - to give the page a focal  point.  Once this dried, I added a few strips of paper and stamped with white ink onto the black paint.  This formed my background. 
 I then randomly painted some of the background stars on the paper green, and added some 2Crafty chipboard - I also painted this green, and added Dimensional Magic too - I wanted to give it a bit of shine and 'pop'.  I love how Dimensional Magic on Chipboard gives it a real resin finish.
I then hunted for lots of embellishments in black/white and green (oh how I adore this colour combo!).  I think it really pops!  I found that the Bella Boulevard Stickers went perfectly, but also so did the Cocoa Vanilla Made of Awesome range!  I love mixing ranges together.  I find it helps me be more creative. Finally I added a bit of journaling, and that's about it!


Products Used:

Thanks for popping in for a look - see you soon! 
Photobucket

Wednesday, October 7, 2015

Crate Paper - Wonder "Besties Everyday" by Fiona Johnstone

  Hello everyone
 
What an exciting month for us here at All About Scrapbooks with two lovely new members to our Design Team. Very excited to be working alongside Tammy & Rachel. 
 
I have created a couple of layouts for this month using the delightful Crate Paper Wonder collection. Super cute at first glance, but quite versatile. 
 
Today's layout is Besties Everyday:
 
 
This photo is from a few years ago but my two are very close and one of each others best friends. I hope that they remain so.

For this layout I wanted to frame my photo in some way and I couldn't find anything the right size in my stash, so I created my own with some florists wire - to get the neat circle I wrapped it around a tin of a similar size to the photo. 

Love this base paper with it's corrugated paper look. Onto this I have layered my papers across my page, getting progressively smaller, added a doily for some added texture, then adding some stamping to tie the page together. I added some paper strips to the top and bottom of my page to bring in a little more colour. I then finished my layout off with minimalist embellishing - some adhesive brads and a tag as well as my wire frame. 

Again I have used a 2Crafty chipboard title piece, which I have sprayed with Dylusions ink sprays and added some old alphas from my stash.
  A close-up of my wire frame:
Thanks for stopping by
Till next week 
Fiona
x
Photobucket 
Products Used:
Crate Paper Wonder -  My Dear Paper
Crate Paper Wonder - Splendid Paper
Crate Paper Wonder  - Discover Paper
Crate Paper Wonder - Curious Paper
2Crafty Chipboard Title - Everyday
Simple Stories I Am Self Adhesive Brads
Crate Paper Notes & Things Mixed Tags
Green Tara Wire
October Afternoon Alphas
Doily
Kaisercraft Texture Stamps - Grid
Kaisercraft Texture Stamps -Chevron
Dylusions Ink 
 

Monday, October 5, 2015

Coco Vanilla Studio - Tis The Season Layout:

Hi Everyone, Rachel here.
 
I am so excited to present my first layout for the month!
 I just love Coco Vanilla Studio and this Christmas range is stunning. I love the fact
 that it is non traditional colour themes. I am a big fan of clustering embellishments and
 you can see that is what I have done in this layout and although it adds interest it does
 not detract from your photo.


The flairs and enamel dots co-ordinate perfectly.


I created the (BELIEVE) title using a cut file from Silhouette Design store.
I hope this simple but eye catching layout inspires you to scrap those precious
 Christmas memories!


Cocoa Vanilla - Tis The Season flair enamel dots
Coco Vanilla Studio -Tis The Season paper Good Cheer
Coco Vanilla Studio - Tis The Season paper All is Bright
Coco Vanilla Studio - Tis The Season Flairs
Coco Vanilla Studio tis the season die cut ephemera
 
 
Photobucket

Friday, October 2, 2015

Excited to be Here - My First Share
by Tammy Klingner

Hi everyone! 
 Tammy here, I'm super happy to be sharing my first project as a 
Design Team Member for All About Scrapbooks.  
 
I was lucky enough to get my hands on some of the new Basic Grey Barista Range.
 
 This is a gorgeous range, with lots of neutrals, and splashes of mustard.  It has a real
 coffee/tea inspired theme, but the colours lend itself to so many options. 
As soon as I saw the leaf paper and the grey, blacks and cream tones I knew I wanted to
 scrap some photos taken recently at my step-dad's.  It was cold and wintery but we all
 went for a lovely walk in the nearby forest - just beautiful!


I just love that grey wood background paper....and had a lovely time cutting out all the 
leaves - quite therapeutic!  I then folded them inwards to give them a bit of dimension. 

 I used a few stickers, as the words along the sides, and I also used some of the frame
 stickers behind my photos. 

Here's a close up which shows the dimension in the leaves a bit more clearly :


A few paint splatters, some sequins and 2Crafty Chipboard completes the page.
 
 This range is really easy to work with......the possibilities are endless!
 
See you again soon!
Tammy
 
Products Used:
Basic Grey Barista Paper - Tea
Basic Grey Barista Paper - Espresso
Basic Grey Barista Paper - Cappuccino
Basic Grey Barista Cardstock Stickers - Title
Cocoa Vanilla Made of Awesome Sequins
2 Crafty Chipboard Line Words - Happiness
Dylusions Black Marble Paint
Cocoa Vanilla Made of Awesome Flair Buttons
The Twinery Twine - Charcoal
 
 
Photobucket

Tuesday, September 29, 2015

Cocoa Vanilla - Made of Awesome "Cheeky Boy" by Fiona Johnstone

 
Hello everyone

Finishing off the month with another Cocoa Vanilla layout, this time using the more masculine Made of Awesome collection.You can probably tell by now that I am a big fan of this new manufacturer. Love the papers and love all the embellishments.

My layout: Cheeky Boy
 
  
With this collection, the first thing I was attracted to was all the circle embellishments in the ephemera pack. I created the design of this layout based on the circles. First I created a few torn layers to the base before layering a combination of the ephemera circles, finishing off with a 2Crafty title and stickers from the Made of Awesome accessory sticker sheet.


A close-up of the bottom circle cluster:
 
 
The top circle cluster and title:
 

Thanks for stopping by
Till next week 
Fiona
x


Photobucket 
Products Used:
 
Cocoa Vanilla Made of Awesome Paper - Boys Rule
Cocoa Vanilla Made of Awesome Paper - Directions
Cocoa Vanilla Made of Awesome Paper- Lucky Star
Cocoa Vanilla Made of Awesome Paper - Rock Star
Cocoa Vanilla Made of Awesome Die-Cut Ephemera
Cocoa Vanilla Made of Awesome Accessory Sticker Sheet
2Crafty Title Cheeky Loopy Font

Friday, September 25, 2015

My last layout using Simple Stories Summer Vibes - by Linda Eggleton

Hello everyone & welcome to the blog today.

Today I am sharing my last layout using the FUN 

But not only is it my last layout using this collection, it is also my last page as a designer for 
All About Scrapbooks :(  as I've made the very difficult decision to step down 
from my position on the team.


Before I get onto the details of the layout, I'd like to say a few words :)
I have been on the AAS team since its inception in Dec 2013, and have to say that I have loved every minute of it & every collection that I have been lucky enough to create with.  Vanessa is the best, and most easy going store owner to work for….she is SUPER generous, very easy going & such a pleasure to work with.  This truly has been the best DT I have ever been on.

I’d like to thank you, Vanessa, from the bottom of my heart, for all that you’ve done for me over the past couple of years – including my time on the 2Crafty DT.   I know I have disappointed you in my decision to step down, for which I am truly sorry, but I’m sure the 2 new DT members will do a fantastic job in creating for you & helping AAS to continually grow.  I’d also like to thank Fiona for being a great design team buddy - always supportive of my work and we just worked together so well…..and most of all, I’d like to thank you both for the lovely friendship that we now share.

I will be taking an extended break from all scrapbooking for the next little while (not sure how long that might be), as I have had a HUGE couple of years with various scrapbooking commitments, and am feeling very weary, tired & worn out.  I hope that after having a break away from it all, that I will be feeling refreshed & wanting to return to this craft that was once a big part of my life, so you may see me back around the traps at some point in the future - all going well.

xxx


Ok, time to get on with my last share....
  

"Riding Along"

I have created something very different to my normal style for this layout...I've gone for a bit of a pocket page style, without the actual pockets.  I wanted to make use of as many of the fabulous element pieces from the different sized element papers, and the pocket page idea is what sprung to mind.
I've also included some of the chipboard frames as well & have created a border around the outside of the page using the Pop Fizz & Brown Wood/Grid papers


Here are a few close ups......

I have also added some of the Diecut pieces with foam tape for a bit of dimension - both the cute little bike on the left & the sunglasses & tiny flower on the right.....along with some of the Expression stickers & Self Adhesive Bradz.


I've inked the edges of all the "pocket" pieces with black ink.


I have backed the 2 small square chipboard frames with some plain coloured paper - from the reverse side of the "Hello" paper & then added some of the Photo stickers to the centre of them.


I've used a variety of sizes in the Element pieces, 
including these small 2x2 pieces - Blue Skies & So Sunny


I used one of the larger frames to frame one of the photos.


And although this very cute Kombi Van piece has nothing to do with me & my vintage bike....I loved it & it just had to be used...lol  :D
Thanks so much for dropping by today...I do hope you have been inspired.
Thanks again to Vanessa for having me over the last couple of years....and wishing the new team members all the best on their journey with AAS :)
xx
Photobucket
Products used:
Petaloo - Darjeeling  Butterfly
Foam Tape

Tuesday, September 22, 2015

Cocoa Vanilla Hello Lovely by Fiona Johnstone

 
Hello everyone
 
This week I have been playing with another Cocoa Vanilla range, Hello Lovely, and it is indeed a very lovely and pretty collection. Once again an amazing array of embellishments in these collections and fabulous papers that co-ordinate so well. 

My layout: Hello Beautiful
 
 I've combined the very busy floral patterned paper with the black and white flowers, love the dramatic contrast in the two, yet they are both lovely florals. I've added some of the other complimentary papers, focusing on the pink and black that match my photo and using a hint of blue for contrast.


 A couple of close-ups:
 
My title Hello Beautiful is from 2Crafty, and I have inked it and sprayed it with a little goosebumps for some shine. The flower cluster is from the Cocoa Vanilla Hello Lovely Blossoms and the Flair button is also from the collection. 


The range even comes with gorgeous wood veneers, as well as tonnes of ephemera in the die-cut ephemera pack.


Cocoa Vanilla Hello Lovely Collection 
 
 
 Thanks for stopping by, 
Till next week

Fiona
x

Photobucket

Friday, September 18, 2015

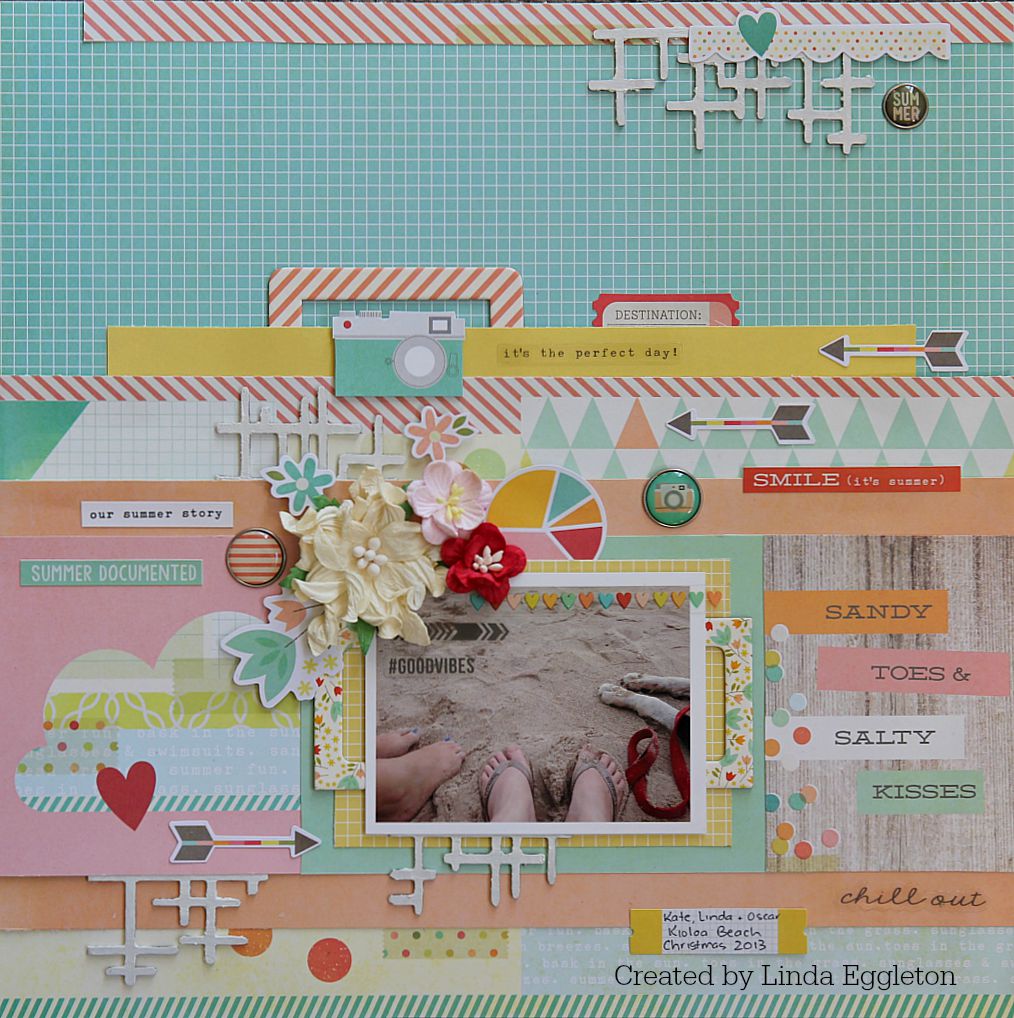
3rd layout with Simple Stories "Summer Vibes" by Linda Eggleton

Good morning all & welcome to the blog today.

I am back with another layout created using Simple Stories - Summer Vibes.
I love the pastel colours in this collection...and all the fabulous patterned papers & matching embellishments, of which there are heaps!


"Sandy Toes & Salty Kisses"

I have used the grid side of the Teal Wood/Grid paper for the background & then layered a variety of papers up under the photo, including a couple of pieces from 3 of the Elements papers - 2 either side of the photo & one underneath.


I've created a cluster of Green Tara flowers, some of the flowers in the Bits & Pieces Diecut pack - up on foam tape, a couple of the Self Adhesive Bradz & a piece of the 2Crafty Interlocking Grid panel, that I've cut into 4 pieces, and used in various spots on the page.

There's also a variety of the Photo Stickers that I've placed on the photo.


I've used more of the Chipboard Frames as part of my layering - I love doing this :)
I've also cut more of the cute little camera's from the Selfie paper to use as an embellishment, which I have popped up on some foam tape for a bit of dimension on the page.


Here's 2 more pieces of the 2Crafty Interlocking Grid panel - simply painted in Gesso.
And one of the small square Chipboard Frames at the side of the photo - again, I cut it in half and the other piece is on the opposite side of the photo, just out of shot.


I used the one of the journaling cards from the 3x4 Elements paper as my title - it was perfect for the pic of our sandy toes at the beach a few Christmas' ago.


I added a strip cut from the Sun Kissed paper across the top of the page, along with another piece of the 2Crafty Interlocking Grid panel, one of the Bradz & a little border strip from the Diecut pack.

I've used a fair few of the clear Photo Stickers on my page - not just on the photo, but they are also good for adding on the plainer papers, as I've done above.


Thanks so much for dropping by today - I hope you are inspired by this fabulous collection :)
xxx
Photobucket
Foam Tape
Gesso