HOMEABOUT USSHOP HERECROPDATESCURRENT CHALLENGESTIPS&TUTORIALS

Monday, January 18, 2016

Pink Paislee - Cedar Lane: Splendid by Rachel Lowe:

Happy Monday everyone!
 
I am back today with another layout using the stunning Pink Paislee Cedar Lane collection.
Intially when you look at these papers it is easy to label it a feminine collection so I am
 here to show you it also can be used for a more masculine layout also.
 
I have hand punched the circles from Circle Street paper with a scallop punch (you could hand 
cut the circles of your choice if you do not own a scallop punch).
 
I then randomly placed these on the white bazzill.
 
I ensured that from Park Place paper I cut a 1/2 inch strip from the blue/yellow zig zag pattern showing only the blue/yellow piece.
I then selected the more masculine looking/coloured embellishments. I individually 
embellished the round scalloped elements which add interest and depth to the layout.
 I stapled the acetate tag with two smaller tags.
Of course I had to add a fox (because I am a little obsessed by them!!!)
 and the stunning arrow embellishments.
 
 
Here are some close up shots of layout.


Sometimes papers or collections can tend to lean us to either more feminine or more
 masculine themed layouts but if you challenge yourself you can make almost any 
collection work for whatever gender you are scrapping for.
 
Thanks for stopping by and see you next week.
 
PP - Cedar Lane paper - Park Place
PP Cedar Lane - Ephemera pack
PP Cedar Lane - Glittered paper arrows
PP - Cedar Lane Paper - Circle street
PP Cedar Lane paper - Park place
PP Cedar Lane paper - Market-square
PP Cedar Lane -Puffy stickers
Bazzill Cardstock - white
Staples
 
Photobucket

Friday, January 15, 2016

True Friendship
by Tammy Klingner

Hi everyone
Hope you have had a great start to 2016!
 
Today I'm sharing a layout about one of our other fur-babies.
Last week I shared an emotional layout about saying goodbye to one of our pets. 
It reminded me that I needed to scrap one of our other cats, and the special relationship
 she has with my son.
 
So this is about Mia.
Mia came to be in our lives about 4 years ago.
The home where she was living, could no longer give her the care she needed. So as I'm 
a bit of a sucker, I took her in.
She is now over 16 years old.  When we took her in, she was quite feisty (as many cats are) and
 not a real cuddly girl.  Well very quickly she bonded with my son.  She sleeps on his bed,
 and although she gives us all a nip every so often, she has only love for my son.
She has become a real loved and special part of our family.


I had a lot of fun with this layout, and took inspiration from the colours in the photo - the
 blue of my son's shirt, and the black of Mia!
 
I scraped some paint directly onto the page, as well as spritzing some ink spray,
 and flicking lots of black paint.  
 
It got pretty messy!


 I then added a few strips of paper, some paper frames, and some 2 Crafty Chipboard - I really
 love those circle clumps - aka Dotty Bits.
Overall it's a bright, happy and messy page. 
 
See you next week!
Tam xx
 
Products used:
White Bazzill
Bella Boulevard Valentina Love Paper
Bella Boulevard Just Add Color Speak Freely Paper
Simple Stories DIY Boutique Insta Frames
Simple Stories DIY Boutique Herringbone/Orange Paper
Cocoa Vanilla Made of Awesome Flair Buttons
Cocoa Vanilla Made of Awesome Die Cut Ephemera
2 Crafty Assorted Arrows Chipboard
2 Crafty Dotty Bits Chipboard
Dylusions Paint - London Blue
Dylusions Ink Spray - Fresh Lime
Heidi Swapp Colorshine - Black
Ranger Craft Scraper
Clear Gesso
Black Thread
 
Photobucket

Wednesday, January 13, 2016

Pink Paislee Memorandum Collection - Amaze Yourself by Fiona Johnstone

Hello everyone

This month I am playing with the awesome Memorandum Collection by Pink Paislee. This is a such a versatile collection. Today's layout is of my daughter, just a note to her to do more.

Amaze Yourself


I've created my background with Dylusions Paint, before adding my paper layer strips. Then I have added some masking and stamping.

I've used the 2Crafty Circle Revolution frames to frame both my photos and my subtitle. These I have painted in Dylusions paint then gone over with some black ink to grunge it up a little. My title is simply inked in black. 


A close-up of some of the paint and stamping - I've added some enamel dots, a flair button and flower to embellish. 


The smaller circle revolution frame has been cut to frame my subtitle, with a few paper strips and an arrow paper clip. 


Thanks for stopping by, 
I'll be back with more Pink Paislee Memorandum next week!

Fiona
x

Photobucket
Products Used:
Pink Paislee Memorandum Paper - Desktop
Pink Paislee Memorandum Paper - Labels
Pink Paislee Memorandum Paper - Ledger
Pink Paislee Memorandum Paper - Memorandum
Pink Paislee Memorandum Paper - Memo
Pink Paislee Memorandum Paper - Showroom
Pink Paislee Memorandum Paper - Time Clock
Pink Paislee Memorandum Paper - Snapshots
2Crafty Circle Revolution Frames 6 inch
2Crafty Title  - Amaze Yourself
Dylusions Paint - Vibrant Turquoise
Flutterby Designs Flair #139
Green Tara Flowers - Fantasy Bloom Flower Pack Lavender
Enamel Dots
Heidi Swapp Stickers
Paper Clip

Monday, January 11, 2016

Pink Paislee Cedar Lane by Rachel Lowe - Everyday is a Blessing:

Happy Monday everyone Rachel here again.
OK so I have a 'thing' about foxes and so one was just not enough!
I am so in love with collection for it's stunning colours with splashes of gold and yes foxes!
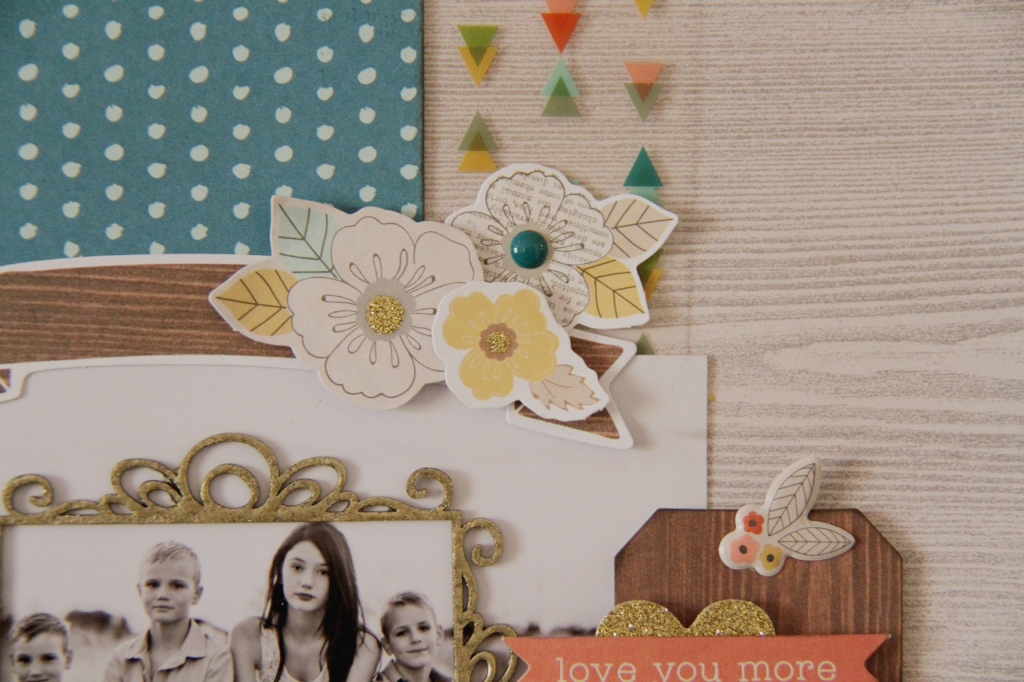
I embossed the 2Crafty chipboard doodled frame for extra wow factor. I also embossed some Harlequin chipboard and tucked it behind the foam taped wood grain tag. Don't be afraid to frame your photo without cutting it down if you have lots of negative space, this way you maintain the mood of the photo whilst framing your subjects.
Again I have used lots of foam tape to create a 3D effect around my photo.
You don't always have to create a large or prominent title, let your photo and embellishments tell the story.
I loved the wood grain banner and I layered flowers over it, foam taping the top two and tucking one underneath, finished with an enamel dot.


I just loved this stunning 2Crafty doodled frame and by embossing it in gold it gave it a rustic look.


I embellished my tag foam taping the fox and flower puffy sticker gold heart to make it a feature of the layout.


I enjoyed rediscovering my love of embossing whilst creating this layout.
I hope you have a go at recreating this layout.
See you next week.
X


2Crafty Harlequin chipboard Set

Photobucket

Friday, January 8, 2016

Saying Goodbye
by Tammy Klingner

 
Good morning everyone!
 
Today I'm sharing a layout I recently created in honour of the beautiful relationship
 between my daughter and one of our precious fur-babies. 
 
Sadly, just before Christmas we had to say goodbye to our beautiful Slinko.
 
He was an amazing cat (secretly I've always thought of him as human).
He'd been through so much with us. We rescued him as a kitten over 11 years ago. 
My daughter received him for her third birthday and they had been pretty much inseperable since.
They had a bond like no other. 
He truly loved us all so completely, but he had just a teeny bit more love for his
special human. 
And she, well she adored him.
He was her best friend in the whole world.
 
This page is about the struggle to say goodbye.
About their love.
 
 
To create the background for this layout, I tried a new technique.
I absolutely loved it and am really happy with the results.
 
I took some old packaging - just the regular packaging that is around all our yummy goodies
 from All About Scrapbooks.  I spritzed a little Dylusions Ink Spray straight onto the packaging.  Then spritzed this with some water to help it spread.  I then splodged this onto the background
 paper.
I love that I had more control over where the spritz was ending up (sometimes I get it totally
 where I don't want it!)  I also felt like the depth of the colour was better, perhaps stronger. 
 Plus it has a more 'natural watercolour' look.
Win, win all round.  I"ll definitely be using it again.
 
Just a reminder that I applied clear gesso to my page first - this gives the spritzes a barrier
 to sit upon.  I do this to most of my pages as paper is so absorbent.
  Applying the gesso creates resist.
 

I added in some die cuts from Basic Grey B Side (love these) and some 2 Crafty Chipboard.  I wanted them all to touch each other and look 'connected', rather than floating about on their own.

This page was an emotional one to create - but I really love how scrapping gives us that down-time to process our emotions, and reflect upon and re-enforce our memories.
Such wonderful therapy.

See you next week.
Tam
xx
 
Products used:
Basic Grey B Side Well Yes Paper
Basic Grey B Side Fold Over Photo Frames
Basic Grey B Side Die Cut Pieces
Dylusions Polished Jade Ink Spray
Dylusions Fresh Lime Ink Spray

2 Crafty Handdrawn Heart Frame Chipboard
2 Crafty Heart Clumps Chipboard
Bella Boulevard Just Add Color Little Bits - Bell Pepper Stickers
Bella Boulevard Just Add Color Little Bits - Gulf Stickers
Cocoa Vanilla Hello Lovely Die Cuts
Pink Paislee Memorandum Labels Paper
White Gesso
Clear Gesso
 
Photobucket

Wednesday, January 6, 2016

Simple Stories Carpe Diem - Planner Love by Fiona Johnstone

Hello everyone 

Happy New Year. Today is my first post of the year, and I am super excited to share my plans for organisation, in the form of my fabulous new Simple Stories Planner.  I am seriously in love with it and hope it will help keep me organised and on track this year!!
I've had a lot of fun setting my planner up and have purchased lots of complimentary bits and pieces as well as using lots of other Simple Stories SNAP sticker embellishments . The first page opens up to a cheery transparency. The left side of the planner has plenty of room to put all the bits and pieces you will need to work on your planner on the go.
But if you don't have enough room, there is also this fantastic zipper pouch that fits lots and lots inside! I've tried to stick with stickers and die-cuts for embellishing my pages so they are nice and flat but I have added a couple of enamel shapes along the way - they're not too lumpy bumpy!
So much room to personalise in between the dividers and pretty up the pages! I've even used a banner & sign that is a downloadable freebie on the Simple Stories FB page. 
When it comes to getting organised this planner has you covered! A large overview of each month that you can individually personalise with the year and days. I've used this section to right down the main things we've planned for this month, when I'm working, when there are birthdays on, when the kids go back to school... things like that! The icon calender stickers and numbers are perfect for this!
Then you have a spot to put in more details of appointments and activities. I've colour coded my planner for each family member. I plan to add some comments as the day ends for Project Life purposes. I have the Plastic Bookmarks which come in a three pack, perfect to mark your spot. 

I've added some Basic Dividers & Basic Inserts to add specific sections to my planner. This first section is for my DT commitments. This page is my January To Do list for All About Scrapbooks. I will add some challenge blogs and other creative projects to the list!
In this section I have also used the Make a List sheets, and added a title of Notes, for any ideas I have in relation to my DT commitments. The basic inserts also comes with other sheets including a meal planner to add to your planner. 
The basic planner also comes with a list for contacts and a year overview, as well as a notebook at the back. I'm loving it!

Thanks for visiting,
till next week
Fiona
x
Photobucket
Products Used:
Simple Stories Carpe Diem - Planner
Simple Stories Carpe Diem - A5 Basic Inserts
Simple Stories Carpe Diem - A5 Tabbed Dividers
Simple Stories Carpe Diem - Plastic Bookmarks 
Simple Stories Carpe Diem - Plastic Storage Pouch
Simple Stories Carpe Diem - Bits & Pieces Die-cuts
Simple Stories Carpe Diem - Stickers Icon
Simple Stories Carpe Diem - Stickers Calendar 
Simple Stories Carpe Diem - Number
Simple Stories Carpe Diem - Word Label Stickers
Simple Stories Snap Set varieties 
October Afternoon Summertime Pop Drops
Teresa Collins Basically Essential Matchbook Alpha White

Monday, January 4, 2016

Bella BLVD Valentina by Rachel Lowe - So So Much Love:


A Happy New Year to you all.

Another year to scrap and document all your precious moments.

Today I have created two layouts for you.

Although this collection is a valentine themed collection it can be used to document
your 'LOVE' for anything or anyone.

I have used a digital cut file to create the large heart. You could hand cut a large heart and
 then add small hand cut or punched hearts layered on large heart to create the same look
shown here. This adds texture and visual impact. I have then randomly foam taped the
 sticker hearts to create another layer.

Although I have used a smaller photo by layering and colour choice is still remains the focus
 of the layout.

I have finished the layout off with a 2Crafty chipboard word title 'Cherish' (loopy font). I have painted it in marble black for maximum visual impact against the white background.


On this second layout I used the alphas from the sticker sheet, as they were so large I designed my layout around my title!

I have sprayed randomly 'Blush' pink colour shine on the right side of the white bazzill before I attached my title. I foam taped the small lips sticker on the O of you and another small XOXO sticker under title, off centre. I them created an embellishment cluster at the bottom of white bazzill, using foam tape to add layers.

I didn't want my photo to get lost on the heart paper so I matted it on a solid red with sticker tabs on top of the photo and small journal word stickers under the photo. I also foam taped my photo.


I do not like to waste product especially when it is this lovely and this type of design is great for using up left overs whilst still creating a lovely memory!


Thanks for stopping by and see you next week where it will all about a fox!
X
Bella Blvd - Valentina little bits stickers
Bella Blvd - Valentina paper cross my heart
Bella Blvd - Valentina paper lets kiss
Bella Blvd - Valentina treasures text sticker sheet
White Bazzill Card stock
Heidi Swapp - color shine spritz blush
Bella Blvd - Valentina paper daily details
Bella Blvd - Valentina paper see you soon
2Crafty Chipboard word - Cherish loopy font
Dylusions paint - black marble
Photobucket

Friday, January 1, 2016

Graduation Book
by Tammy Klingner

Good morning everyone!
Happy New Year to you all! 
 Hope you were able to ring in the New Year with some of the people you love.
 
Well I thought I'd kick off by sharing a book I created for my son's graduation from Primary School.  Yep he's off to High School (middle school) this year! Eeek! 
 
He graduated from his Primary School last year, and to commemorate the occasion I created this book.  The school does a wonderful job of hosting a graduation ceremony. 
As part of this they ask the parents to write a card/letter which they secretly slip into
 their graduation pack.
Of course, I couldn't just do a card now could I?? Nope I just HAD to create a book. Something for him to look back on and reflect on those years/friendships created whilst at Primary School.
 
(I'm warning you....this blog post has lotsa  photos).


For this book I used Cocoa Vanilla's Made of Awesome range. 
 I love the mix of colours and also the 'star' theme.
Plus it has a real 'tween' feel about it.  Perfect!
I love that I have papers, stickers, die-cuts, flairs and alphas that all co-ordinate!
 
 
I created this book by cutting a 12x12 chipboard/cardboard sheet in half, and then trimming these two pieces to measure 6x8". This formed the covers.
 I then covered the front and back of these with co-ordinating papers.
I added embellishments, popping quite a few of them 'up' by using foam tape.
 
 
For the inner pages, I cut various sheets of 12x12 paper from the Made of Awesome range into the same size as the covers (6x8").  I like working with this size as it simply means trimming your sheet in half, then turning it and cutting again at 8".  I love that I have little bits of co-ordinating off cuts, which are perfect for embellishing, matting photos etc.
 
When creating a book, I like to add in patterned transparency sheets.  I like the different texture it creates and also that you can 'peek' through to the next page.  For this project, I just used a couple from my stash.  I don't measure when I add them - I just trim it to where I think it looks good.
 
 
Look at my son's cute little hands, turning the page!
 
 
This next page has a photo of myself and my son, and I created a pocket which holds a letter that I wrote for  him.
I like to wrap twine around the pockets before I stick them in so I can add a little tag to the front.  So cute and so very simple.
 
 
This next page houses a bunch of little notes in another pocket. 
These notes were written by some of his classmates, and they are just beautiful.  I had organised it all in secret (along with the help of one of my son's teachers), and I was so touched by what I received back. 
 
 Being boys, I wasn't expecting too much - maybe some pictures or a joke or something, but when the teacher tucked them in my handbag, and I sat and read them, I wept with pure joy. 
Such beautiful words right from the heart.  Words to treasure forever
 
 
On the right hand side, I created a flap using a Project Life Card from my stash, and included  photos of his classmates and friends. 
 
 
I love creating little flaps by just adding photos together with just a bit of washi tape. 
 
 
I do this technique often in my Project Life album, when I have multiple photos I want to include.


The following page features a mini book that I created with all of the 'mini's' from his school photos.  I simply used Raven Bazzill, and sewed down the centre with my sewing machine before adhering to  the page of the book.  By using the sewing machine, it is super strong, and won't fall apart after a couple of years.


 Also, before I adhered it to the book, I added some twine underneath the mini book, and a brad to the front cover.  Then I simply wind the twine around the brad as a way of keeping it closed.  Again, so simple, yet so effective.
 
On the right hand side of this page, I added another transparency sheet.  I popped a photo of my son and my daughter together, and when you turn the page, I have created a pocket with a precious letter from my daughter to her little bother......whoops brother!
 
 
The final page in the book, contains another Project Life Card, which I have turned into
 a flap with a bit of Washi tape.
 
 
Underneath this one there is a pocket containing little notes from a few of his teachers. 
 Again these little notes touched my heart.
 
 
To finish off this book, I used my Zutter to create the binding, and then just added some co-ordinating ribbons to this.
 
I really loved working with this range. 
The Die Cuts and the stickers made it super easy to add clusters of embellishments.  
 
I hope you've enjoyed looking at this book.  I really loved making it, and my son absolutely loves it!  I also know that it will become something even more important to him as he grows older.
 
I'll be back next week!
 
Products used:
Cocoa Vanilla Made of Awesome Lucky Star Paper
Cocoa Vanilla Made of Awesome Boys Rule Paper
Cocoa Vanilla Made of Awesome Mixed Up Paper
Cocoa Vanilla Made of Awesome Rock Star Paper
Cocoa Vanilla Made of Awesome Directions Paper
Cocoa Vanilla Made of Awesome Awesome Paper
Cocoa Vanilla Made of Awesome Flair Buttons
Cocoa Vanilla Made of Awesome Die Cut Ephemera
Cocoa Vanilla Made of Awesome Sticker Sheet
Cocoa Vanilla Made of Awesome Alpha Stickers
Raven Bazzill  
The Twinery Charcoal Twine
12x12 Chipboard
Assorted Transparencies 
Zutter
Ribbon
Washi Tape
2 x Project Life Cards
 
Photobucket