HOMEABOUT USSHOP HERECROPDATESCURRENT CHALLENGESTIPS&TUTORIALS
Showing posts with label Tsukineko. Show all posts

Friday, February 3, 2023

Love using Simple Stories The Simple Life by Kerryn Fry

Hey everyone!
My layout today has been created with
the collection, Simple Stories The Simple Life.
The beautiful photo is my Father and his youngest 
Great-Grand daughter at her first birthday party.


The base of the page is a 
I have layered the photo onto the reverse 
The two main paper layers under the
photo are Happy Together and Our Story.
I've used a gold pen to outline 
the darker paper Our Story.


To add some interest on the right side of the photo,
I have hand cut the pattern of the paper and then 
 stuck down the reverse side of the pattern.
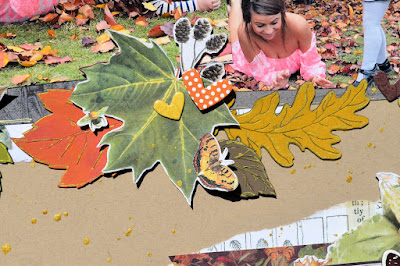
In the top right corner of the photo I have added the 
'heart this' ephemera piece from the Journal Bits Die Cuts pack.


In the bottom right corner of the photo are some
more ephemera pieces from the Die Cut pack.
There are two floral pieces and the quote
all lifted with foam tape.
The leaves have been hand cut from a 
journal card on the Journal Elements paper
and the butterflies have been cut from Our Story.


To the left of the photo I have added layered three
journal cards from the Journal Elements paper
The larger 'Family' card is first, with the 'Memories' 
card added to the left side with foam tape 
and the date card added at the bottom.
The floral pieces have been highlighted with gold pen.


At the top of the layered journal cards
I have added another hand cut butterfly
and two more pieces from the Die Cuts pack.


The title of the page is the to the left of the photo 
with Forest Moss Distress Paint and backed 
with the reverse side of the 4x6 Elements paper.
I have highlighted each letter with
a gold pen to pop on the page.

The finishing touch to the page is the
splashes of the Tsukineko All Purpose
Gold Ink to tie in all of the gold touches.


Thank you for dropping by today,
I hope you have been inspired by the page.
Have a great weekend and 
join us again on Monday.
Happy Crafting!

Products used:


Friday, September 16, 2022

Awesome, Handsome and Brave using Cocoa Vanilla Studio No Limits by Kerryn Fry

Happy Friday everyone!
The page I am sharing today
has been created with the collection,
Cocoa Vanilla Studio No Limits.
The photos are from 2009,
Mr H aged 5 at Glenelg Beach.
His outfit matched the collection perfectly.


For something different this week, the base today
 is a 12x12 sheet of Bazzill Raven Cardstock.
I thought the black would pop the colour a little more.

At the top of the page, I've used a strip
 some hand cut stars from Nebula paper
and a journal spot from Universal paper.

I've used a gold gel pen to add 
a faux stitch line across the page
and gold ink to colour the 
Thicker numbers for the date.


There are multiple paper layers
under the photos, then I have used more 
hand cut pieces from the Universal paper
to embellish the page.

The 'Star' tab is from the Accesssory Stickers
and it has been lifted with foam tape.
I've used a black gel pen to add borders
to some of the paper elements.


The photos have been matted with another
layer of black cardstock.
The words to left of the photos
are a mixture of hand cut elements 
and stickers from the Accessory Sheet.
The elements have been lifted with foam tape.

I have added a little sparkle
to some of the elements on the page with 


The rainbow journal 3x4 card
was hand cut from the Universal paper
and lifted with foam tape.

The black banner journal element
was also cut from the Universal paper.


The bottom right corner of the page
is a combination of hand cut journal card
and sticker elements from the Accessory Sheet.

The layers have been created with foam tape
and the sparkle with Glitter Glue. 


The title for the page has been created with
words from the 2 Crafty Mini Word Set 4.
I've used the words Awesome, Handsome
and Brave, they have been covered with
Gold Ink and added to the page.

The word 'and' has been created with 
Kaisercraft Alpha stickers, covered with
gold ink and then double matted with 
scrap pieces of black and white cardstock.

The final layer is splashes of gold ink
on the black cardstock, love it!


Thank you for visiting the blog today,
 I hope you have be inspired by the process.
Have a great weekend and 
enjoy your crafting time.
Please join us again on Monday.

Products used:
Cocoa Vanilla Studio No Limits - Accessary Stickers


Photobucket

Friday, March 25, 2022

Together using Carta Bella Sunflower Market by Kerryn Fry

Hi everyone!
Today I'm sharing another page that 
was created with the gorgeous collection
Carta Bella Sunflower Market. 
The photos still just make me smile!
The original photo was taken in 1974
with Mum and my siblings.
We decided to do a re-creation 
last year, 48 years later, 
while we were altogether for a birthday.
Seriously good fun.


The page started with the fabulous, amazingly sturdy
I cannot recommend this paper enough
for wet mixed media background effects.

I planned the layout of the page first,
cut the patterned papers to fit and then put them aside.
Using plastic packaging, water and Distress Oxide Inks
Pine Needles and Evergreen Bough.
the background came together.

Using the darker Pine Needles closer to the papers
and then Evergreen Bough to soften the edges.


The background was thoroughly dried using a heat gun,
and a sponge to apply the ink to the background.

At the top of the page I have used a
3x4 Journaling Card, a few strips of patterned papers,
The frame of a 6x4 journal card used for the title,
some hand-cut flowers from Sunny 
and a Tag for the Frames & Tags pack.


To the right of the photos,
 I have added the larger 'Welcome Home' tag, 
but covered the words with the 'Gather' tag
that I have hand-cut to the shape of the word.

There are some bees hand-cut from Busy Buzzing paper
and more flowers from the Sunny paper.


Under the tag and flower cluster,
I have added the remaining piece of the 
floral frame from the layout last week.

The journal spot was created from a 
6x4 Journal card and add under the photo.
I've used layers of foam tape to lift most elements.

Then using a black pen I have added borders
to some elements and paper pieces.


The small flower bunches were cut
from the 6x4 Journal Card that I've used for the title.
I've used foam tape to lift the flowers 
to create more dimension on the page.


Above the photos, I have created a small cluster
and built a sub-title for the page.
More bees cut from the Busy Buzzing paper
and the words were cut from a 
6x4 Journal Card and 3x4 Journal Card.
All raised with foam tape.


The main title of the page has been
cut from a 6x4 Journal Card.
It has been lifted with foam tape and is sitting on
a 2 Crafty Floral Banner covered with Gold Ink.

To finish the page, I've watered down
some Tsukineko All Purpose Ink Vegas Gold
and flicked some splashes across the page.

Once the page was completed,
I did lightly spray the back of the Foundations Paper
and 'flattened' it with some heavy weights
It worked beautifully!


Thank you for visiting the blog today.
I hope the page has inspired you and given you a giggle.
Enjoy your weekend, make some time for yourself
and join us again on Monday.

Products used:
Carta Bella Sunflower Market - Sunny
Distress Oxide Ink


Photobucket

Friday, February 25, 2022

Just Hanging About using Simple Stories Simple Vintage Country Harvest by Kerryn Fry


Morning everyone!
Today I am sharing my first page created with
Simple Stories Simple Vintage Country Harvest.
Some fun Autumn photos of my Niece
and Great Niece playing in the leaves 
while we were setting up to take some family photos.


The base is a plain 12x12 sheet of Bazzill Kraft Cardstock.
I've torn the edge of the Nature's World paper,
leaving a white exposed edge and added 
those pieces to the cardstock.


At the top of the photos I've used the top 
part of a 6x4 journal card under the photo
and then cut some elements from the Journal Elements paper.

The butterflies have been cut from the journal card
and from the Favorite Season paper,
these have been added with foam tape.

The 2 Crafty Chevron Bits have been
covered with Ground Expresso Distress Paint
and added in groups of three to the top
and the bottom of the page.


The 2 Crafty Autumn Leaves have been covered 
with Peeled Paint, Spiced Marmalade, Mustard Seed
and Ground Expresso Distress Paints.

have been covered with the Distress Paints too.
I've used  gold pen to add 
some extra details to each of the leaves.

The leaves have been layered with 
some hand cut leaves from Favorite Season Paper
and a Chipboard sticker from the 6x12 chipboard sheet.

I've also add some chipboard hearts


The bottom halves of the journal cards
have been used to build the cluster
in the bottom right corner.

I've hand cut a small journal spot
and added a chipboard butterfly.

I've watered down some of the Vegas Gold Ink
and added some flicks of ink across the layout. 


Thanks for visiting the blog today,
I hope you've enjoyed the steps
and been inspired to create.
Have a great weekend
and join us again on Monday.


Products used:
Bazzill Kraft Cardstock
Simple Stories Simple Vintage Country Harvest - Happy Harvest
Simple Stories Simple Vintage Country Harvest - Nature's World
Simple Stories Simple Vintage Country Harvest - Favorite Season
Simple Stories Simple Vintage Country Harvest - 4x6 Elements
Simple Stories Simple Vintage Country Harvest - Journal Elements
Simple Stories Simple Vintage Country Harvest - 6x12 Chipboard
2 Crafty title Just Hanging About
2 Crafty Chevron Bits
2 Crafty Autumn Leaves
2 Crafty Acorn & Foliage
Distress Paint
Tsukineko All Purpose Ink - Vegas Gold
Dimensional Magic


Photobucket

Friday, December 10, 2021

Adorable using Penelope Dee Charlotte by Kerryn Fry


Morning everyone!
The page I'm sharing with you today
was created with Penelope Dee Charlotte collection.
The beautiful photo is my Great-Niece
at her first birthday, she is such a cutie!


The base cardstock is a 12x12 piece
This cardstock is an awesome, solid base for any mixed media.
The background effect was created with some
plastic packaging, water and Distress Oxide Inks.

I've used the colours Dried Marigold, Abandoned Coral,
Ripe Persimmon and Worn Lipstick.
Once the first layer if inks were dry,
I have used the Dried Marigold and Worn Lipstick
with two stencils to add some highlights of colour.
 The stencils were the older Vicki Boutin Wildflower & Honey
Honeycomb stencil and Celebr8 Damask Stencil.
 

The finishing touch on the background cardstock before 
adding the paper layers were some flicks 
I have watered the glaze down on plastic packaging
and then used a paint brushes to flick it on.
Love it!


Most of the embellishments on the page
have been hand cut from the Sentimental Paper.
The  embellishments have been lifted with 
foam tape to create dimension on the page.
I have used a gold pen to outline some 
of the paper layers to tie in with the gold splashes.


All of the flowers were also cut
from the Sentimental Paper.
I have cut down the wreath of flowers to 
smaller pieces to use on the page.

The journal card has been cut
from the Devoted paper and
lifted with foam tape to 
 add to the side of the photo.


I have used the gold pen again at
the bottom of the page to create a pattern
below the scalloped border edges.


The 2 Crafty title Adorable has been 
I have added to the base of the photo
and then added more gold pen touches
to the flower centres on the page.


Thank you for visiting the Blog today,
I hope the layout has inspired you to create.
Have a fabulous weekend
and join us again on Monday.

Products used:
Vicki Boutin Mixed Media Foundations Paper
Penelope Dee Charlotte - Precious
Penelope Dee Charlotte - Gracious
Penelope Dee Charlotte - Memorable
Penelope Dee Charlotte - Sentimental
Penelope Dee Charlotte - Devoted
2 Crafty title Adorable
Distress Oxide Inks
Vicki Boutin Mixed Media Creative FX Glaze - Gold
Celebr8 Lavender Lane Grunge Damask Stencil
Tsukineko All Purpose Gold Ink


Photobucket

Friday, November 12, 2021

Forever Layout using Penelope Dee Charlotte by Kerryn

Hello everyone!
The page I'm sharing with you today
has been created using the collection,
The beautiful photo is of my sister and my niece,
it was taken at my older niece's engagement in March.
The colours in the photo work well with the collection. 


The base cardstock is Bazzill Kraft Cardstock, my fav.
The effect in the background has been 
Aged Mahogany and Ripe Persimmon.
I've added them with the Sweet Sunflower Carta Bella Stencil
The inks have been applied in 3 main areas.

I've used the stencil and a gold pen 
to outline the circle part of the stencil.

The next layer is the Celebr8 Love Story Stencil
and Brillance Gold Ink added to random areas.


been covered with Tsukineko Gold Ink.
It has been tucked under the journal card
that was hand cut from the Devoted Paper.


I hand cut some extra flowers from the Sentimental paper
to add to the flower cluster on the journal card.
Then I've added Stickles Glitter Glue
to the flower centres for a little sparkle.


The flower cluster tucked under the 
top right corner of the photo has been
hand cut from the Sentimental paper as well.
The small heart was also hand cut from the paper.

I've add gold pen fake stitching
to either side of the Precious Paper.


The quote has been hand cut
from the Sentimental paper.
I have cut it down into four smaller pieces
and added it the page with foam tape.


The title for the page has been created with 
the words 'Loved Beyond Measure'
hand cut from the Devoted paper.

has been covered with gold ink
and then added to the page as a sub-total.

The final touch to the page
is flicks of gold ink across the page.


Thanks for visiting the Blog today,
I hope you have enjoyed the process.
Have a happy and crafty weekend
and please join us again on Monday.

Products used:


Photobucket