HOMEABOUT USSHOP HERECROPDATESCURRENT CHALLENGESTIPS&TUTORIALS

Tuesday, December 29, 2020

End of Year Sale

Didn’t get what you wanted from Santa?
Want to end 2020 on a positive?
Want to get some Crafting done while on Christmas break?


Why not stock up on some Craft Supplies in our
Bye Bye to 2020 Sale.


From now until midnight on New Year's Eve,
get 25% off everything instore,
this includes already Discounted Items in the
Massive Clearance Section.


Use the code bye2020 in the coupon code section of payment screen to receive 25% off all orders over $50.


(includes already discounted items)
(Excludes shipping)
(Sorry no code = no discount)

Use code in checkout process, once entered it will automatically discount
order before payment details are entered.  


  All orders must be paid for at the time of ordering, any payment not
received by the 1st January will not qualify for discount.


  Sale Conditions:

Sale does not apply to existing orders or backorders.
Sale cannot be combined with any other offer.
Sale applies only to in stock items.
Sale excludes Shipping Costs

All orders must be paid in full at the time of order processing

Sale ends midnight 31st December 2020  


Be quick and Shop Now ............


Photobucket

Monday, December 28, 2020

Merry Christmas with Pinkfresh Studio Oh What Fun by Fiona Johnstone

Hello everyone

Merry Christmas! Last post of mine for the year and will finish the month with another Chrissy page!

Merry Christmas


This one was a reasonably quick layout as I have utilised the cute baubles on the background paper and used these as a feature. I simply layered up some of the other papers in the collection to create my background for my photo then used the sticker sheet to embellish. 


Close up of the stickers - and I have also used the stars from the puffy phrase stickers to add a bit of dimension.

Next my title is an older acrylic word from Bella Blvd - an assortment can be found here: and also a small 2Crafty Chipboard word Merry. 


Wishing you all a Happy New Year, let's hope it is better than this one!

Till then, 
Fiona
x


Photobucket

Products Used

Pinkfresh Studio Oh What Fun paper - Home for the Holidays
Pinkfresh Studio Oh What Fun paper - Good Tidings
Pinkfresh Studio Oh What Fun paper - Christmas Gifts
Pinkfresh Studio Oh What Fun paper - Merry Everything
Pinkfresh Studio Oh What Fun paper - Puffy Phrase Stickers
Pinkfresh Studio Oh What Fun Cardstock Stickers
2Crafty Card Words - Merry Xmas
Bella Blvd Acrylic Word Christmas

Friday, December 25, 2020

Thankful using Cocoa Vanilla Studio Daydream by Kerryn Fry

Morning everyone & Merry Christmas!
I am sharing my final page using the collection,
I've gathered my remaining pieces of this range
to put this page together.
The photo is two of my gorgeous nieces, who are also sisters,
it was taken, with a beautiful Autumn backdrop, in May 2013.


The base of the page is a 12x12 sheet of Kraft cardstock.
All of the flowers have been hand cut 
from the paper Garden Variety
I couldn't let this paper go to waste.
Once each cluster was cut out,
I've laid the flowers around the edge 
of the cardstock to form a border and frame the photo.
Some flowers have been lifted with foam tape.


The butterflies, small journal spot and single flower 
are all from the Accessory Sticker sheet.
The quote was hand cut from the Happy Place paper,
it's been lifted with foam tape for extra dimension.


The sparkle trail from the butterflies
is small dots of Stickles Glitter Glue.
The tiny flowers have all been hand cut from Garden Variety.


The large journal card is from Happy Place.
I've added word & heart stickers from the Accessory Stickers.
The title is a word cut from Happy Place as well
and has been stuck down with foam tape.


A simple page today which was great fun to create.
Thank you for visiting the blog today.
Hope you enjoy the festivities over the weekend
and have some creative time as well.
Please join us again on Monday.
Stay safe!


Photobucket

Monday, December 21, 2020

Tis the Season with Cocoa Vanilla Studio Merry & Bright by Fiona Johnstone


Hello everyone

Another Christmas share today with the beautiful Merry and Bright collection:

Tis the Season


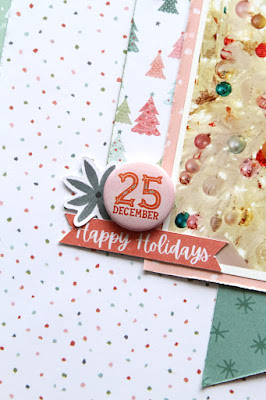
Love this spotty background paper - with all it's colours and subtle design. I have added a border in the light green Christmas Tree paper to add some definition to the page. 

I've used several layers of the patterned paper to create todays design then hit up the embellishments in the collection. 


Love the ephemera pack, always chock full of prettiness!  I've also used the cardstock stickers and love a flair button for that finishing touch. 


I'm getting a lot of use from the Pinkfresh Oh What Fun Puffy Phrase stickers, using them again for this title!


Thanks for stopping by
Till next week
Fiona
x


Photobucket

Products Used:
 Cocoa Vanilla Studio Merry & Bright paper  - Countdown
 Cocoa Vanilla Studio Merry & Bright paper - Happy Holidays
 Cocoa Vanilla Studio Merry & Bright paper - Oh Christmas Tree
 Cocoa Vanilla Studio Merry & Bright paper - Jingle all the Way
 Cocoa Vanilla Studio Merry & Bright paper - Joy to the World
 Cocoa Vanilla Studio Merry & Bright Ephemera
Cocoa Vanilla Studio Merry & Bright Flair Buttons
 Cocoa Vanilla Studio Merry & Bright Accessory Stickers
Pinkfresh Studio Oh What Fun! Puffy Phrase Stickers
Doily

Friday, December 18, 2020

My Everything using Simple Stories Simple Vintage Great Escape By Kerryn Fry


Hi everyone!
Today's page has been created with the collection,
I love how well the photo suits this range.
A very young Mr H,
photo taken in 2005 at Gumeracha Toy Factory.
He loved to explore!


The page started with a black Bazzill Raven Cardstock for the base.
I've also used the black cardstock for the photo base.
The patterned papers have been layered vertically on the page
and I've used Time for Adventure as a second layer on the photo.


The sub-title of the page has been hand cut 
I've cut out each line and mounted it with foam tape.
Then using a gold pen, I have highlighted the larger letters.
With the same gold pen, I've added stitching lines
down both sides of the paper layers.


The foliage pieces have been cut from 100% Natural
and tucked each side of the photo.
I've used foam tape to lift the ends of the foliage.


The cluster on the left of the photo 
was hand cut from two different 4x4 Element pieces
and layered on a journal piece from 4x6 Elements
The butterfly is from the Foliage Bits


The cluster at the bottom right of the page
has been made from the mushroom pieces in the Foliage Bits pack.
I've used foam tape to lift each layer.
The small foliage pieces were cut from 100% Natural.
I've add a touch of gold to the butterflies with the gel pen.

The 2 Crafty title My Everything has been
covered with Gold Ink.
It has been stick down to run vertically along side of the photo.


Thank you for visiting the ASS Blog today,
I hope you have enjoyed the page.
Have a fabulously, creative weekend!
Please join us again on Monday for Fiona's next project.


Products Used:


Photobucket

Monday, December 14, 2020

December Days with Pinkfresh Studio Oh What Fun, by Fiona Johnstone

Hello everyone

I'm back again continuing the Christmas theme for the month.
This weeks share is created with Pinkfresh Studios Christmas collection - Oh What Fun!

December Days


I've used the Vicki Boutin Foundations Paper for my base, love how well it takes wet mediums with less curling. I created a simple water colour background using some distress oxide inks - Salty Ocean and Tumbled Glass. Then to my background I have added a cut file, which I have cut out of regular textured cardstock and left as it. 


I've mounted my 4x4 inch photo onto some patterned paper then went about fussy cutting other parts of the paper - the presents from Christmas Gifts and the rectangles from Merry Everything - which I have used around my photo. The presents I have stucked up either side and added some stickers from the collection and a bit of twine. 


I've added stickers from the cardstock sheet and then finished the page with the puffy stickers, creating both a title and subtitle and then finished off the layout with some puffy hearts from the words stickers. 


Thanks for stopping by
Till next week

Fiona
x

Photobucket
Products Used:

Pinkfresh Studio Oh What Fun paper - Christmas Gifts
Pinkfresh Studio Oh What Fun paper - Good Tidings
Pinkfresh Studio Oh What Fun paper - Merry Everything
Pinkfresh Studio Oh What Fun Cardstock Stickers
Pinkfresh Studio Oh What Fun Puffy Phrase Stickers
Vicki Boutin Foundations Paper 
Distress Oxide Inks

Friday, December 11, 2020

You Are Lovely using Cocoa Vanilla Studio Daydream by Kerryn Fry

Hello AAS Followers!
Today's page has been created with the gorgeous collection,
Cocoa Vanilla Studio Daydream.
The B&W photo is my Great-Niece,
playing outside on a cool winter's day in July 2014.
Love her delight in a simple blossom.

The page has a Kraft Cardstock base,
with only a small border showing around the edge.
The main patterned paper is Sun Shower,
the beautiful rich yellow dominating the page.
Using a white gel pen, I've drawn a scalloped edge around the paper
and then added lines within each scallop.


To the left of the photo, I've added two rainbow stickers
They have been lifted with foam tape
and then given a little sparkle with the Crystal Stickles Glitter Glue.


The title has been created by the word stickers
and the flag hand cut from the paper Happy Place
The word LOVELY has been highlighted with Glitter Glue.


The cluster of flowers at the base of the photo 
have been hand cut from the papers Garden Variety and Daisy Days.
The butterflies have been cut from All Aflutter
and have been added to the page with foam tape.
The centres of the flowers have been given some sparkle as well.


The right side of the photo has a 3x4 rainbow cut from Happy Place,
with a journal strip added and some word stickers from the Accessory Sheet.
The 2 Crafty Heart Arrow has been covered with Gold Ink
and added to the flower cluster.
I've added a Date sticker and some banners 
to the top section of the page,
all lifted with foam tape.


Thank you for dropping in to the blog today.
I hope you have enjoyed the steps to create this page.
Have a fabulous weekend,
with plenty of crafting.
Please join us again on Monday.


Products Used:
Bazzill Kraft Cardstock
Cocoa Vanilla Studio Daydream - Daisy Days
Cocoa Vanilla Studio Daydream - Sun Shower
Cocoa Vanilla Studio Daydream - Happy Place
Cocoa Vanilla Studio Daydream - Garden Variety
Cocoa Vanilla Studio Daydream - All Aflutter
Cocoa Vanilla Studio Daydream - Accessory Cardstock Stickers
2 Crafty Heart & Circle Arrow Set
Ranger Stickles Glitter Glue - Crystal
White Gel Pen


Photobucket

Monday, December 7, 2020

Merry Memories with Cocoa Vanilla Studio Merry & Bright by Fiona Johnstone

Hello everyone

Well it's December so time to bring out the Christmas layouts!!
First up I have created a page using the festive Merry & Bright collection
from Cocoa Vanilla Studio. 

Merry Memories


You should know by now, I love a woodgrain background paper and this one is fabulous!! Naturally I chose this as my base paper to scrap my Christmas Tree. Next I started layering up the papers - I love the pink and red combo with the softer Christmas colours in this collection. 


As always the embellishments in Cocoa Vanilla Studio range really help make the layout. I've used Ephemera, Flair buttons and stickers for my layout, continuing the tree theme and adding a little sleigh like I have next to my tree. 


How cute are the baubles? I added a little twine to finish them off. 

For my title I have jumped to another Christmas range, this time PinkFresh Studio's Oh What Fun! and their puffy phrase stickers. The red is a perfect match for the CVS collection!


Thanks for stopping by
Till next week

Fiona
x


Products Used:

Cocoa Vanilla Studio Merry & Bright Accessory Sticker Sheet
Twine

Photobucket


Friday, December 4, 2020

Let's Explore using Simple Stories Simple Vintage Great Escape by Kerryn Fry

Hi everyone!
Today's page has been created with the collection,
Simple Stories Simple Vintage Great Escape.
The photos are from the archives, October 2005,
and were perfect for this range.
Mr H at nearly 18 months old,
we had been to the Adelaide Zoo
and then he was running around in Botanic Park.
This boy was always on the move!


The page started with my favourite Bazzill Kraft Cardstock,
but the was only a small border visible once I had finished layering papers.
The main patterned paper in the top half of the page is Born to Roam
and the bottom of the page is the hand cut ferns 
across the bottom of Time for Adventure.
The edges of the papers have all been inked with Walnut Stain Distress Ink.


The next layer is some ferns from the Foliage Bits,
the edges have been inked and then stuck down with foam tape.
The photos have been cut out to fill the scenery, 
I've inked around the edges and used foam tape
to lift them above the ferns.


The variety of mushrooms and butterflies 
are also from the Foliage Bits,
I've layered them in clusters either side of the photos, 
using foam tape to add dimension to the scenery.


I've added Stickles Glitter Glue to the mushrooms
to highlight different sections of each mushroom.
The edges have all been inked.
The quote has been cut from the 4x6 Elements
and added to the mushroom cluster with foam tape.


The 2 Crafty Grassy Clumps have been covered with
Peeled paint and Walnut stain Distress Paints.
Once dry, I've add a stitched line with a gold pen
and then added a coat of Dimensional Magic.


The 2 Crafty Ricky's Trees have been covered with 
Forest Moss and Gathered Twig Distress Paints.
The final coat is Dimensional Magic.


covered with a two-tone effect,
Ground Expresso and Walnut Stain Distress Paint.
I've used a gold pen to outline the letters
and then finished it with Dimensional Magic.
The journal spot has been hand cut from the 4x4 Elements
and then decorated with more Foliage Bits.


And that's my project for this week.
Thanks for visiting today,
I hope you have been inspired to get crafty this weekend.
Please join us again on Monday.


Products used:
Bazzill Kraft Cardstock
Simple Stories Simple Vintage Great Escape - Lose Yourself
Simple Stories Simple Vintage Great Escape - Time for Adventure
Simple Stories Simple Vintage Great Escape - Born to Roam
Simple Stories Simple Vintage Great Escape - Foliage Bits
Simple Stories Simple Vintage Great Escape - 4x6 Elements
Simple Stories Simple Vintage Great Escape - 4x4 Elements
2 Crafty title Let's Explore
2 Crafty Grass Clumps
2 Crafty Ricky'sTree
Distress Paints
Distress Inks
Dimensional Magic
Stickles Glitter Glue


Photobucket