HOMEABOUT USSHOP HERECROPDATESCURRENT CHALLENGESTIPS&TUTORIALS
Showing posts with label Distress Inks. Show all posts

Friday, September 9, 2022

#Beauty using Uniquely Creative Moody Blues by Kerryn Fry

Hi everyone!
Today I'm sharing another page that
I have created with the collection,
Uniquely Creative Moody Blues.
The B&W photos of my Great-Niece
were taken in July 2013 at Glenelg Beach.
A beautiful winter stroll during
the school holidays.


The base of the page is Bazzill Kraft Cardstock.
I've planned the layout and then added
Chipped Sapphire Distress Ink
to specific parts of the cardstock
to highlight the chipboard elements.


The 2 Crafty 6inch Mandela No. 5
has been cut into two pieces, 
each piece has been covered 
with white gesso and then finished 
with Ranger Stickles Glitter Glue.

The chipboard has been layered
on the Distress Ink and then paper elements 
add on the chipboard.


The embellishment cluster on either side
of the photos have been created 
with small paper mandalas that were
hand cut from Periwinkle paper
and elements from the Creative Cuts.

The white areas of the embellishments
have been highlighted with Glitter Glue.


To the right side of the photos I have
cut down a paper Mandala to add 
the triangle pieces down the side of the paper.


The larger Mandala in the bottom right
corner of the page was cut from Moody paper 
and decorated with more hand cut pieces
from the Periwinkle paper and Creative Cuts.

The word 'Hello' and quote are also
from the Creative Cuts pack.
I've used plenty of foam tape to
 lift different elements on the page.


I've used Stickles Glitter Glue to 
highlight different areas of each elements.

The title of the page '#Beauty' is 
from the 2 Crafty Mini Words Set 13
I have covered the chipboard with black ink.

To finish the page I have added
both black and white ink splatters
over the page.


Thank you for visiting the blog today,
I hope you have enjoyed the steps.
Have a lovely weekend.

Products used:


Photobucket

Friday, June 10, 2022

Cheeky but Handsome using Play All Day Boy Echo Park Paper by Kerryn Fry

Hello everyone!
Today my page has been created from 
the remaining pieces of the collection
Echo Park Paper Play All Day Boy.
A very cute photo of a younger Mr H
playing outside with his favourite nerf gun.
Just being a typical boy, doing boy things.

This page started with a 12x12 sheet of 
Vicki Boutin Mixed Media Foundations paper.
The background has been created with Distress Inks,
water and a piece of plastic packaging.
I've used Rustic Wilderness & Blueprint Sketch
and balanced the two colours to surround the paper layers.

Once the inks were dry, I have added
splashes of each colour across the page.
The final layer in the background was created
with Crafters Workshop stencil and black ink.


I've used Bazzill Raven Cardstock to back 
the photo and the main patterned paper 4x4 Journaling Card.
I've hand cut some of the word bubbles
and added them as another layer to the paper.
Each bubble has been lifted with foam tape.


The right top corner cluster has been created with
then Element stickers balloon, helicopter and plane.

The 'Sun' has been covered with Wild Honey Distress Paint
and the cloud has been covered with White Gesso.


The bottom left corner is a hand cut 2x2
square "All Boy' on foam tape.
The bike and scooter are stickers from

I've also used foam tape to lift the tips 
of the banner ends on the patterned paper piece.


At the bottom of the page, I've added a cluster
of Element stickers lifted with foam tape.
The 'All Boy' strip along the bottom edge of the page
is also from the Element Sticker Sheet.

I've added more hand cut word bubbles
to the bottom section of the 4x4 Journaling Card paper.


The title for the page has been created with
the 2 Crafty Mini Word Set 4.
Using the words Cheeky and Handsome
and letters from the words 'Brave' and Fantastic.

The title words have been covered with
Blueprint Sketch Distress Paint.


Thank you for visiting the blog today.
I hope the page has inspired you.
Have a great weekend, enjoy your crafting
and join us again on Monday for Fiona's next project.

Products used:


Photobucket

Friday, May 27, 2022

You Have All My Heart using Simple Stories Simple Vintage Weathered Garden by Kerryn Fry

Good morning Crafters!
Today I'm sharing my 2nd page using the collection
Simple Stories Simple Vintage Weathered Garden.
The range has worked beautifully with the two 
B&W photos of my Niece taken outside
on a visit to Brisbane back in 2012.


The base of the layout is Bazzill 12x12 Kraft Cardstock.
I have hand cut the heart from Love You More Paper
and marked out the heart with pencil on the cardstock.

Using Bundled Sage Distress Ink and a blender
I have added a shadow around the shape of the heart.
I have then watered down the Distress Ink
and flicked some ink onto the cardstock.


The final layer on the background is
Antique Linen Distress Oxide Ink
randomly added to the page.


On both sides of the page, I have added pieces of 
the reverse striped side of Love You More paper.
Each strip has been outlined with a faux stitch
 line using a black gel pen.

The top cluster has been created with hand 
cut flowers from the Memories Made paper
and a sticker from the Combo Cardstock Sticker Sheet


To the top left section of the large hand cut heart
I have added words from a 3x4 Journal card
to use as a title for the page,
a hand cut butterfly from Fills My Heart paper 
and small heart stickers from the sticker sheet.
All of these elements have been lifted using foam tape.


To the right top section of the heart
I have added a journal spot from 
the word and small butterfly sticker.

The small hand cut flowers are from the 
Made Memories Paper and 
they have been added with foam tape.


The  embellishment cluster on the left side 
of the photos includes the large hand cut
butterfly from Fills My Heart paper,
more hand cut flowers from Made Memories paper
and stickers from the Combo Cardstock Sticker Sheet.


Across the bottom of the photos are 
the words 'moments' and 'happy thoughts',
these are both from the Sticker Sheet
and have been added with foam tape
to create dimension and layers on the page.

I've also added more small hand cut flowers
and another large butterfly to 
the right bottom corner of the photos.


Thank you for visiting the blog today,
hopefully you have been inspired to sit 
at you craft desk and get creative.

We hope you enjoy your weekend, 
please join us again on Monday
for Fiona's next project.

Products used:


Friday, May 20, 2022

Cherished Moments using Simple Stories Simple Vintage Weathered Garden by Kerryn Fry

Hi everyone!
This week I have started creating with the collection,
Simple Stories Simple Vintage Weathered Garden.
The photo is a beautiful close-up snap
of my Great-Niece taken in 2015.

The base paper is Bazzill Kraft Cardstock.
I've used a blending tool and Distress Inks Crushed Olive 
and Forest Moss to colour the background.
The next layer is a quick spritz of water and 
then mopped up with paper towel for a mottled finish.

The final layer on the background is the 
Echo Park First Day of School 6x6 stencil
and gold ink pad for a lighter finish.


I've added the patterned papers, layering the torn edges
and using foam tape for the striped paper.

The cardstock sticker 'My Heart'
has also been lifted with foam tape.

I've used a gold pen to outline some of the papers
to highlight different layers and bring together the
background and chipboard elements.


The photo has also been outlined gold
for clear definition amongst the paper layers.
I've also roughly outlined one of the 
photo mats under the photo.


The embellishments on the top right corner
of the photo are from the Cardstock Sticker Sheet.
Both pieces have been lifted with foam tape.


The embellishment cluster to the left of the 
photo is a combination of a journal element
and stickers from the Cardstock Sticker Sheet.
I've used foam tape on some elements.


been covered with gold ink and used as 
a background for the butterfly sticker.

The small hearts are also from the 
Cardstock Sticker Sheet added with foam tape.


To the right of the photo, I've used another
covered with gold ink.
The next layer is a hand cut butterfly from 
the reverse side of Memories Made Paper.

The small butterfly, heart and log 
are all stickers from the Cardstock Sticker Sheet.
They have been added with foam tape.


has been covered with gold ink
and the sticker 'Hello Beautiful' on the photo
has been lifted with foam tape.


Thank you for visiting the blog today,
I hope you have been inspired by the page.
Have a happy, crafty weekend
and join us again on Monday.

Products Used:
Bazzill Kraft Cardstock
Simple Stories Simple Vintage Weathered Garden - Fills My Heart
Simple Stories Simple Vintage Weathered Garden - 3x4 Elements
Simple Stories Simple Vintage Weathered Garden - Journal Elements
Simple Stories Simple Vintage Weathered Garden - Love You More
Simple Stories Simple Vintage Weathered Garden - Memories Made
Simple Stories Simple Vintage Weathered Garden - Cardstock Sticker Sheet
2 Crafty title Cherished Moments
2 Crafty Anthea's Butterflies
Distress Inks
Echo Park First Day of School 6x6 Stencil


Friday, January 7, 2022

It's the Simple Things using Pinkfresh Studio Keeping it Real By Kerryn Fry

Hi everyone!
Today I am sharing my second page created with 
the gorgeous collection, Pinkfresh Studio Keeping it Real.
I have been saving this photo for just
the right papers to suit the beautiful purple jacket.
Another lovely photo of my youngest niece
and her very first snow experience last year.


I started with two 12x12 sheets of
The first piece was used for the background.

Using the 6x6 Echo Park Paper Snowflake Swirl,
I have stamped the stencil in a puddle of water 
and Dusty Concord Distress Ink 
and then added Spun Sugar Distress Ink 
through the stencil before lifting it.
A great technique from a VB video that I had to try out.


Once the background was dry, I've added
a few random areas of Pickled Raspberry Distress Ink 
I have used a small stamp and gold ink
in the background and Ranger Stickles Glitter Glue.


The second sheet of Foundations Paper
was used to die-cut the snowflakes.
I've used Milled Lavender, Dusty Concord,
Spun Sugar, Pickled Raspberry Distress Inks
with the packaging technique to colour the paper.
Then die-cut multiple sizes of snowflakes.


I have layered the snowflakes with foam tape
and spread them across the page.
that extra sparkle to the page.


The rainbow strips on Big Mood paper provided
the layers of colour behind the photo
The hearts and journal card were cut from


The 2 Crafty Mini Stick That Smile 
was covered with gold ink and
added to the page with foam tape.


also been covered with gold ink
and then added to the bottom left corner of the photo.


Thank for visiting the blog today.
I hope the layout has inspired you to create.
Have a fabulous weekend
and join us again on Monday
for Fiona's next project.

Products used:
Vicki Boutin Mixed Media 12x12 Foundations Paper
Pinkfresh Studio Keeping it Real - A Little Chaos
Pinkfresh Studio Keeping it Real - Adulting
Pinkfresh Studio Keeping it Real - Big Mood
Pinkfresh Studio Keeping it Real - Daily Grind
Pinkfresh Studio Keeping it Real - Reality Check
2 Crafty title It's the Simple Things
2 Crafty Mini Stick Set 3
Distress Oxide Inks
Distress Inks
Vicki Boutin Colour Study Stencils
Echo Park Paper 6x6 Snowflake Swirl Stencil
Ranger Stickles Glitter Glue


Photobucket

Monday, August 23, 2021

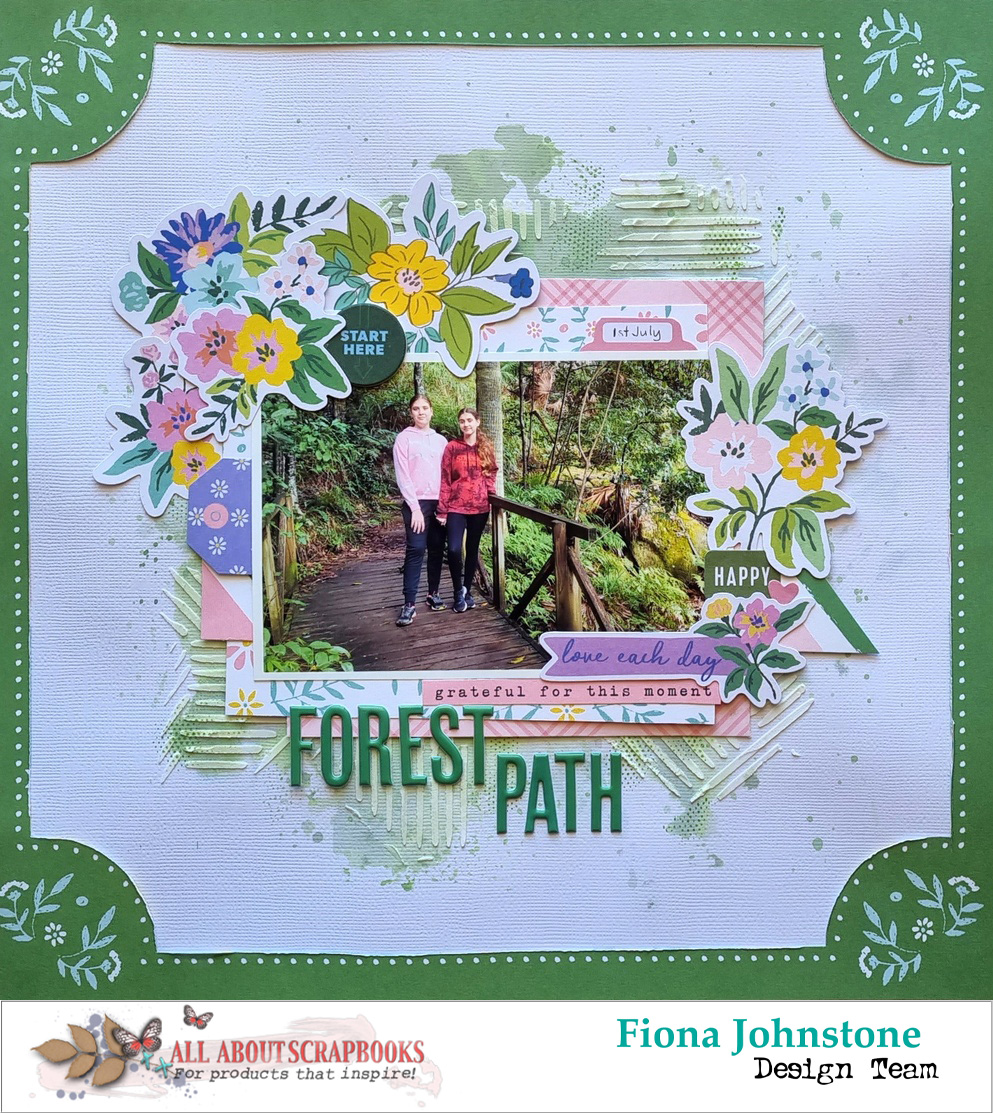
Forest Path with Pinkfresh Studio Happy Blooms by Fiona Johnstone

Hello everyone

Today I have another layout to share with the gorgeous Pinkfresh Studio Happy Blooms:

Forest Path
 

I love this gorgeous green patterned paper - Handkerchief:


But it was a little busy, so I got my craft knife and cut around the border of it to frame my layout. Next I used some distress oxide ink in Rustic Wilderness to create a softer green background, then added some texture with a VB stencil and some opaque texture paste. Then some stamping with distress ink in Mowed Lawn. 


Then it was a few papers layers - utilising the pink in one of the girls jumpers and because pink and green always go well together!

Next was to hit the floral ephemera pack hard! Lots of pretty florals to frame my photo and adding some regular ephemera pack for words and tags, as well as cutting out words from the Happy Place paper to use. I've also used some stickers and embellishments from previous Pinkfresh collections - I find this the easiest way to mix and match ranges. 


And finally the title to finish off - Happy Blooms Puffy Alpha Stickers!


Thanks for stopping by
Till next week
Fiona
x

Photobucket

Products Used:

Pinkfresh Studio Happy Blooms paper - Handkerchief
Pinkfresh Studio Happy Blooms paper - Cottage
Pinkfresh Studio Happy Blooms paper - Happy Place
Pinkfresh Studio Happy Blooms Ephemera
Pinkfresh Studio Happy Blooms Floral Ephemera
Pinkfresh Studio Happy Blooms Puffy Alpha Stickers
Pinkfresh Studio Some Days Stickers
Pinkfresh Studio Some Days Chipboard Flair
Kaisercraft Cardstock - Snow
Distress Oxide Ink - Rustic Wilderness
Distress Ink Mini 4 Pack (inlc Mowed Lawn)
Ranger Texture Paste Opaque Matte
Vicki Boutin Color Study Stencil Fresh