HOMEABOUT USSHOP HERECROPDATESCURRENT CHALLENGESTIPS&TUTORIALS
Showing posts with label Ranger. Show all posts

Friday, January 27, 2023

Winter Wonderland using Simple Stories Simple Vintage Winter Woods by Kerryn Fry

Hello everyone!
The layout I'm sharing with you today 
has been created with the collection
Simple Stories Simple Vintage Winter Woods.
The photos of Mr H were taken in 2018
on our last trip to Lake Mountain in Victoria.


The base of the page is Bazzill Kraft Cardstock.
The background effect has been created in two stages. 
The first layer is Distress Oxide Inks 
Evergreen Bough and Salvaged Patina.

I've combined both colours on a plastic scrap,
sprayed it with water and mixed them together.
With a round paint brush I've added 
splashes to the outer area of the cardstock.

Once dry, I've used the Vicki Boutin Evergreen & Holly
Snowflake stencil and white paint to add
some random flakes to the background.


At the top of the photos I've added the smaller 
bird embellishment from the Page Pieces pack.
The embellishment has been lifted
with foam tape for extra dimension.


The 'Day to Remember' piece on the 
left side of the photos has been hand cut 
from 4x4 Elements paper. I've added it to 
a journal card cut from the Journaling Elements paper.


covered with white gesso and then
Salvage Patina Distress Paint.
Once it was dry, I've added
to some of the branches.


On the right side of the photos, I've used
more embellishments from the Page Pieces.
The 'Snow' card has been tucked under
the photo layer with the top edge lifted
with foam tape. The larger bird has been added
with foam tape and then a little Glitter
Glue to the star on the card.


At the base of the snow card I've added
and another hand cut embellishment.
The 'Love this most' embellishment was
hand cut from 4x6 Elements paper.


The title for the layout Winter Wonderland
is from the Page Pieces pack.
I've added it to the page with foam squares
and the decorated it with Ranger Stickles Glitter Glue.


Thank you for dropping by the Blog today.
I hope my page has inspired you to create
or at least cooled you down a little.
Have a great weekend and
join us again on Monday.

Products Used:
Bazzill Kraft Cardstock
Simple Stories Simple Vintage Winter Woods
Simple Stories Simple Page Pieces Winter Woods
2 Crafty Winter Twig Branches
Distress Oxide Inks
Distress Paints
Ranger Stickles Glitter Glue
White paint


Friday, January 20, 2023

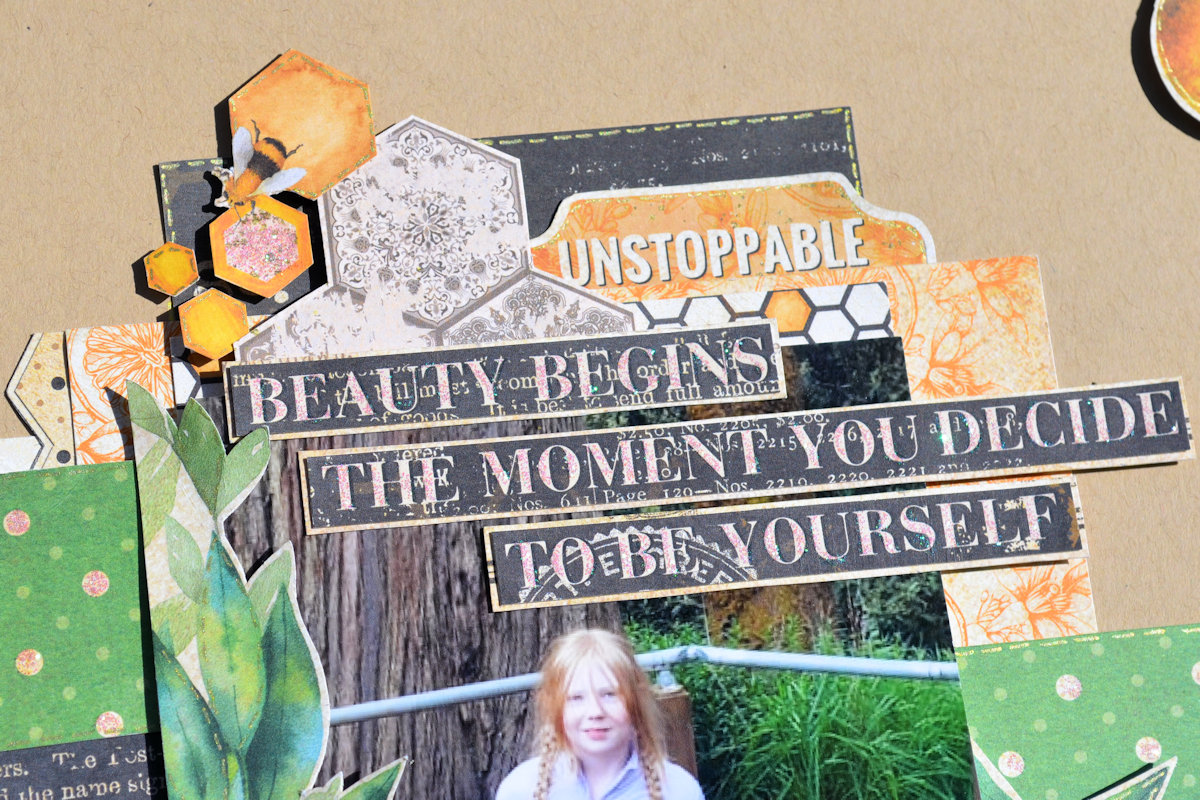
One of a Kind using Celebr8 Just Be You by Kerryn Fry

Hello everyone!
Today I am sharing another page created with the 
amazing paper pack Celebr8 Just Be You.

The photo of my beautiful niece was taken
on an adventure with her Mum in August 2021.
They were on the search for snow 
near their home in country Victoria.

The base of the page is my usual 
I've layered the patterned paper
pieces under the photo, balancing
the solid colours with the lighter patterns.

At the top of the page, I've added a torn strip
of the foliage paper and some hand cut pieces,
the Hive, the orange and some leaves.
Using a gold pen, I've add some
fake stitch lines to random elements.


I've created three main embellishment
 clusters on the page using with the 
hand cut elements from the papers.

The quote is from the barcode strip and 
has been cut into 3 parts and added to the
'blank area' of the photo with foam tape. 
Glue in Crystal to highlight each letter.


The hand cut hexagons in varies sizes
have also been lifted with foam tape
and the 'Unstoppable' tab.


On the the left side of the photo,
there are some patterned paper banner 
pieces that have been outlined with gold pen.

I've added a leafy corner piece
to frame the left side of photo and added
some Tim Holtz quote pieces.


At the bottom left corner of the photo,
there are larger hexagon pieces
and orange slices. More gold highlights
Love the sparkle! 


The third cluster is the bottom
right corner of the photo.
More orange slices, a hive piece,
leaves and the title piece.
All of the elements have been 
hand cut from the patterned papers.

The title 'One of a Kind' fits perfectly.
I've added a border with gold pen
and lifted the piece with foam tape.
There are a few more Tim Holtz pieces
added under the title.

As a finishing touch to the page,
I've add extra highlights with the 
Stickles Glitter Glue in the flower centres
and spots  on the patterned papers.


Thank you for visiting the blog today.
I hope you have been inspired by the page
and have a relaxing, crafty weekend.
Join us again on Monday for
Fiona's next project.

Products used:
Tim Holtz Small Talk Words


Friday, November 11, 2022

A Moment to Treasure using Echo Park Paper Let's Create by Kerryn Fry

Hi everyone!
Today I am sharing a page that 
has been created with the collection 
Echo Park Paper Let's Create.

Such a pretty colour palette, perfect 
for some family photos of my Aunty, 
my sister and I while visiting our family 
heritage tree located in Springton.


I've used 12x12 Bazzill Kraft Cardstock
as the base for the layout. Then using some 
Brilliance gold ink and The Crafters Workshop
6x6 Mini Tiny Circles stencil, I've added 
some stencilling around the page.


The embellishment cluster on the top left 
of the photos has been created with 
hand cut flowers from Fresh Flowers paper.
I've used foam tape to lift the flowers
and then added stickers from the Sticker sheet.


There are more hand cut flowers on
the right side of the photo lifted with foam tape 
and decorated with some Stickles Glitter Glue.

Some of the papers and photos have
been highlighted with gold pen.


The bottom right corner of the photo
is a larger sticker from the Sticker Sheet.
I've added some stickers from my stash.

+

To the left of the photo I've added a journal 
The smaller square photos have been lifted 
with foam tape and double matted
with layers of patterned paper.
I've added some heart stickers to the top
corner of the photos and decorated 
them with some Stickles Glitter Glue.


The embellishments under the title are a mixture 
of hand cut flowers and the large flower sticker.
Some highlights of glitter glue with 
add on top of the flowers.
The chipboard has been covered with black ink


Thanks for visiting the blog today.
I hope you've been inspired by the page
and get the chance to craft.
Have a great weekend and 
join us again on Monday.

Products used:


Friday, October 14, 2022

My Beautiful Niece using Bella Blvd Time to Travel by Kerryn Fry

Hi everyone!
This week my layout has been created 
with the collection Bella Blvd Time To Travel.
Not a travel photo, but a very cute photo
of one of my nieces in a beautiful floral dress.
The colours just worked perfectly,
her hair, her eyes and that dress. 


The base is a 12x12 sheet of 
Bazzill Kraft Cardstock.
I've coloured the background with
a Tim Holtz Layering Stencil
and three different Distress Oxide Inks.
I've used Candied Apple, 
Spiced Marmalade and Kitsch Flamingo.


I've kept the richest part of the stencilling 
to the outside edge of the cardstock
and then fading it towards the papers.
Using Distress Oxide Ink gives
the strong pop of colour on the Kraft.


The top right corner of the photo
has been embellished with stickers
and hand cut florals from the Back Roads paper
I've raised some of the elements
with foam tape for extra dimension.


The bottom right corner of the photo
is a mixture of stickers form the Sticker Sheet
and hand cut elements the camera 
and cactus from the Borders paper.

The photo has been layered


The small cameras to the left side
of the photo have been
hand cut from the Borders paper

The journal spot and pink banner flag
are form the Vicki Boutin Sweet Rush Stickers Book.

There are more hand cut flowers 
from the Back Roads paper
and stickers from the Sticker Sheet.

I have add touches of sparkle 
to different elements on the page
with Ranger Stickles Glitter Glue 


has been covered with black ink
and added to the page with glue.

I have added extra hand cut embellishments
around the title with foam tape.


Thanks for visiting the blog today,
hopefully the page has inspired you to create.

Have a great weekend and join us again on Monday.

Products Used:


Friday, September 30, 2022

Capture Memories using Uniquely Creative Moody Blue by Kerryn Fry

Hi everyone!
The page I'm sharing today has been
created with the collection,
Uniquely Creative Moody Blues.
I've also created two cards
to share with you.
The B&W photo of my sister and I
was taken at the start of the 26km walk
that we completed back in May.

The base of the page is Vicki Boutin 
Mixed Media 12x12 Foundations paper.
The top part of the page is different pieces 
of patterned paper and Bazzill Raven Cardstock
with varying widths layered across the paper.

The black cardstock has been punched
with a scalloped border punch and
 the shapes on the Midnight paper
have been hand cut to layer on the paper
for extra dimension. 


The Periwinkle paper is were the 
small mandala shapes have been
hand cut from, they've been
 added to the page along the black strip.


The Creative Cuts pack has provided
 the embellishments for the page,
The words, quotes and butterfly.

The background effect on the paper
has been created with a combination
of different 'blue' Distress Oxide Inks.

The 2 Crafty Polaroid frame has
been covered with patterned paper
and backed with white paper to
create a journal spot.


across the page to highlight different shapes
and patterns on the layout.  
The small flowers were hand cut from 
the Moody paper and they have 
been added with foam tape.


The title has been created with 
The words 'capture' and 'memories,
have been covered with Black Ink.


Card One

Card Two


Thanks for visiting the blog today.
I hope you have enjoyed the page and cards.
Have a great week and please join 
us again on Monday for the next adhere.


Products used:
Uniquely Creative Moody Blues - Creative Cuts


Photobucket

Friday, September 16, 2022

Awesome, Handsome and Brave using Cocoa Vanilla Studio No Limits by Kerryn Fry

Happy Friday everyone!
The page I am sharing today
has been created with the collection,
Cocoa Vanilla Studio No Limits.
The photos are from 2009,
Mr H aged 5 at Glenelg Beach.
His outfit matched the collection perfectly.


For something different this week, the base today
 is a 12x12 sheet of Bazzill Raven Cardstock.
I thought the black would pop the colour a little more.

At the top of the page, I've used a strip
 some hand cut stars from Nebula paper
and a journal spot from Universal paper.

I've used a gold gel pen to add 
a faux stitch line across the page
and gold ink to colour the 
Thicker numbers for the date.


There are multiple paper layers
under the photos, then I have used more 
hand cut pieces from the Universal paper
to embellish the page.

The 'Star' tab is from the Accesssory Stickers
and it has been lifted with foam tape.
I've used a black gel pen to add borders
to some of the paper elements.


The photos have been matted with another
layer of black cardstock.
The words to left of the photos
are a mixture of hand cut elements 
and stickers from the Accessory Sheet.
The elements have been lifted with foam tape.

I have added a little sparkle
to some of the elements on the page with 


The rainbow journal 3x4 card
was hand cut from the Universal paper
and lifted with foam tape.

The black banner journal element
was also cut from the Universal paper.


The bottom right corner of the page
is a combination of hand cut journal card
and sticker elements from the Accessory Sheet.

The layers have been created with foam tape
and the sparkle with Glitter Glue. 


The title for the page has been created with
words from the 2 Crafty Mini Word Set 4.
I've used the words Awesome, Handsome
and Brave, they have been covered with
Gold Ink and added to the page.

The word 'and' has been created with 
Kaisercraft Alpha stickers, covered with
gold ink and then double matted with 
scrap pieces of black and white cardstock.

The final layer is splashes of gold ink
on the black cardstock, love it!


Thank you for visiting the blog today,
 I hope you have be inspired by the process.
Have a great weekend and 
enjoy your crafting time.
Please join us again on Monday.

Products used:
Cocoa Vanilla Studio No Limits - Accessary Stickers


Photobucket