HOMEABOUT USSHOP HERECROPDATESCURRENT CHALLENGESTIPS&TUTORIALS

Monday, September 10, 2018

Happy with CVS Bohemian Dream by Fiona Johnstone

Hello everyone

This week I am using up my stash by creating with an older collection which is still a firm favourite - Cocoa Vanilla Studios Bohemian Dream:

Happy

To start this layout I have created a background using my Dylusions Paints which have been watered down and applied with the plastic bag technique, a favourite technique for giving a light watercolour style background.  Then followed that up with a few sploshes of the remaining paint. 

Next I added some stamping with some Kaisercraft texture stamps in co-ordinating colours to create a subtle effect. 


Then I have layered up some of the pretty Bohmenian papers and added co-ordinating chipboard stickers  - which I have also used for my title. 

I've finished the page with some Green Tara flowers and a  CVS flair badge. 


Thanks for stopping by
Till next week
Fiona
x
Photobucket
Products Used:
Cocoa Vanilla Studio Bohemian Dream paper - Abundant
Cocoa Vanilla Studio Bohemian Dream paper - Dreamer
Cocoa Vanilla Studio Bohemian Dream Chipboard Stickers
Cocoa Vanilla Studio Bohemian Dream Flair Buttons
Green Tara Cherry Blossoms - White
Dylusions Paints - Laidback Lilac
Dylusions Paints - Rose Quartz
Kaisercraft Texture Stamp - Tiny Dot
Kaisercraft Texture Stamp -  Script
Cardstock White

Friday, September 7, 2018

One of a Kind using Echo Park Back to School by Kerryn Fry

Good morning everyone!
Today I am sharing my first page created with 
Echo Park Paper Co Back to School.
This collection has beautiful rich primary colours, my favourites
 and easy to use, flexible patterned papers.
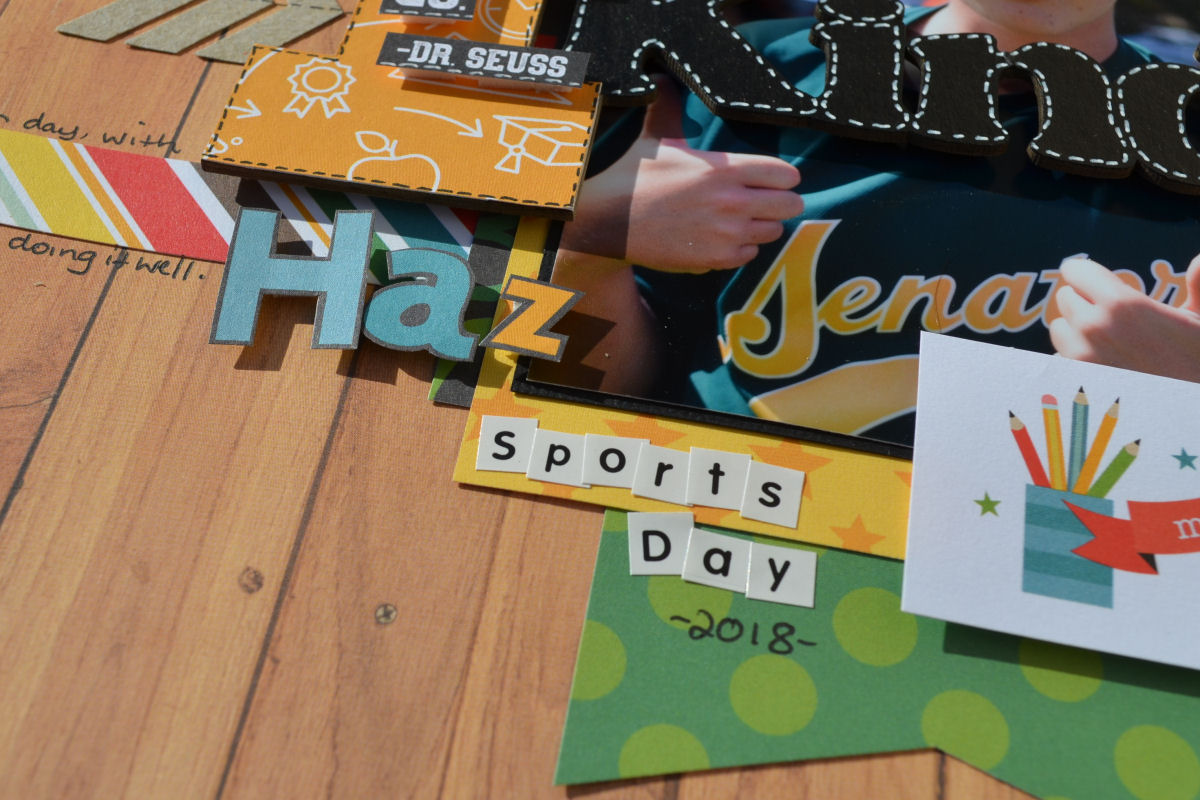
The photo is Mr 14 acting goofy at this year's school sport carnival
Go Emerald!
 

There was no messy background this week,
I loved the wood panel on the reverse side of Pencil Pushers way too much.
And only a hint of kraft cardstock for this page,
I've used the chevron scraps from last week's border.
I have hand cut some larger chevrons from patterned paper as well.
The Ephemera Icon pack came in handy to add some clusters across the page.


The letters have been  hand cut from the Alphabet Scramble.
I used foam tape to lift the letters and other elements off the page.


The cluster at the very top has been hand cut from some of the embellishments
and the word 'school days' was cut from School House Fun.
I've used a white pen to add some faux stitching.


The 2 Crafty title 1 of a Kind was a large chipboard piece,
but I loved that I could use it to frame the photo.
The number has been covered with patterned paper and
outlined with a black pen.
The remainder of the title has been painted with Black Soot Distress Paint.
Once the paint had dried, I have outlined the letters with a white pen.
The quote was cut from an existing embellishment
and given dimension with foam tape.

A simple page, with colourful layers.
That's all from me.
Thanks for dropping by today and have a great weekend.
Please join us again on Monday for Fiona's next project.
Products used:
Echo Park Paper Co Back to School - Pencil Pushers
Echo Park Paper Co Back to School - Alphabet Scramble
 Echo Park Paper Co Back to School - School House Fun
Echo Park Paper Co Back to School - 3x4 Journaling Cards
Echo Park Paper Co Back to School - School Stripes
Echo Park Paper Co Back to School - Chalkboard Cursive
Echo Park Paper Co Back to School - Backpacks
Echo Park Paper Co Back to School Ephemera
2 Crafty title 1 of a Kind
Distress Paint
Photobucket

Wednesday, September 5, 2018

Sweet, by Amanda

Hi everyone,

Sharing a sweet page today, with a lovely pink, blue and grey colour scheme.
 I used a mix of papers to do this page. Check out all the details and some close ups below.


The blue base paper is "Cobalt" from the Kaisercraft Wandering Ivy collection. I used this at the back and also to mount the photo.

The next paper layer is the lovely grey wood panelled "Board Walk" paper from the Kaisercraft Beach Shack collection.

On this piece of paper, I added some pink to the background, using Colour Blast Colour Paste in Blush through a script stencil. I also added a few splatters of Steel-  Colour Blast Colour Shimmer Spray.

The butterflies were hand cut from a piece of paper, also from the Kaisercraft Wandering Ivy collection.

For the title, I used a grey chipboard word, from the Cocoa Vanilla Studio, More than words pack. I gave it a coat of dimensional magic for a little extra shine.


I used some word stickers from the Cocoa Vanilla - More Than Words Accessory Stickers 6x12 pack, as well as some flowers and bits and pieces from my stash.

That's it! A sweet colour combo, for my sweet daughter!

Thanks for looking,
Amanda

Products used:

Photobucket

Monday, September 3, 2018

Fabulous with Simple Stories Dream Big by Fiona Johnstone

Hello everyone

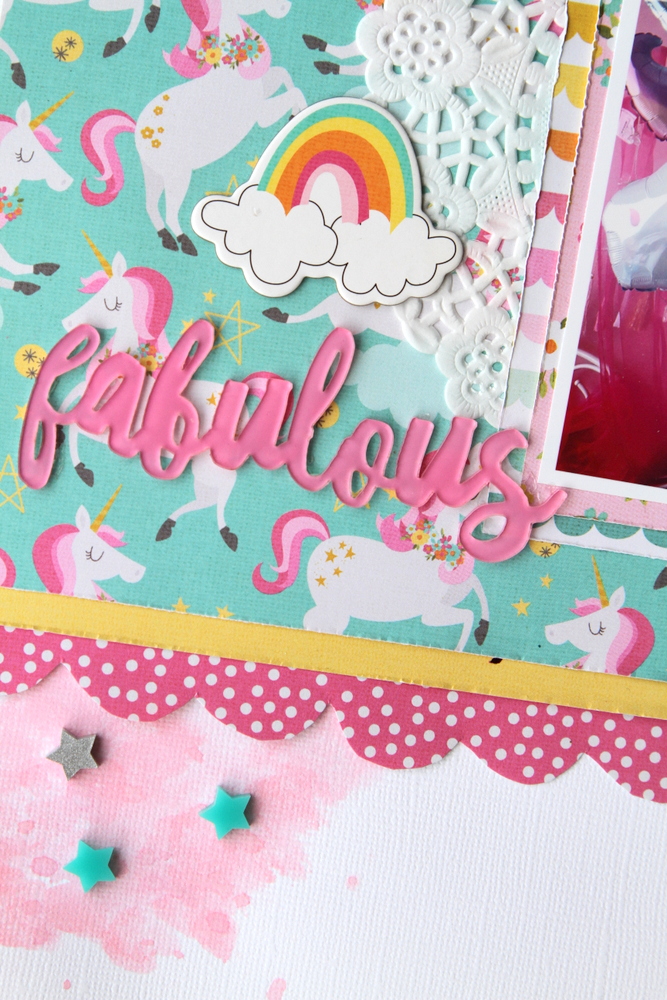
I have a fun page to share today created with Simple Stories Dream Big collection. This is lots of fun this collection - think Unicorns, Fairies, Mermaids - it's got them all!I had this fun selfie of me with the fabulous Unicorn balloon at my nieces birthday recently - it's just perfect for this range!

Fabulous

This Unicorn paper is just the cutest and made the perfect feature paper for my layout. I have added some fussy cut scallops in hot pink for a border and added a strip of yellow paper to add in a little more colour.  I've used a little pink paint watered down to give my stars some contrast on the white cardstock. 


The quote was too funny & perfect for the page!

Lots of cute embellishments from the chipboard elements for the dimension and to stand out on the busy paper. I've dug into my stash for a few other embellishments this week and finished my page off with this super cool acrylic word - fabulous indeed!


Photobucket
Products Used:
Simple Stories Dream Big paper - Just Imagine
Simple Stories Dream Big paper - Chase Rainbows
Simple Stories Dream Big paper - Be Younique
Simple Stories Dream Big paper - 3x4 Elements
Simple Stories Dream Big Chipboard Stickers 6x12
CVS Make a Wish Bits & Pieces (Similar Bow)
Bella Blvd Acrylic Word - Fabulous
White Cardstock
Dylusions Paint - Rose Quartz
Doily
Acrylic Stars 
Button

Friday, August 31, 2018

Don't follow your dreams using Simple Stories Lil' Dude by Kerryn Fry

Good morning everyone.
Today I am back sharing my last page for August and 
it's another page created using the collection Simple Stories Lil' Dude.
Oh how I love this collection!!
The photos capture Mr 14 doing some extra work for soccer,
he just loves the game and works extremely hard.
 

I have kept the Kraft Cardstock totally clean this week,
no inks or paints to be seen.
Instead, I have used an old border punch and Lil' Dude - Boys Rule
to create a feature along the side of the page.
I wanted to use multiple photos this week,
so I've created different sections on the page to form a grid design.
In each section, I've created layers with foam tape and embellishments.


With a black gel pen, I have outlined different features across the page to make them pop.
The Bits & Pieces pack was fantastic to embellish the page and 
some elements were hand-cut from different patterned papers.


The black frame was hand-cut from the 4x4 Elements
and was the perfect size for the photo.
I love the word elements in the Bits & Pieces pack ,
they were the perfect addition to this page.

The 2 Crafty title Don't follow your Dreams, chase them was cut into 
two pieces to travel across the page.
It's been painted with Black Soot Distress Paint.
I have used two arrows for the 2 Crafty Mini Fast Forwards Arrow pack
to draw the eye to each part of the title.
The arrows have been painted with Ripe Persimmon Distress Paint 
and then been added to the arrows from the Bits & Pieces pack.
It helps that Mr 14 was wearing a bright orange top to coordinate with this collection.
And that's a wrap for today.
Thank you for visiting the blog today.
Hope you enjoy the upcoming weekend
and get a chance to create.
Please check back with us on Monday to see Fiona's next project.
Products Used:
Bazzill Kraft Cardstock
Simple Stories Lil' Dude - No Limits
Simple Stories Lil' Dude - Play Hard
Simple Stories Lil' Dude - 2x2 Elements
Simple Stories Lil' Dude - Little Man
Simple Stories Lil' Dude - Boys Rule
Simple Stories Lil' Dude - 4x6 Elements
Simple Stories Lil' Dude - 4x4 Elements
Simple Stories Lil' Dude - Bits & Pieces
2 Crafty title Don't follow your dreams, chase them
2 Crafty Mini Fast Forward Arrows
Distress Paint
Photobucket

Wednesday, August 29, 2018

"Super Cute" by Amanda H

Welcome to this unicorn Wednesday!

I'm sharing a page of my daughter at her recent unicorn party. I was so excited when I saw the new collection from Simple Stories - Dream Big as I knew it would be perfect for her birthday photos!

Here is the page and some close ups....

I started with 3 papers from the range, which I layered - using distressing on the edges, and some angles for interest.

I mounted the photo on more of the patterned paper and then started layering stickers on the page. I used two packs of stickers: the sticker sheet and chipboard stickers.


Of course, I had to use the chipboard unicorn from the chipboard stickers pack, which I combined with some word sticker strips and dots from the sticker sheet.


I cut a rainbow strip of paper (Be Younique) and used this across the layout. Then I put more stickers and chipboard on it, with some messy off cuts of muslin. I used the chipboard "super cute" as the title of the page.

Finally in the top right corner, I added one more cluster. With a strip of paper and some muslin, I finished it with more stickers and a cute chipboard butterfly.
 
Such a sweet range, and I have heaps more left and plenty of birthday photos to scrap - can't wait to use this collection again!
 
Thanks for looking!
Products used:
Simple Stories - Dream Big Paper - Chase Rainbows
Simple Stories - Dream Big Paper - Dream Big
Simple Stories - Dream Big Paper - Super Cute
Simple Stories - Dream Big Paper - Be Younique
Simple Stories - Dream Big Combo Cardstock Sticker Sheet
Simple Stories - Dream Big Chipboard Stickers 6x12"
 
Photobucket

Monday, August 27, 2018

Cool with Cocoa Vanilla Studio Boys Rule by Fiona Johnstone

Hello everyone

Back with another layout using Cocoa Vanilla Boys rule collection. I just love the bright greens and blues in this range. 

Cool

This patterned paper is perfect for a background as most of the work is already done! I have added a little bit of stamping to the background but it doesn't need much. 

I've then used a couple of the patterned papers to add some layers behind my photo.


Next I have used the frames from the ephemera pack to create a cool design - I plan out the design then cut the frames so they can fit the layout. 


I've used the stars and arrows from the ephemera pack to embellish and to create my title Cool. I've finished off with some flair buttons from Cocoa Vanilla Studio and Flutterby Designs. 


Thanks for stopping by
Till next week 

Fiona
x

Photobucket
Cocoa Vanilla Studio Boys Rule paper - Expressionist
Cocoa Vanilla Studio Boys Rule paper - Happy Go Lucky
Cocoa Vanilla Studio Boys Rule paper - Straight and Narrow
Cocoa Vanilla Studio Boys Rule Ephemera
Kaisercraft Texture Stamp - Numbers
Kaisercraft Texture Stamp - Tiny Dots
Flair Buttons 

Friday, August 24, 2018

Dwell in Possibility using Simple Stories Lil Dude by Kerryn Fry

Good morning all!
Today I'm sharing my second page created with the 
cool collection, Simple Stories Lil' Dude.
The colours have worked perfectly with the photo.
Mr 14 playing in a baseball development tournament,
he looks so grown up!
 
The page started with a Bazzill White Cardstock base.
Once I had worked out my basic page design, I've added Distress Oxide
using a plastic wrapper and water to the cardstock.
Broken China, Twisted Citron and Blueprint Sketch were
added to two focal points of the background.
Once dry, I have added splatters of the colours,
some black paint splatters and stamping.


I have doodled borders around some elements using a black pen.
I love the pop of the paper No Limits, 
the bright blue picks up the main colour in the photo.
I've kept some white space in the page.


I've hand-cut a few of the elements from the papers 
to add to the clusters around the photos.
Foam tape is used to create depth in the layers.
The Bits & Pieces elements helped to build the clusters.


The rainbow frame from the Bits & Pieces page was used to 
draw the eyes to Mr 14 in the photo.
A handy tip when there are others in the photo.


The journal strip has been hand-cut from 4x6 Elements paper.
I've used more foam tape to add that extra layer 
at the bottom of the photo.


The 2 Crafty title was painted with Blueprint Sketch Distress Paint.
After the paint had dried, I have stamped using the Texture stamp and white ink.
Trying to match the patterned paper.

Bright and bold, love it!
Thanks for visiting the AAS blog today.
Hope you have enjoyed the process.
Have a fabulous weekend and 
please join us again on Monday morning for Fiona's next project.
Products Used:
Bazzill White Cardstock
Simple Stories Lil' Dude - No Limits
Simple Stories Lil' Dude - Play Hard
Simple Stories Lil' Dude - 2x2 Elements
Simple Stories Lil' Dude - Little Man
Simple Stories Lil' Dude - Boys Rule
Simple Stories Lil' Dude - 4x6 Elements
Simple Stories Lil' Dude - 4x4 Elements
Simple Stories Lil' Dude - Bits & Pieces
2 Crafty title Dwell in Possibilty
Distress Oxide Ink
Distress Paint
Kaisercraft Texture Stamp - Grid
Photobucket

Wednesday, August 22, 2018

Snapshots, by Amanda H

Hi everyone,
 
Earlier in the month I shared a page I created with the latest Bo Bunny collection where I used the blues and neutrals for a fab family page. 
Today I use the same Bo Bunny Little Wonders collection, this time using the super cute animal designs.
 

As cute as this page is, it is also simple. Starting with a white background, I created a grid by cutting the Bo Bunny patterned paper Sage, into 9 squares. I machine stitched these to the background with some white and some pink thread.

Then I used a few diecuts plus some chipboard and stickers in most of the squares. The cute bears and bunny come from the ephemera pack.
I added the photo to the centre square and decorated around that.
For the title, I used the chipboard word "snapshots" from the 2 Crafty Travel words set which I inked dark blue. I layered this on an arrow from the ephemera pack with some messy pink thread. A little pink heart sticker worked perfectly too. I got this from a new pack of PinkFresh Studio puffy heart stickers.

In the top and bottom opposite corners, I layered an inked 2 Crafty Word circle chipboard, on a circular diecut from the ephemera pack. And more pink puffy hearts, of course!
And don't forget those bears - taken from the ephemera pack and popped on some foam tape for dimension - I just love these. And more puffy heart stickers on bows to finish them off!

That's it for today! I hope you enjoyed this page, overflowing with cuteness!

Thanks for looking,
Amanda


Products used:
White cardstock
 
 
Photobucket