HOMEABOUT USSHOP HERECROPDATESCURRENT CHALLENGESTIPS&TUTORIALS
Showing posts with label Dimensional Magic. Show all posts

Friday, January 6, 2023

Todays moments using Bella Blvd School is Cool by Kerryn Fry

Hello crafters!
Happy New Year from me!

My first page for the year has been created
with the collection, Bella Blvd School is Cool.
The papers were picked for their colours, 
not the theme, they match the photo perfectly.

The photo of Mr H, at nearly 5 years old
and his cousin Nicole hanging in the 
then sandpit, now our veggie garden. 


The base of the page is my absolute 
The background effect has been created
with the Simple Stories Arrow Stencil
and Spiced Marmalade Distress Oxide Ink.
It pops the small amount of orange
in the photo and patterned papers.


Across the top of the page I have added 
a strip of Simple Stories Say Cheese at the Park
Meet Me on Main, a thin strip of Daily Details
and a scalloped sticker from the Cardstock sheet. 

The sun and clouds have been hand cut from
the Daily Details paper and the sticker is
from Cocoa Vanilla Sunkissed Accessory Stickers
I've used foam tape to lift each piece.


The 2 Crafty Stars Pack was used to embellish 
the page and to create a journal spot.
The chipboard stars have been covered with
patterned paper and the extra stars are patterned paper.

The black chipboard dots on the page are 
the dot centres from the 2 Crafty Photo Corners.
They have been covered with black ink
and lifted with foam tape.

The 2 Crafty Mini Camera has been covered
with Spiced Marmalade Distress Paint.
After drying, I have then covered it with 
Spiced Marmalade Oxide Ink and hit it with a heat gun.
The final layer is Dimensional Magic
which had a great reaction with the Oxide.
Love the marbled finish.


The photo has been matted with Bazzill Raven Cardstock,
with patterned papers layers added underneath.
I have raised the photo and first two paper
layers with foam tape to create extra layers. 
I've used a black pen to add borders to some 
of the paper pieces and stars.

To the left of the photo I have added 
two more stars and words from both 


The title for the page has been created
Using 'todays moments, tomorrows memories'.
The chipboard has been swiped with black ink,
layering the colour without colouring the words.
I have cut the phrase into two pieces and
then added them to the page with foam tape.

The finishing touches are the small hearts
from the DooHickey Sticker sheet. 


Thanks for visiting the blog today.
I hope you have been inspired to spend 
some time crafting over the weekend.
Please join us again on Monday for 
Fiona's next project.

Products used:
Bazzill Kraft Cardstock
Bazzill Raven Cardstock
Bella Blvd School is Cool - Daily Details
Bella Blvd School is Cool - Paperclips
Bella Blvd School is Cool - School Uniform
Bella Blvd School is Cool - Wise One
Bella Blvd School is Cool - DooHickey Cardstock Stickers
Simple Stories Say Cheese at the Park - Meet Me on Main
Simple Stories Hello Today Stencil - Arrows
Cocoa Vanilla Sunkissed Accessory Stickers
2 Crafty 6x4 Phrase Stick Set 5
2 Crafty Stars Pack
2 Crafty Mini Camera
2 Crafty Photo Corner Dots
Distress Paint
Distress Oxide Inks
Dimensional Magic


Photobucket

Friday, December 9, 2022

Be You using Celebr8 Just Be You by Kerryn Fry

Good morning everyone!
Today I'm sharing another page created with 
the beautiful collection Celebr8 Just Be You.
A rare selfie taken after a short hair cut
in August last year. It's long again now! 


The page has started with a 12x12 piece 
of Bazzill Kraft Cardstock for the base.
I knew I intended to use the wreath hand 
cut from the patterned paper on the page.

The simple background effect has been created 
to appear around the outside edge of the wreath edge.
Using the Crafters Workshop 6x6 Mini Tiny Circles and 
white ink, I have added some light details on the cardstock.

Using a white paint pen, I have added
some splashes across the page as well.


I've hand cut some of the half oranges
to add some extra dimension to the wreath.
Some of the leaves on the wreath have
been outlined with a gold pen.

The quote 'Beauty Begins' is from the barcode strip,
I have cut it into two pieces and cut flags each end.
I've used foam tape to add it to the page.


The large 2 Crafty Anthea's Butterfly frame has been 
covered with black ink and backed with patterned paper.
I have only used adhesive in the centre of the butterfly 
frame and paper, to allow it to have some movement & dimension.

cut into smaller pieces and covered with Mowed Lawn 
& Rustic Wilderness Distress Paint.

been covered with black patterned paper
and the smaller frames have been backed 
with a lighter patterned paper.


I have added a few more hand cut elements
from the collection to the page.
The orange bloom to the left of the photo
and a cluster of oranges to the bottom
of the photo under the butterflies.

have been covered with a combination of 
Mustard See, Fossilized Amber and 
Spiced Marmalade Distress paint.
I've finished the butterflies with a layer of
Dimensional Magic for a shiny finish.

The title is the Be You banner
hand cut form the patterned paper.


Thanks for visiting the blog today.
Hopefully you have been inspired to create.
Enjoy your weekend, do something you love
and join us again on Monday.

Products used:


Friday, March 18, 2022

We Are Family using Carta Bella Sunflower Market by Kerryn Fry

Hi everyone!
Today I've created a page using the collection
The family photos were taken in October 2014 
while we were on holidays in Mount Gambier. 
On this particular day, we went for a drive
down to the beautiful town of Port Macdonnell.


The page has started with a 
The main paper layer across 
the top section of the page
is the reverse side of Baking Bash 
with a little sparkle of Ranger Stickles Glitter glue
added to a small part of the pattern. 


In the top right corner of the page
I have used two frames from the 
Frames & Tags pack to create this small cluster.

The 'Together' is the centre piece of one frame 
and the floral piece has been cut from another frame.
I have outlined the floral piece with a Black gel pen 


The bottom section of the Kraft cardstock
has been coloured with Distress Oxide Ink.
I've used Oxide Ink to sit better & brighter
 on the Kraft cardstock.

I have planned the layout of the papers
and then used a pencil to mark out 
where the papers would finished.
Then using a blending tool, I have added 
Salvaged Patina Distress Oxide
to shadow behind the patterned papers.


I have fussy cut different flowers
from the Sunny paper and used them
to build the cluster across the bottom of the photos.
I have raised most of the flowers
with foam tape to create layers within the cluster.


The 2 Crafty Flowers (Set 1) were covered 
Once dry, I've then added a coat of 
Dimensional Magic to each flower.


I've used some of the hand-cut flowers
to add centres to the 2 Crafty Flowers.
More of the tags from the Frame & Tags Pack
were used for the left side of the photos.


The journal spot is another frame
backed with a scrap of white cardstock.
The 'We are Family' tag forms the title
and has been lifted with foam tape.
Some hand-cut flowers have been used to 
embellish around the journal spot.


Thank you for visiting the AAS Blog today.
I hope you have enjoyed the process of the page,
I love the finished project and 
how well the colours came together.

Have a great weekend,
make some time to relax and craft.
Please join us again on Monday
for Fiona's next project.

Products used:


Photobucket

Friday, February 25, 2022

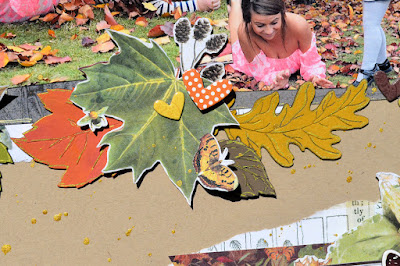
Just Hanging About using Simple Stories Simple Vintage Country Harvest by Kerryn Fry


Morning everyone!
Today I am sharing my first page created with
Simple Stories Simple Vintage Country Harvest.
Some fun Autumn photos of my Niece
and Great Niece playing in the leaves 
while we were setting up to take some family photos.


The base is a plain 12x12 sheet of Bazzill Kraft Cardstock.
I've torn the edge of the Nature's World paper,
leaving a white exposed edge and added 
those pieces to the cardstock.


At the top of the photos I've used the top 
part of a 6x4 journal card under the photo
and then cut some elements from the Journal Elements paper.

The butterflies have been cut from the journal card
and from the Favorite Season paper,
these have been added with foam tape.

The 2 Crafty Chevron Bits have been
covered with Ground Expresso Distress Paint
and added in groups of three to the top
and the bottom of the page.


The 2 Crafty Autumn Leaves have been covered 
with Peeled Paint, Spiced Marmalade, Mustard Seed
and Ground Expresso Distress Paints.

have been covered with the Distress Paints too.
I've used  gold pen to add 
some extra details to each of the leaves.

The leaves have been layered with 
some hand cut leaves from Favorite Season Paper
and a Chipboard sticker from the 6x12 chipboard sheet.

I've also add some chipboard hearts


The bottom halves of the journal cards
have been used to build the cluster
in the bottom right corner.

I've hand cut a small journal spot
and added a chipboard butterfly.

I've watered down some of the Vegas Gold Ink
and added some flicks of ink across the layout. 


Thanks for visiting the blog today,
I hope you've enjoyed the steps
and been inspired to create.
Have a great weekend
and join us again on Monday.


Products used:
Bazzill Kraft Cardstock
Simple Stories Simple Vintage Country Harvest - Happy Harvest
Simple Stories Simple Vintage Country Harvest - Nature's World
Simple Stories Simple Vintage Country Harvest - Favorite Season
Simple Stories Simple Vintage Country Harvest - 4x6 Elements
Simple Stories Simple Vintage Country Harvest - Journal Elements
Simple Stories Simple Vintage Country Harvest - 6x12 Chipboard
2 Crafty title Just Hanging About
2 Crafty Chevron Bits
2 Crafty Autumn Leaves
2 Crafty Acorn & Foliage
Distress Paint
Tsukineko All Purpose Ink - Vegas Gold
Dimensional Magic


Photobucket

Friday, December 17, 2021

Those Eyes That Smile using Cocoa Vanilla These Days by Kerryn Fry

Hi everyone!
The page I'm sharing today has been created with
Cocoa Vanilla Studio These Days
Love the soft pastel colours
and how well they work with the photo.
The photo is my youngest niece
and was taken at Grandma's house
in January holidays 2014.


The base is a 12x12 piece of Bazzill Kraft Cardstock.
The background effect has been created with 
a 6x6 stencil from my stash 
and Speckled Egg Distress Oxide Ink.


Once the background ink has dried,
I have added dots of Ranger Stickles Crystal 
Glitter Glue to the pattern of the stencil.

The photo has been matted with
the reverse side 'wood veneer' of Pretty Posies.


has been covered with gold ink
and finished with Dimensional Magic.


I have built three embellishment clusters
across the page with the Die Cut Ephemera Pack
and come hand cut frames from the Wall of Frame paper.

The top left of the page is parts
of frames layered with foam tape.
The butterflies are from Ephemera pack
also lifted with foam tape.

I have highlighted some of the paper
layers by outlining them with a gold gel pen.


The cluster to the bottom right corner of the photo
are layers of the Ephemera pieces.
Some are lifted with foam tape
and I have highlighted spots with Glitter Glue

been covered with gold ink
and then finished with Dimensional Magic


The cluster to the left side of the photo
is the small banner lifted with foam tape
and a flower cluster, both from the Ephemera pack.

The flower centres have been highlighted
with Stickles Glitter Glue.

The floral paper Pretty Posies
has also been highlighted with Stickles Glitter Glue
in the centre of the flowers.


The 2 Crafty title Those Eyes that Smile
has been covered with gold ink
and added to the left of the photo.


Thank you for visiting the AAS blog today.
I hope you have found my page inspiring.
Have a fabulous weekend
and join us again on Monday.

Products used:
Bazzill Kraft Cardstock
Cocoa Vanilla Studio These Days - Pretty Posies
Cocoa Vanilla Studio These Days - Family Ties
Cocoa Vanilla Studio These Days - The Good Life
Cocoa Vanilla Studio These Days - Wall of Frames
Cocoa Vanilla Studio These Days Die Cut Ephemera Pack
2 Crafty title Those Eyes That Smile
2 Crafty Mini Title Stick Set 3 - You are beautiful
2 Crafty Mini Camera
Distress Oxide Ink
Dimensional Magic
Ranger Stickles Glitter Glue


Photobucket

Friday, October 22, 2021

Happy & Magical using Carta Bella Craft & Create by Kerryn Fry

Hello everyone!
Today I'm sharing a page created with 
the collection Carta Bella Craft & Create.
Some fun photos from 2012 of Mr H
playing with his very cute, youngest cousin
during the January school holidays. 


The page began with a 12x12 piece of Bazzill Kraft Cardstock.
I've created the background effect in stages.
The first layer is three different Distress Oxide colours,
Using a blending tool and an older Vicki Boutin Stencil,
I have applied the Oxide inks randomly mixed
around the outside edge of the page.


The next layer is using Vicki Boutin Colour Study 
It has been applied with a sponge, over-lapping the Distress Oxides
in multiple spots on the cardstock.
I've then made watery mixtures of the gold ink 
and white gesso to create splashes on the page.


The final layer in the background 
is with a gold pen and I have outlined 
some of the hexagon shapes from the original stencil.


covered with the Tsukineko Ink.
I have finished the chipboard with a layer

The flowers on the page have been hand cut
from the paper Sew Lovely Floral.
I have raised each floral cluster with foam tape.


The 4 photos have been matted with
lifted with scrap cardboard to create dimension.

I've used black and white pens to outline
different layers of the patterned paper
with a fake stitch border.


The numbers and '&' are from a Thickers set.
They have been covered with the gold ink
and finished with Dimensional Magic.

The tag for journalling has been cut from 
The tag has been raised with foam tape.


The title has been created with the chipboard pieces 
Both piece have been covered with the 
Once dry, the final layer is Dimensional Magic.
Love the mixture of different fonts.


Loved creating this page!
Thank you for visiting the Blog.
I hope you have enjoyed the process of the page.
Have a fabulous weekend and happy crafting!
Join us again on Monday with Fiona's next page.

Products Used:
Thickers - Numbers